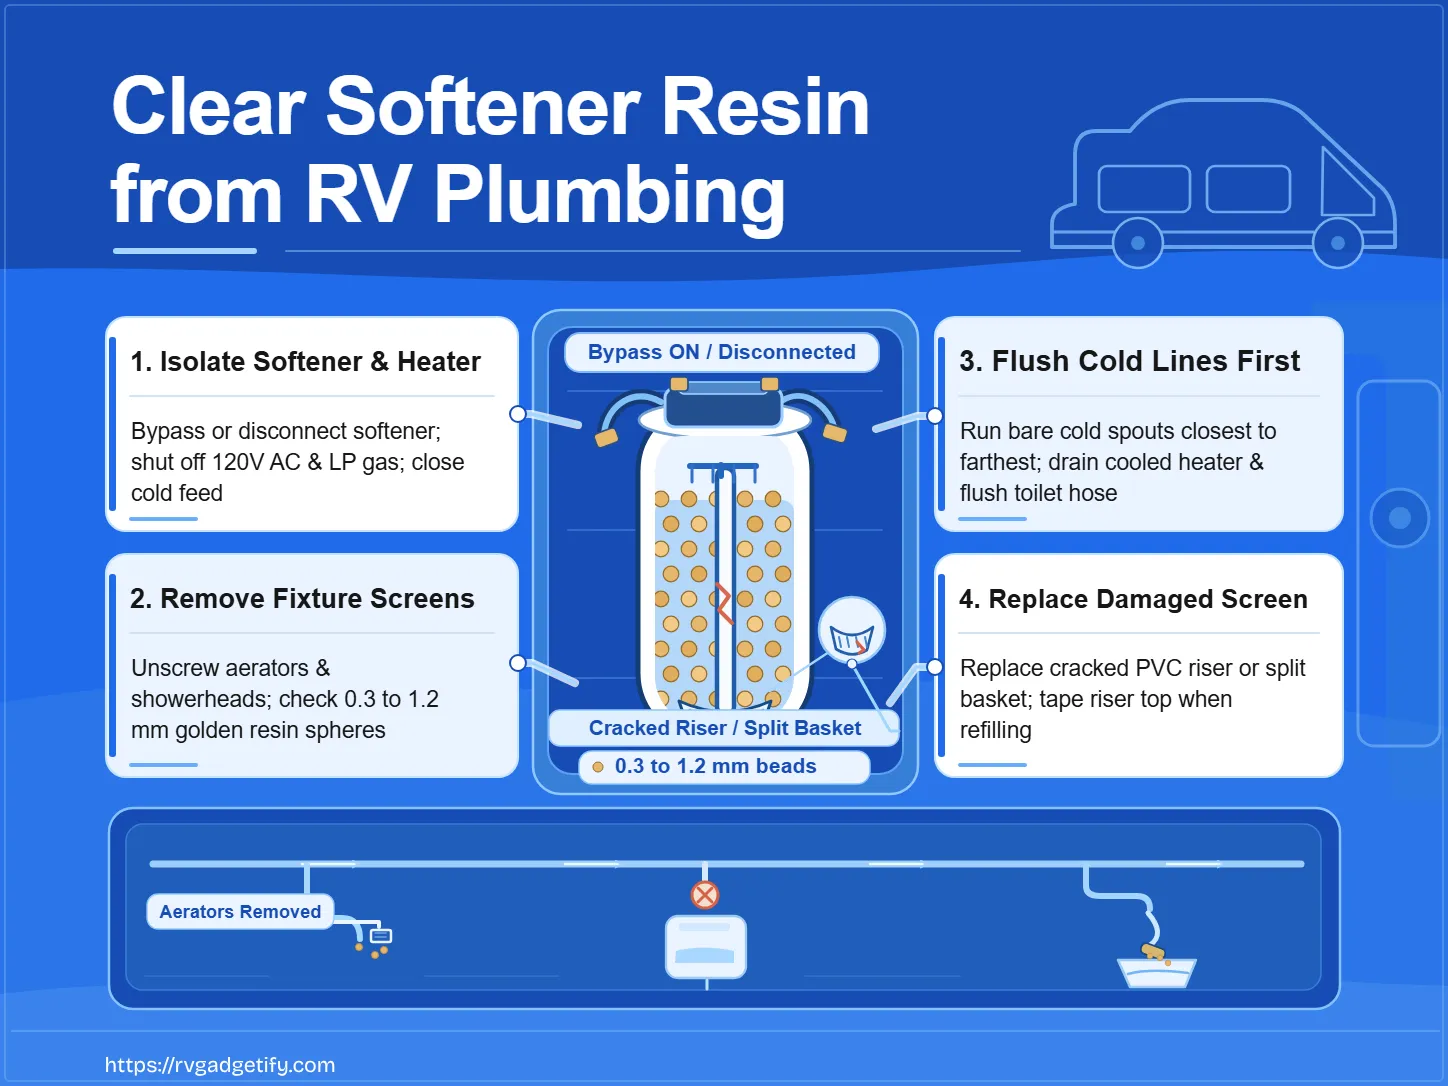

Water softener resin beads in RV water pipes require immediate softener isolation before you open faucets, flush lines, or drain appliances. Bypass or disconnect the softener first, connect an unsoftened water supply, isolate and power down the water heater, remove fixture screens, and flush the cold lines before clearing the water heater tank, hot lines, and toilet fill valve. Before returning the softener to service, inspect the internal distributor assembly and replace any cracked riser tube or broken bottom basket.
Key Takeaways
- Isolate the softener immediately: Push the bypass handle in on an onboard unit or disconnect both garden hoses from a portable RV softener as soon as resin beads appear.
- Protect downstream valves and appliances: Do not flush toilets or run an onboard washing machine until the supply lines are clear, and shut off 120V AC power and LP gas to the water heater before draining it.
- Confirm the debris type: Intact cation resin beads are uniform golden or amber spheres measuring 0.3 to 1.2 mm in diameter, whereas fine fractured particles point to degraded resin media.
- Flush with fixture screens removed: Take off faucet aerators, showerheads, and spray wands before opening taps so water pressure pushes beads out of open spouts rather than deeper into valve cartridges.
- Replace damaged distributor parts: Never glue shattered basket ribs or reload fresh cation resin into a tank with a cracked central PVC riser pipe or split bottom screen.
How Do You Confirm That the Debris Is Water Softener Resin?
Confirming that plumbing debris is escaped cation exchange resin requires inspecting the physical particles trapped at fixture strainers, showerheads, or the softener drain rather than relying on low water flow or odor alone. Intact water softener resin beads are uniform golden, amber, or reddish spherical particles measuring 0.3 to 1.2 mm in diameter. Seeing these uniform spheres at multiple fixtures distinguishes a softener screen failure from ordinary campground sediment or mineral scale.
Particle size also helps isolate what failed inside the softener:
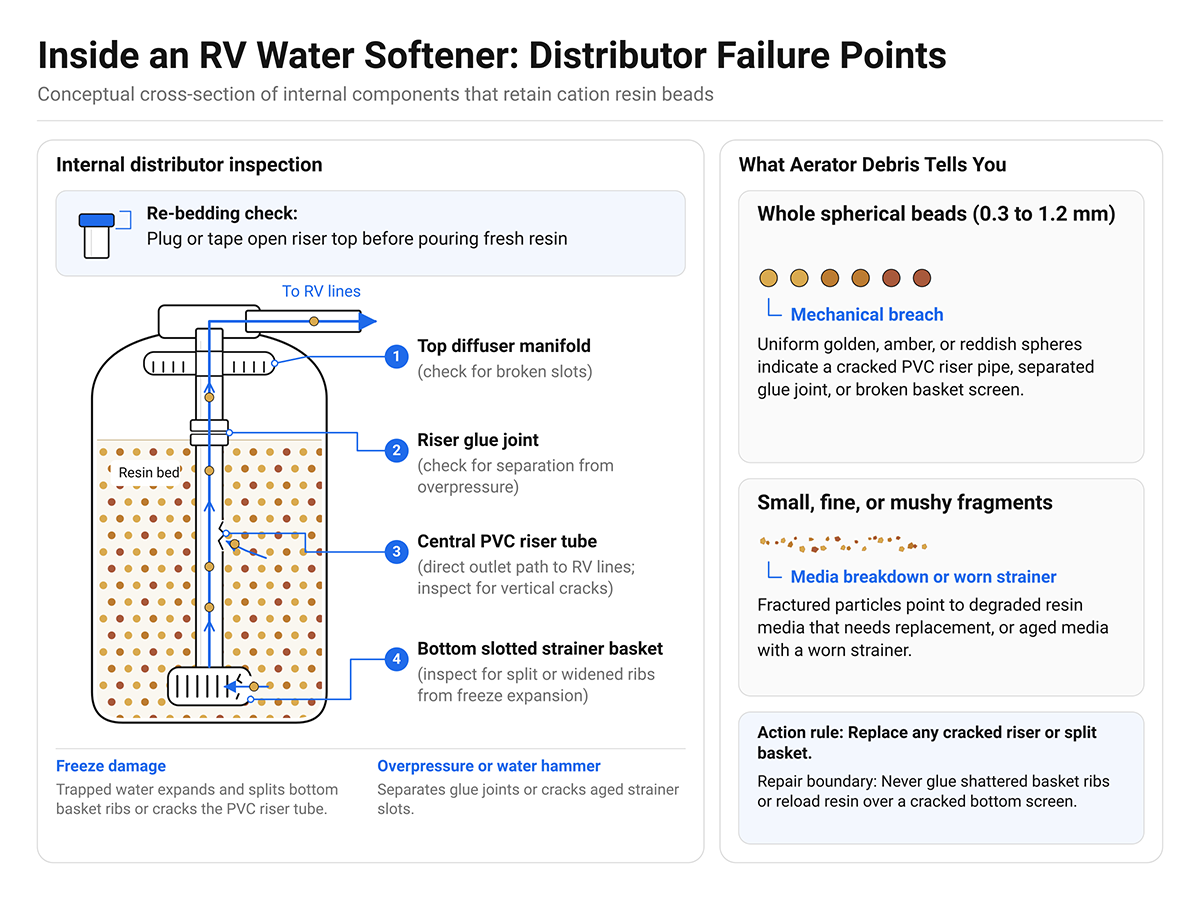
- Whole spherical beads (0.3 to 1.2 mm): Indicate a mechanical breach in the internal distributor assembly, such as a cracked central PVC riser tube, a split bottom distributor basket, or a broken top diffuser manifold.
- Small, fine, or mushy fragments: May indicate deteriorated resin media that has broken down and needs replacement, or a combination of aged media and a worn strainer.
Low water pressure by itself does not prove resin migration, and water odor does not diagnose bacterial contamination. Evaluate the physical debris retrieved from an aerator alongside fixture symptoms and a visual inspection of the softener internals.
| Symptom | Possible Cause | Distinguishing Check | Corrective Action | Expected Result | Stop Condition |
|---|---|---|---|---|---|
| Yellow or amber spheres in faucet aerators or showerheads | Cracked distributor riser pipe, split bottom basket screen, or broken top manifold | Inspect aerator debris for uniform golden spherical beads measuring 0.3 to 1.2 mm | Bypass or disconnect the softener, remove aerators, and flush cold PEX lines | Bead migration stops and cold lines run clear of loose particles | Do not leave the softener in line while flushing |
| Sudden pressure loss at multiple faucets | Beads packing behind fine-mesh aerators and shower flow restrictors | Unscrew an aerator and test flow with the bare spout open | Rinse aerators, showerheads, and outdoor spray wands in a bucket of clean water | Unrestricted dynamic water pressure returns at the bare spout | Do not force high pressure through clogged aerators |
| Beads at hot taps or water heater drain | Beads carried through the cold supply line into the water heater tank | Open the exterior heater drain or anode port after cooling and depressurizing | Shut off 120V power and LP gas, cool and depressurize the tank, drain, and rinse the bottom port | Settled bead sludge washes out of the tank bottom | Do not energize the heater while drained or coated in beads |
| Toilet runs continuously or foot-pedal valve fails to seal | Beads wedged in the toilet fill valve diaphragm or seating gasket | Shut off supply, disconnect the toilet inlet line, and inspect the valve orifice | Flush the detached supply hose into a bucket and clear the inlet valve screen | Valve seals tightly and water stops trickling into the bowl | Do not flush the toilet before clearing the supply line |
| Softener continues releasing beads | Crack in the central PVC riser pipe, separated glue joint, or broken slotted basket ribs | Depressurize and disassemble the softener head, then pull and inspect the riser and bottom screen | Replace the damaged distributor assembly before loading fresh cation resin | New distributor screen retains resin under full operating pressure | Do not glue shattered ribs or re-bed with a cracked basket |
Immediate Stop Conditions and First Isolation Steps
Stop water flow through the failed water softener immediately, isolate the water heater, and refrain from using toilets or appliances before opening any faucets to flush the RV. Leaving pressurized water routed through a breached softener pushes additional resin beads out of the tank and deeper into the RV manifold.
Complete these isolation steps before beginning line cleanup:
- Bypass or remove the water softener: Push the bypass valve handle into the bypass position on a plumbed-in softener, or disconnect both garden hoses from a portable unit. If you disconnect a portable softener at the campground spigot, connect your drinking water hose and pressure regulator directly from the water source to the RV city water inlet so you have clean pressurized water available for flushing.
- Shut down and isolate the RV water heater: Turn off both the 120V AC electric heating element switch (and breaker) and the LP gas control switch. Close the water heater incoming cold feed valve, or set the RV water heater bypass valves to bypass mode, so flushing the cold water lines does not drive additional beads into the heater tank. Never energize an electric element or gas burner while resin beads coat the inside of the tank or while the tank is drained.
- Do not flush toilets or run washing machines: Keep toilet foot pedals, flush handles, and onboard clothes washers off until the supply lines have been cleared. Opening these valves early pulls loose beads into rubber toilet diaphragms, seating gaskets, and washer solenoid screens.
- Do not reload the softener tank yet: Wait until you have depressurized the softener, pulled the central distributor riser tube, and inspected the bottom basket for cracks before buying or pouring replacement resin.
Which RV Fixtures Trap Resin Beads First?
Kitchen and bathroom faucet aerators, handheld showerheads, inline flow restrictors, and appliance inlet screens trap escaped resin beads first because their mesh openings are smaller than the 0.3 to 1.2 mm bead diameter. When a distributor basket fails, beads travel with the main flow and pack tightly behind these terminal screens, causing a sudden drop in water pressure across multiple fixtures at once.
Before opening any faucet to flush the pipes, remove the terminal screens at every affected fixture:
- Unscrew the aerator housings from the ends of kitchen and bathroom faucet spouts.
- Unthread handheld showerheads from their flexible hoses and remove accessible inlet cone washers or mesh screen gaskets.
- Remove the spray nozzle or screen from the exterior utility shower or outdoor spray wand.
- Submerge the removed aerators, showerheads, and screen washers in a bucket of clean water to rinse and pick out wedged beads.
Never try to clear a slow faucet by turning the supply pressure up while the aerator is still attached. Forcing full line pressure against a bead-packed screen can drive fine resin fragments backward or wedge beads into the faucet mixing cartridge.
How Do You Flush Resin Beads from RV Cold and Hot Water Lines?
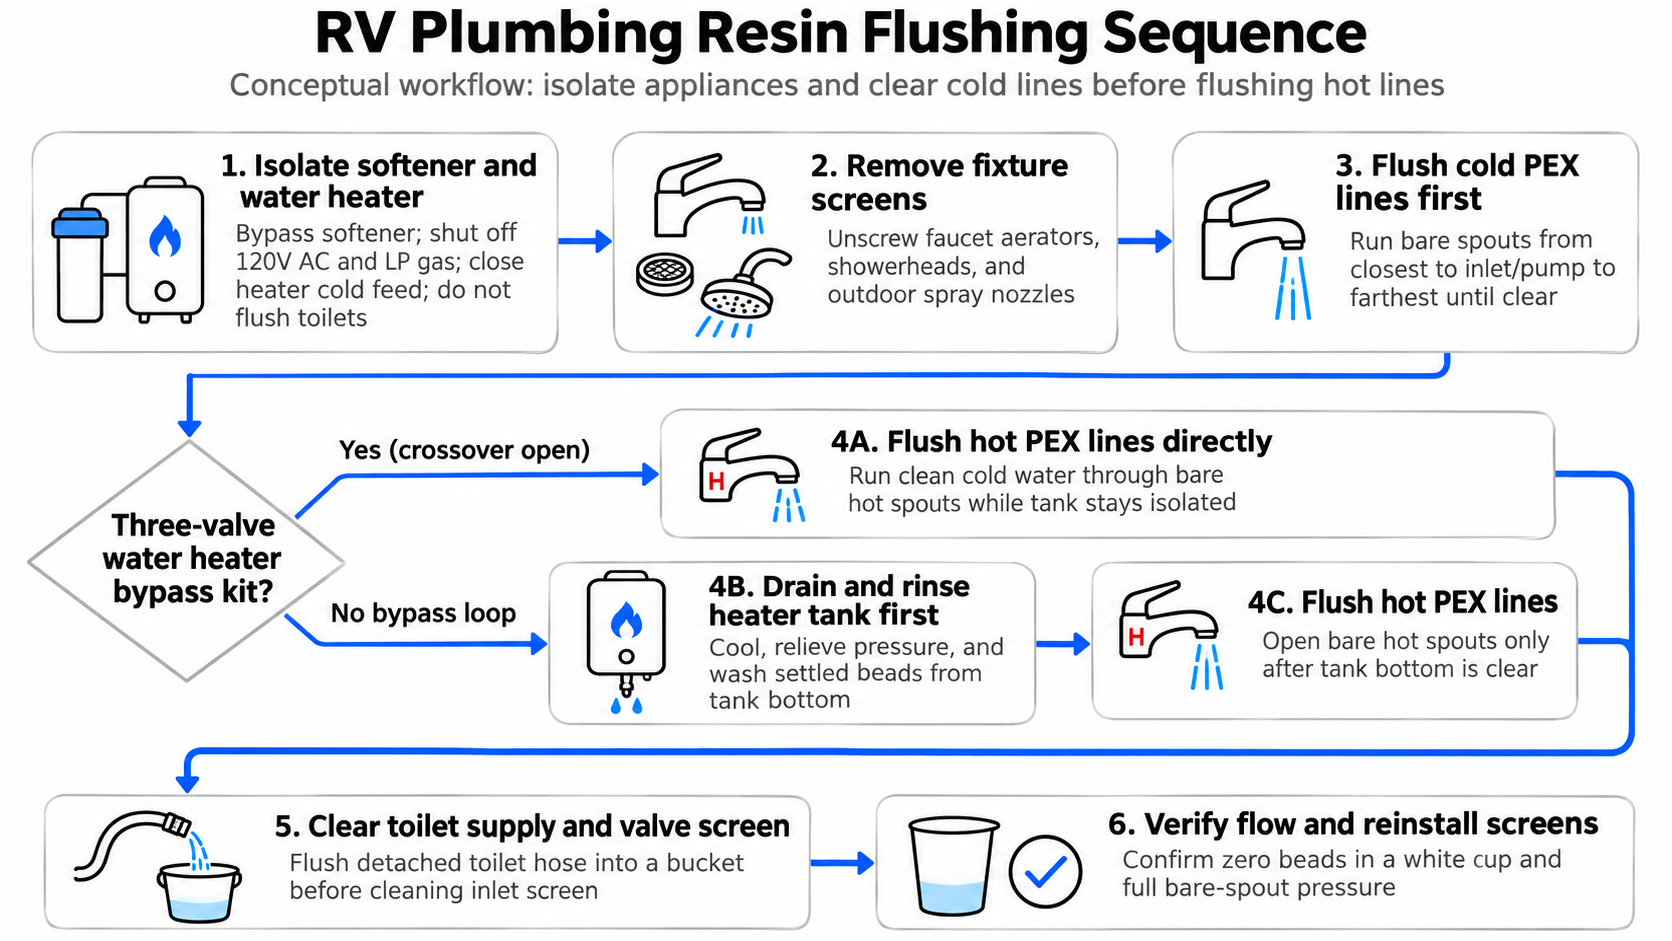
Flush the RV cold water lines first with all fixture screens removed and the water heater isolated, then flush the hot water lines only after ensuring the water heater cannot feed trapped beads into the hot manifold. Working in this order prevents cold-line flushing from contaminating the water heater or hot faucet cartridges.
Flushing the Cold PEX Lines
- Confirm that the water softener is bypassed or disconnected, the water heater cold feed valve is closed (or the heater bypass crossover is engaged), and all faucet aerators and showerheads are removed.
- Start at the cold water tap closest to the RV city water inlet or fresh water pump. Open the cold handle fully and let water discharge from the bare spout until no golden beads or fine particles appear in the stream.
- Close that tap and repeat the process at each remaining cold faucet, shower valve (set to full cold with the showerhead removed), and outdoor utility tap, working toward the fixture farthest from the inlet.
Flushing the Hot PEX Lines
- If your RV has a three-valve water heater bypass kit (cold inlet closed, hot outlet closed, crossover valve open), you can flush the hot PEX lines directly with clean cold water before opening the water heater tank. Open one hot tap at a time with the aerator removed and run water until the bare spout discharges clear water.
- If your RV does not have a crossover bypass loop and all hot-side flow must pass through the water heater tank, drain and rinse the water heater tank completely before flushing the hot water faucets. Opening hot taps while beads remain inside an unbypassed heater tank draws settled resin out of the tank and into the hot plumbing branches.
How Do You Remove Resin Beads from an RV Water Heater?
Removing resin beads from an RV tank water heater requires shutting off all heat sources, letting the water cool, relieving internal pressure, draining the tank, and washing settled bead sludge out of the bottom cavity before refilling. Resin beads carried through the cold supply line sink to the bottom of a tank-type water heater, where ordinary faucet flushing cannot lift them out.
Follow your water heater manufacturer’s shutoff and maintenance instructions alongside these steps:
- Shut off power, fuel, and incoming water: Verify that 120V AC electric power and LP gas to the water heater are off. Close the incoming cold water feed valve (or turn off the campground spigot and 12V RV water pump) and confirm that no pressurized water is entering the heater.
- Cool the tank and relieve pressure: Allow the water inside the tank to cool completely so you are not exposed to scalding water. Open a hot water faucet inside the RV and leave it open to relieve line pressure and allow air into the top of the tank during draining, which prevents a vacuum lock. Follow the heater manual to relieve any remaining pressure at the temperature and pressure (T&P) relief valve before removing the bottom plug.
- Drain the tank and inspect the initial discharge:
- Standard RV exterior drain plug or anode rod port: Place a catch bucket beneath the exterior water heater access opening and unthread the nylon drain plug or metal sacrificial anode rod. Inspect the initial surge of water for amber resin beads.
- Heaters equipped with a bottom hose-bib drain valve: Connect a garden hose to the bottom drain valve, route the hose to a safe drainage area capable of handling high water volume and sediment, and open the bottom drain valve until the tank empties.
- Flush settled bead sludge from the tank bottom:
- Through an open RV drain or anode port: Attach a tank flusher wand to a garden hose, insert the wand nozzle through the open drain or anode port to reach the bottom of the tank, and spray in short bursts to wash accumulated bead sludge out into the catch bucket until the runoff is completely clear.
- Through a bottom hose-bib drain valve: With the drain hose still attached and the bottom valve open, close the interior hot faucet you opened earlier and slowly crack open the heater’s incoming cold feed valve. Let fresh incoming water sweep residual beads across the bottom of the tank and out the drain hose until the discharge runs clear, then close the drain valve.
- Reinstall the plug and refill before restoring power: Clean the drain port threads, reinstall the drain plug or anode rod according to the manufacturer’s instructions, open the cold feed valve to refill the tank until water flows steadily without air sputters from an open interior hot tap, and confirm the tank is completely full before turning 120V electric or LP gas heat back on.
Tankless RV Water Heater Considerations
Tankless RV water heaters do not store a standing reservoir of water, so beads do not settle in a bottom sump. Instead, escaped resin beads can lodge in the cold-water inlet strainer or jam the fine turbine flow sensor that triggers burner ignition. If hot water flow drops or the burner fails to ignite after a resin leak, shut off power, gas, and water, clear the inlet filter screen, and consult the appliance manual or a qualified RV technician to unthread and backflush the internal turbine flow sensor.
How Do You Clear Resin Beads from an RV Toilet Fill Valve?
Clearing resin beads from an RV toilet requires disconnecting and flushing the flexible supply hose into a bucket before cleaning the toilet inlet screen and valve orifice. Because an RV toilet fill valve sits at the end of a dead-end cold branch line, operating the flush pedal while beads are in the pipe drives beads straight into the valve’s internal rubber diaphragm or seating gasket, causing the valve to stick open and trickle continuously into the bowl.
- Shut off the cold water supply: Close the dedicated toilet shutoff valve if present, or turn off the main RV water supply and 12V water pump, then briefly open an already-flushed cold sink faucet to relieve line pressure.
- Disconnect and flush the toilet supply hose: Place a towel and small bucket under the water connection at the back or side of the toilet. Unthread the flexible water supply line from the toilet inlet fitting, aim the open end of the hose into the bucket, and turn the water supply on briefly until the stream runs completely clear of resin beads. Shut the water off again.
- Clear the toilet inlet screen and valve orifice: Inspect the threaded inlet port on the toilet water valve. Remove the small mesh inlet screen if your toilet model includes one, rinse out any trapped beads, and check the valve orifice for particles wedged against the rubber diaphragm or seating gasket.
- Reconnect and verify the seal: Reinstall the clean inlet screen, thread the supply hose back onto the toilet valve, turn the water supply on, and test a single flush. Confirm that the fill valve shuts off crisply and that water stops trickling into the bowl once the pedal is released. If beads have torn or permanently deformed the internal rubber seal, replace the toilet water valve assembly.
Why Is the Softener Still Releasing Resin Beads?
A water softener continues to release whole resin beads when there is a physical breach in its internal distributor assembly, most commonly a cracked central PVC riser pipe, a separated riser glue joint, or broken slotted ribs on the bottom distributor basket. The distributor assembly consists of the central PVC riser tube, the top diffuser or manifold, and the bottom slotted strainer basket that sits at the base of the mineral tank.
In RV use, two conditions frequently fracture these plastic components:
- Freeze damage: Water left trapped inside the resin tank during freezing weather expands and splits the slotted ribs of the bottom basket or cracks the central PVC riser tube.
- Overpressure or water hammer: High campground water pressure without a functioning pressure regulator, or sudden pressure spikes, can separate riser glue joints or flex and crack aged plastic strainer slots.
Do not attempt to diagnose a continuous bead leak by smell or by assuming the resin media simply wore out. Depressurize the softener, remove the top valve head or cap, and pull the central riser assembly out of the tank so you can visually inspect the full length of the PVC tube and every slot on the bottom basket and top diffuser.
When Should You Replace the Distributor Screen Instead of Re-Bedding the Tank?
You must replace the distributor riser and basket assembly whenever you find a cracked PVC riser tube, a loose glue joint, or even a single broken or widened rib on the bottom strainer basket before loading fresh cation resin into the tank. Pouring new resin into a tank with a compromised distributor assembly guarantees another resin blowout as soon as full operating pressure is restored.
Never attempt to glue, epoxy, or heat-weld shattered distributor basket ribs, and never re-bed a tank over a cracked bottom basket. The narrow slot tolerance required to retain 0.3 to 1.2 mm beads under pressure cannot be restored with adhesive repairs.
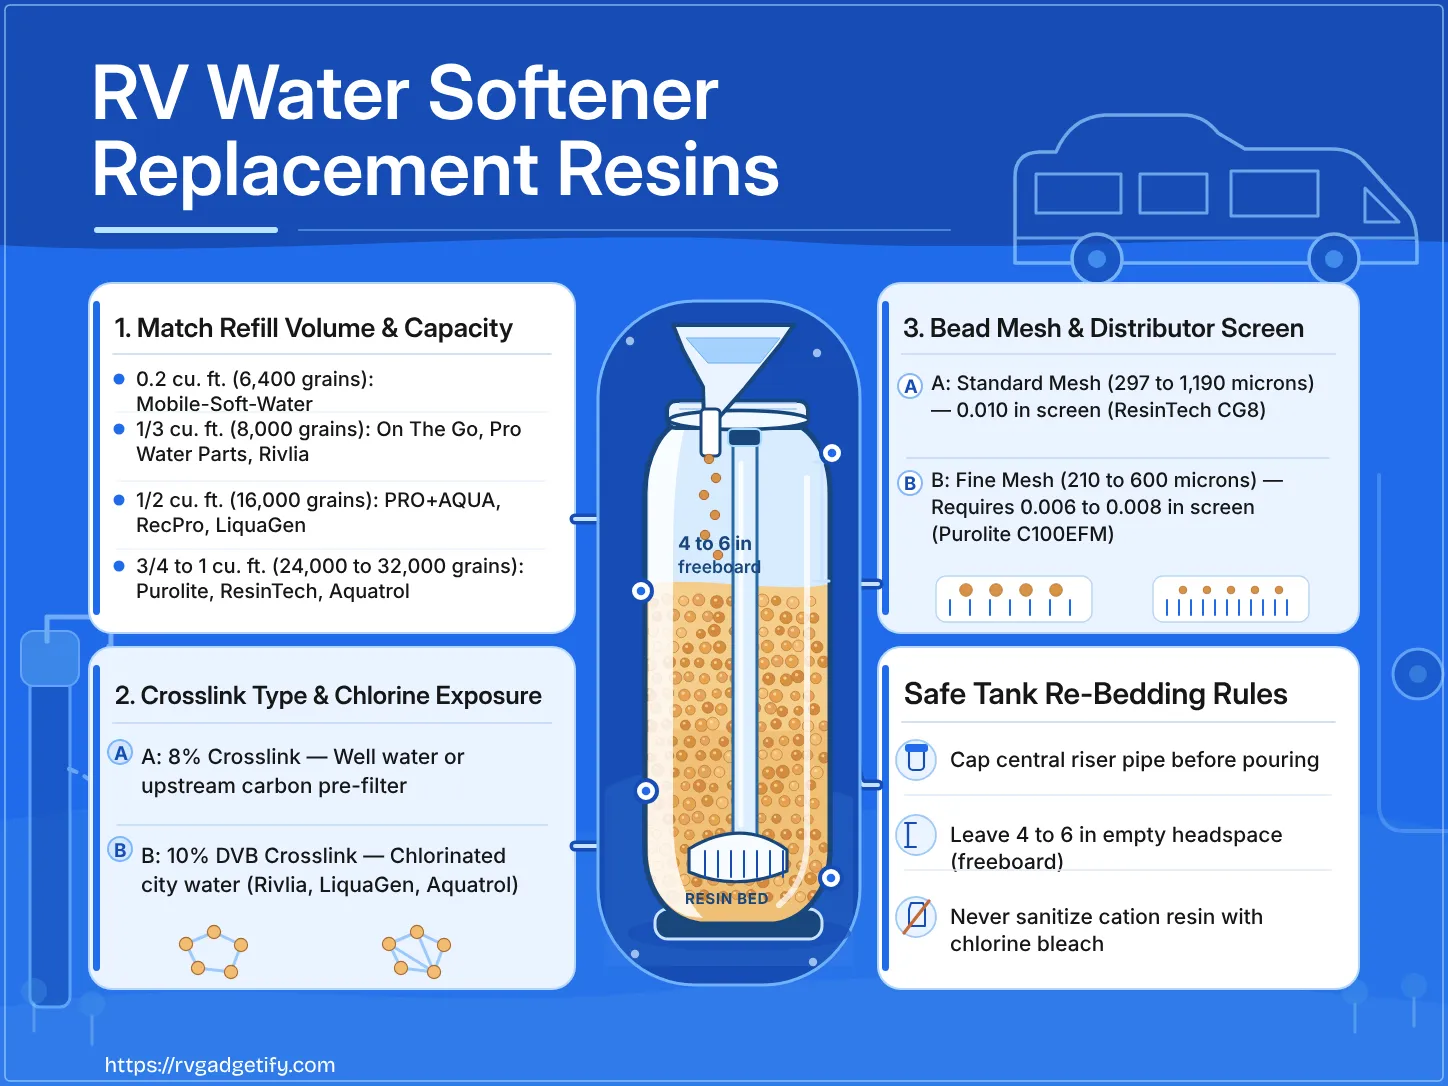
When your softener model uses a serviceable tank head and replaceable distributor tube, gather these supplies before replacing the distributor and re-bedding the tank with fresh cation resin:
- Bucket lined with heavy garbage bags: Wet cation resin beads are dense, heavy, and extremely slippery when spilled on floors. Empty the old media into a garbage-bag-lined bucket for containment and disposal.
- Replacement distributor riser and bottom basket: Seat the new bottom distributor basket centered at the base of the empty, rinsed tank and verify that the riser tube height matches the manufacturer’s specification for the valve head.
- Pipe plug or tape and a wide-mouth funnel: Before pouring fresh strong-acid cation resin into the tank neck through a funnel, plug or tape the open top of the central PVC riser tube. Capping the riser tube prevents resin beads from falling down the center pipe, which is the direct outlet path to your RV plumbing.
- Silicone-based lubricant and optional pliers: After filling the tank to the manufacturer’s specified media level and removing the tape or plug from the riser top, apply silicone-based lubricant to the O-ring seals on the riser interface and tank neck so the top distributor and valve head seat smoothly without pinching an O-ring.
If your portable RV softener uses a permanently sealed tank or proprietary manifold where replacement distributor parts are not sold separately, evaluate replacement portable RV water softener models rather than returning the damaged vessel to service.
How Do You Verify That the RV Plumbing Is Clear?
Confirm that your RV plumbing and repaired softener are ready for normal service by completing four operational checks before reinstalling fixture aerators and showerheads:
- Clear discharge at every branch: Run cold and hot water from each bare faucet spout, shower hose, and utility outlet into a clean white cup or bucket. Verify that zero golden beads or fine resin fragments appear in the water.
- Restored bare-spout dynamic flow: Confirm that full, unrestricted dynamic water pressure has returned at each open faucet spout with the aerator removed. If a specific faucet still dribbles while adjacent fixtures have full flow, shut off the water and inspect that faucet’s internal mixing cartridge or supply shutoff valve for trapped beads.
- Positive toilet valve shutoff: Flush the toilet and observe the bowl rim after the pedal closes. Water must stop flowing completely with no continuous trickle into the bowl.
- Resin retention under operating pressure: If you repaired and re-bedded the water softener, flush the softener to waste or into a bucket at full regulated operating pressure before reconnecting it to the RV inlet. Confirm that the new distributor screen retains 100% of the resin bed before routing softened water back into the RV. Once verified, reinstall the cleaned faucet aerators and showerheads.
When Should You Stop and Get Qualified Help?
Stop DIY troubleshooting and consult the equipment manufacturer or a qualified RV service technician under any of the following conditions:
- Continued bead release after isolation or repair: If resin beads still appear after bypassing the softener, or if a repaired softener continues discharging beads into a test bucket, take the unit out of service immediately.
- Leaking pressure vessel or damaged tank threads: Stop work if the fiberglass or plastic softener tank weeps water, shows structural cracks, or has stripped neck threads. Do not pressurize a compromised vessel.
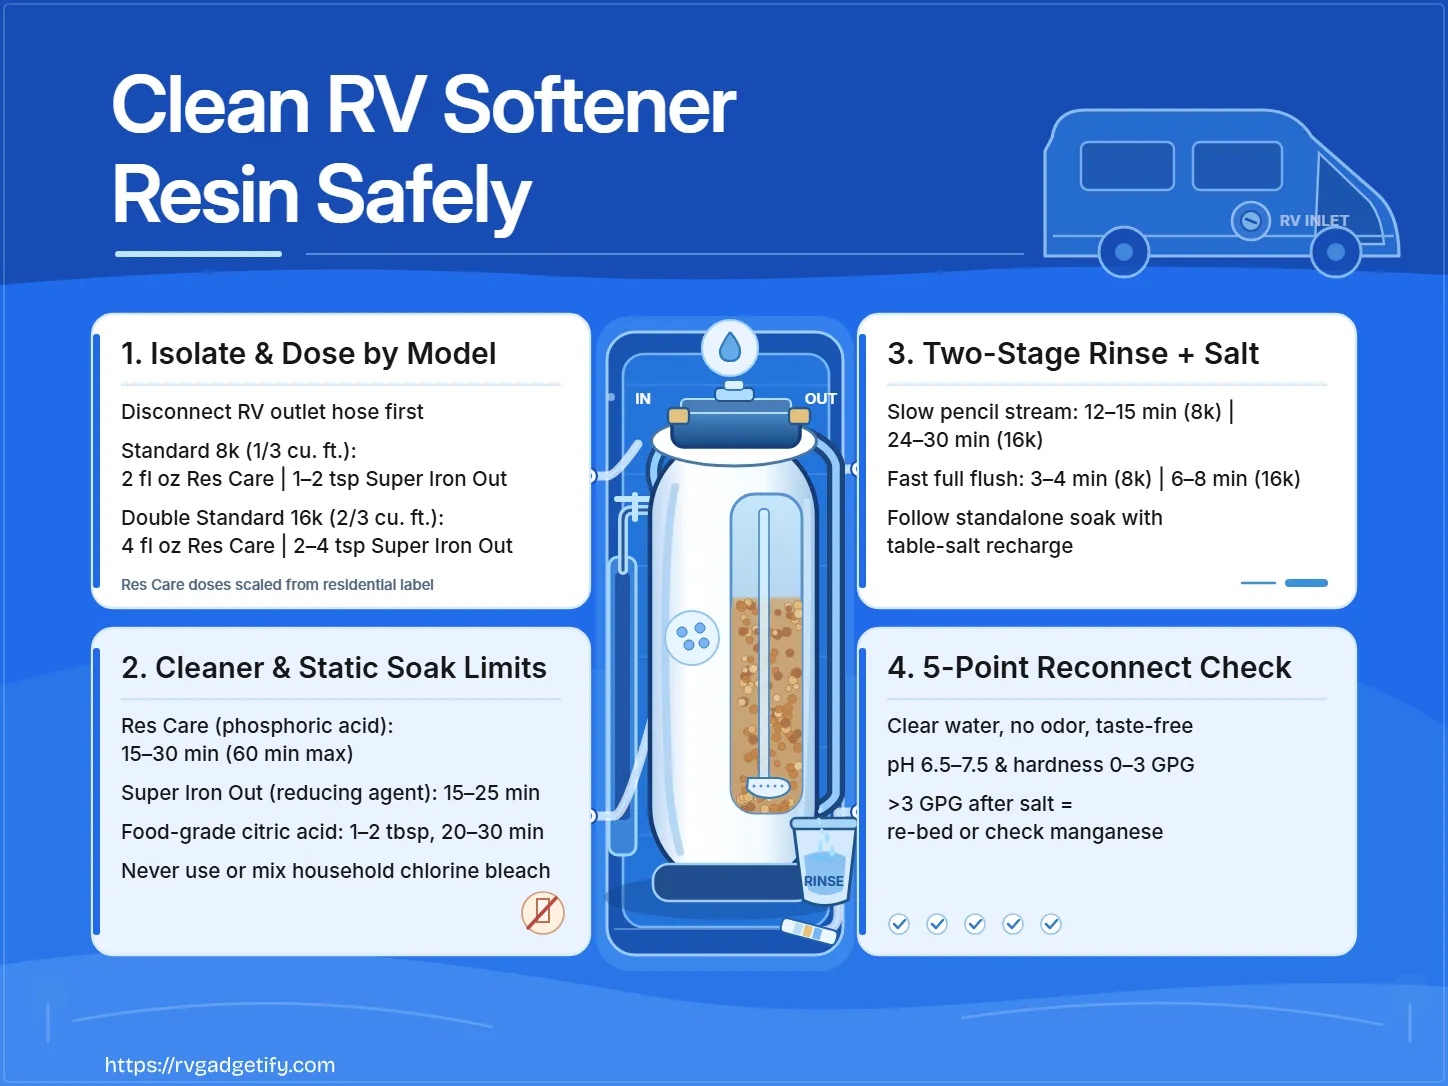
- Unresolved chemical compatibility or suspected unsafe water: Never pour household cleaners, descalers, or chemical treatments into the softener or RV plumbing based on generic recipes or brand reputation. This guide covers mechanical flushing of escaped resin beads only and does not provide a bacteriological drinking-water guarantee. If you suspect biological or chemical water contamination, stop using the water supply and follow OEM sanitization and water-testing protocols.
- Complex internal appliance disassembly: If resin beads have bypassed the isolation steps and entered an onboard washer-dryer combo’s internal solenoid manifold or jammed deep inside a tankless water heater’s flow-control module beyond the accessible inlet screen, stop and have a qualified technician service the appliance.
FAQ: Water Softener Resin in RV Water Pipes
What do escaped water softener resin beads look like?
Intact water softener cation resin beads look like tiny, uniform golden, amber, or reddish spheres measuring 0.3 to 1.2 mm in diameter, similar in size to coarse sand or fish eggs. Fine, broken particles usually point to aged or degraded resin media, while whole round beads indicate a cracked internal distributor tube or basket.
Why did water pressure drop at several RV faucets at the same time?
Escaped 0.3 to 1.2 mm resin beads travel with the main water flow and pack tightly against the fine mesh of faucet aerators and showerhead flow restrictors. Removing an aerator and testing flow from the bare spout confirms whether the clog is at the fixture tip or deeper in the valve cartridge.
Can resin beads damage an RV water heater if I leave it turned on?
Yes. Beads carried into a tank-type water heater settle at the bottom around the heating element or burner flue tube. Energizing a 120V electric element or LP gas burner while the tank is drained or packed with resin sediment can overheat the element, melt or char the polymer beads, and foul the tank interior.
Why must I tape or plug the center riser tube when refilling a softener tank with resin?
The central PVC riser tube carries softened water up from the bottom basket and directly out to your RV water lines. If you pour new resin into the tank without capping the top of the riser pipe, beads fall straight down the inside of the pipe and flush directly into your RV plumbing the moment you turn the water on.
Does a rotten-egg or musty smell in RV water prove that resin or bacteria is the cause?
No. Odor alone does not diagnose bacterial contamination or resin failure, and mechanical line flushing is not a substitute for water sanitization. Inspect aerators physically to confirm whether resin beads are present, and rely on proper water testing rather than smell when water safety is in question.