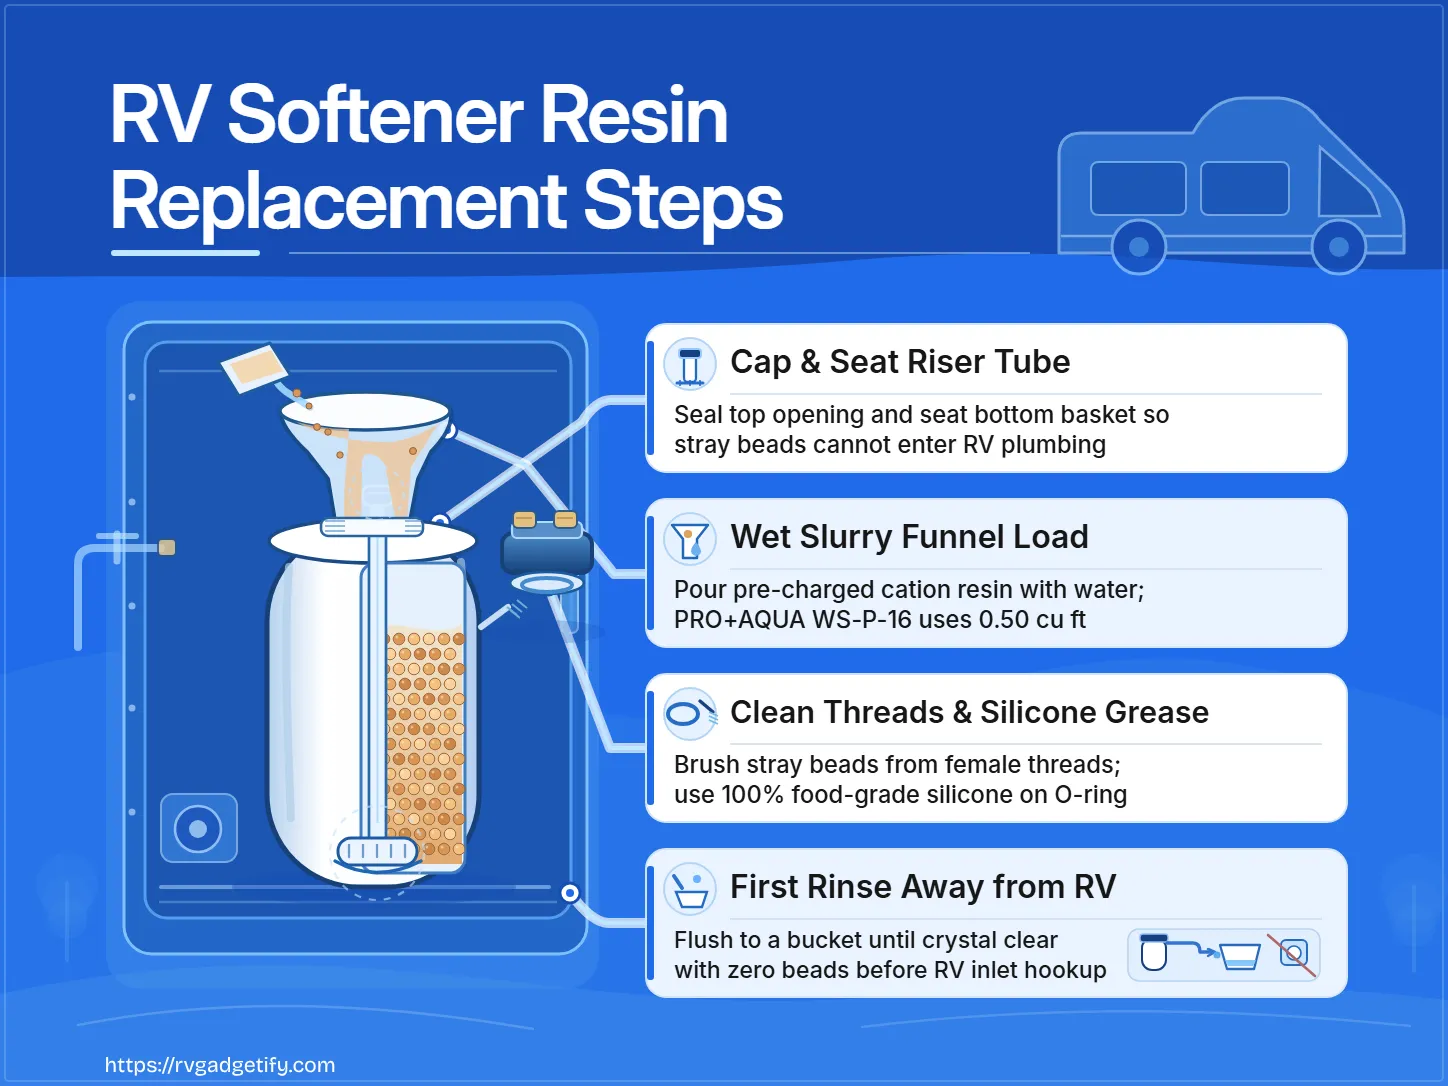

Replacing RV water softener resin restores softening capacity when aged cation-exchange beads no longer respond to salt regeneration due to physical breakdown or chemical crosslink degradation. The re-bedding process requires depressurizing the tank, unscrewing the top head assembly, flushing out the exhausted media, centering and capping the central distributor riser tube, funneling in fresh cation resin with water, and flushing the new bed before reconnecting to your RV.
This guide covers the complete physical re-bedding procedure for a portable RV water softener tank that uses a removable top head and central distributor pipe.
Quick Summary
- When to Replace Resin: Re-bed the tank when standard salt regeneration no longer restores soft water because the resin beads are physically degraded or fouled.
- Critical Plumbing Precaution: Always center the distributor riser tube in the bottom cavity and tape or cap its top opening before pouring resin. Stray beads inside the central pipe will wash directly into your RV plumbing fixtures and clog aerators or valves.
- No Initial Salt Needed: New replacement cation resin arrives from the factory pre-charged in the sodium form. It requires an initial freshwater rinse to clear manufacturing preservatives and bead fines, not a salt regeneration cycle.
- O-Ring Protection: Lubricate the tank head O-ring only with 100% food-grade silicone grease. Never use petroleum jelly, which swells and degrades synthetic rubber seals.
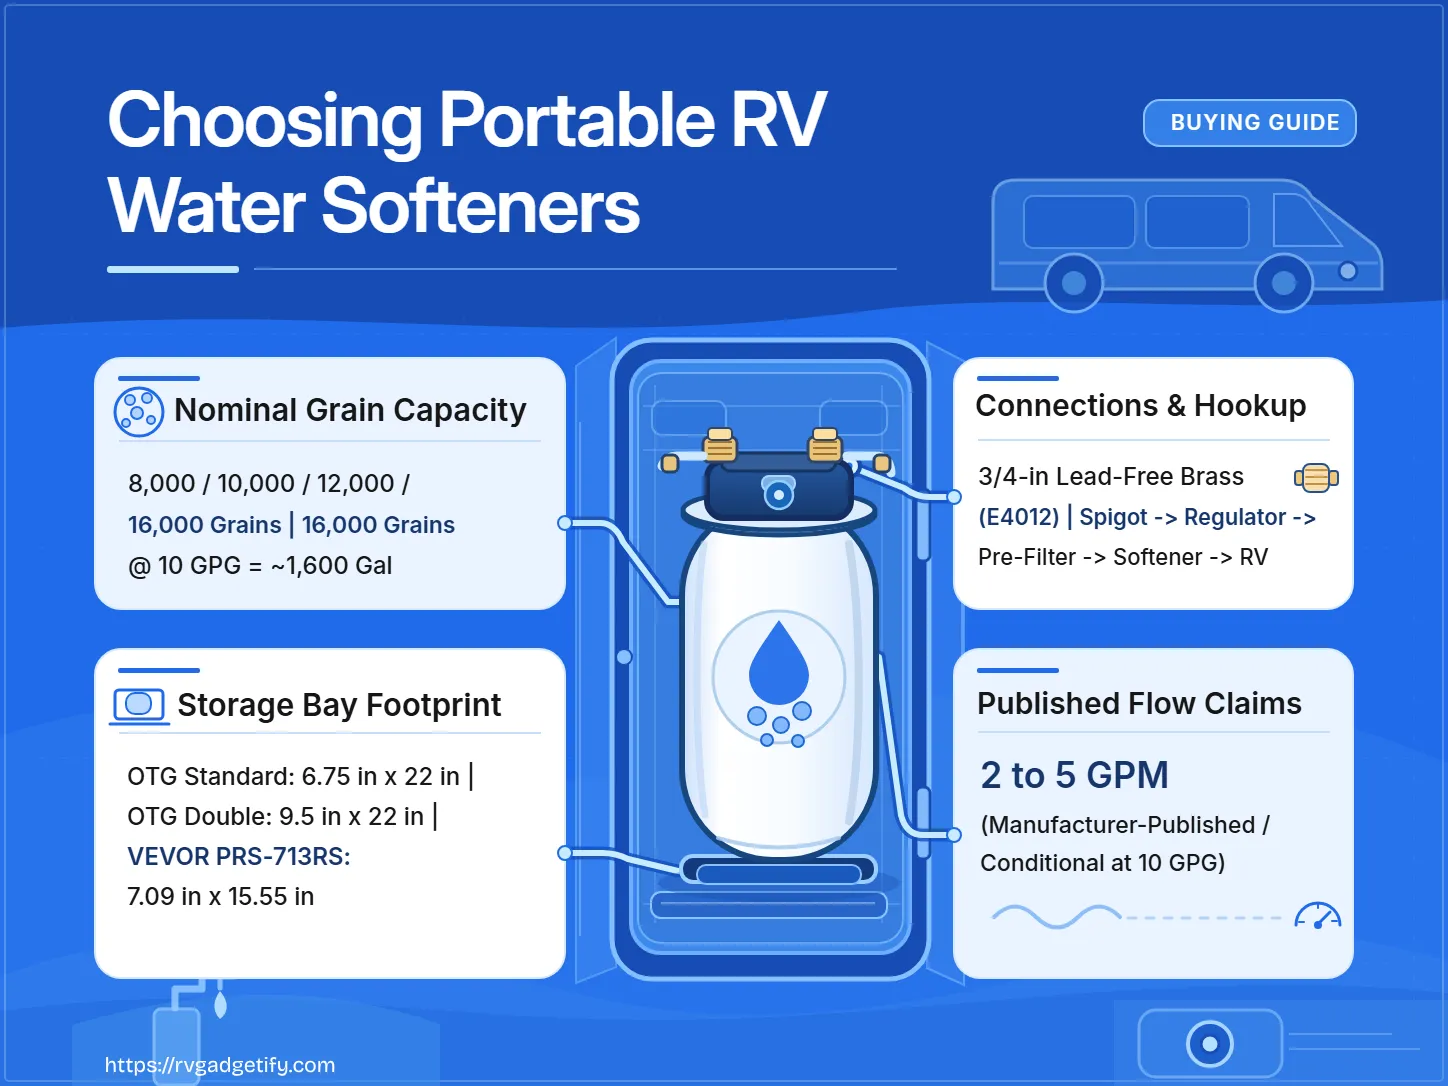
- Resin Volume: Match the cubic-foot resin volume to your exact model manual (for example, the 16,000-grain PRO+AQUA
WS-P-16uses 0.50 cubic feet of resin).
Tools, Supplies, and Resin Volume Requirements
Gather all tools and verify your tank’s required media volume before opening the vessel.
Required Tools and Supplies
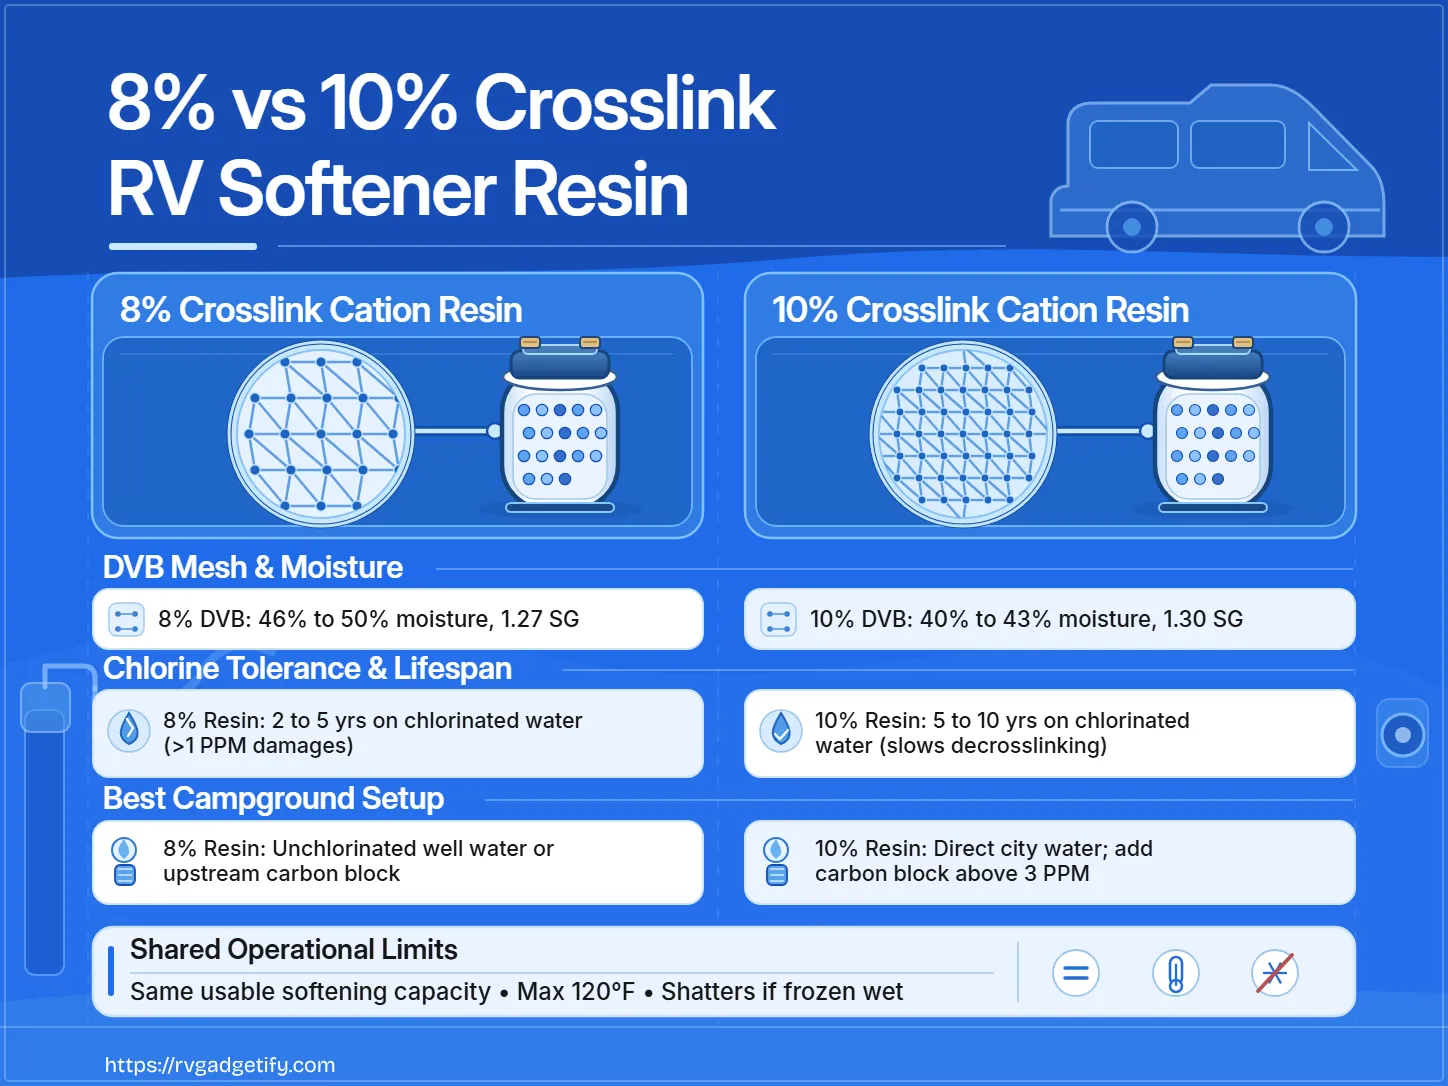
- Replacement cation-exchange resin: Pre-measured to your tank’s exact cubic-foot capacity (such as standard 8% or 10% crosslink water softener resin).
- Large bucket or heavy-duty trash bags: To catch and dispose of spent resin beads.
- Garden hose and freshwater source: For flushing out compacted old beads, adding slurry water during loading, and running the initial rinse.
- Waterproof tape or rubber pipe plug: To seal the top opening of the central distributor riser tube during filling.
- Wide-mouth loading funnel: Sized to fit over the tank neck while clearing the capped riser pipe.
- Soft-bristle brush: For cleaning stray beads out of the female tank threads.
- 100% food-grade silicone grease: For lubricating the rubber head O-ring.
- PTFE thread tape or thread sealant: For hose connection fittings if needed.
Confirming Your Model’s Resin Volume
Portable RV water softeners vary in cylinder size, so no single resin volume fits every unit. The only model-specific volume documented in this guide is 0.50 cubic feet for the 16,000-grain PRO+AQUA WS-P-16. Check your owner’s manual to confirm both the exact cubic-foot capacity and that your tank uses a removable manifold head before ordering replacement media (for help choosing between 8% and 10% crosslink resin, compare their chlorine resistance and lifespan).
Critical Stop Conditions and Safety Rules
Follow these six mandatory stop conditions throughout the procedure to prevent personal injury, tank damage, or clogged RV plumbing:
- Never unscrew a pressurized tank: Shut off the water supply and relieve all internal line pressure before loosening the top head assembly. Opening a pressurized vessel can cause violent water spray, stripped plastic threads, or sudden tank tipping.
- Stop if the tank shell is cracked or swollen: Inspect the fiberglass or composite tank body once empty. If you see structural cracks, delamination, or bulging, stop the project and replace the entire softener unit.
- Never pour resin with an uncapped riser pipe: Seal the top of the central distributor tube completely before loading media so beads cannot enter the outlet channel.
- Stop pouring if the riser tube shifts upward: If resin beads slip underneath the bottom distributor basket and push the pipe up, stop immediately. You cannot push a displaced riser pipe back down through loaded resin without emptying the tank and starting over.
- Never use petroleum-based lubricants: Products like Vaseline soften, swell, and ruin EPDM and synthetic rubber O-rings. Use certified food-grade silicone lubricant only.
- Never flush spent resin or initial rinse water into drains or RV lines: Do not dump old resin down household sinks, campground drains, dump stations, or storm sewers where beads will clog P-traps. Likewise, do not connect the softener outlet to your RV city water inlet until the initial freshwater flush runs completely clear.
Step-by-Step Procedure: How to Replace RV Softener Resin
Step 1: Shut Off Water and Relieve Internal Pressure
Turn off the campsite faucet and open a downstream drain valve or hose fitting to bleed off all internal water pressure. Disconnect both the incoming and outgoing garden hoses from the softener head.
- Checkpoint: Confirm that water flow has stopped completely and line pressure is zero before touching the main tank head.
Step 2: Unscrew the Top Head Assembly
Unscrew the top manifold head assembly counterclockwise and lift it off the tank neck. Set the head aside on a clean surface where dirt or gravel cannot stick to the O-ring.
- Stop Condition: Inspect the tank neck threads and outer shell. Do not proceed if the vessel exhibits structural fiberglass cracks or swelling.
Step 3: Empty and Dispose of the Spent Resin
Tip the tank upside down over a wide bucket or heavy-duty contractor trash bag. Insert a garden hose into the tank opening and use a gentle stream of water to break up the compacted resin bed and wash out the old beads. Using water pressure rather than metal scraping tools evacuates the cylinder quickly without scratching the inner polyethylene liner.
- Disposal Rule: Drain the excess water and place the non-hazardous spent cation resin into sealed heavy-duty trash bags for standard municipal solid waste collection in accordance with local regulations. Never wash beads into sinks or campground drains.
Step 4: Seat and Center the Distributor Riser Tube
Stand the empty, rinsed tank upright on flat ground. Place the central distributor riser pipe inside the tank and seat its bottom distributor basket firmly into the centering depression at the bottom of the vessel.
- Checkpoint: Look inside the neck to verify that the riser tube rests flat in the bottom center cavity and stands vertically plumb. Once resin fills the cylinder around the pipe, the tube cannot be pushed down or recentered.
Step 5: Cap or Tape the Top of the Riser Tube
Cover the open top end of the distributor riser pipe tightly with waterproof tape or a snug rubber plug.
- Why This Matters: The central riser pipe leads straight to the softener’s clean-water outlet. If beads drop into the top of this pipe during loading, they bypass the bottom retention screen and shoot straight into your RV water lines, water heater, and faucet valves when you turn on the water.
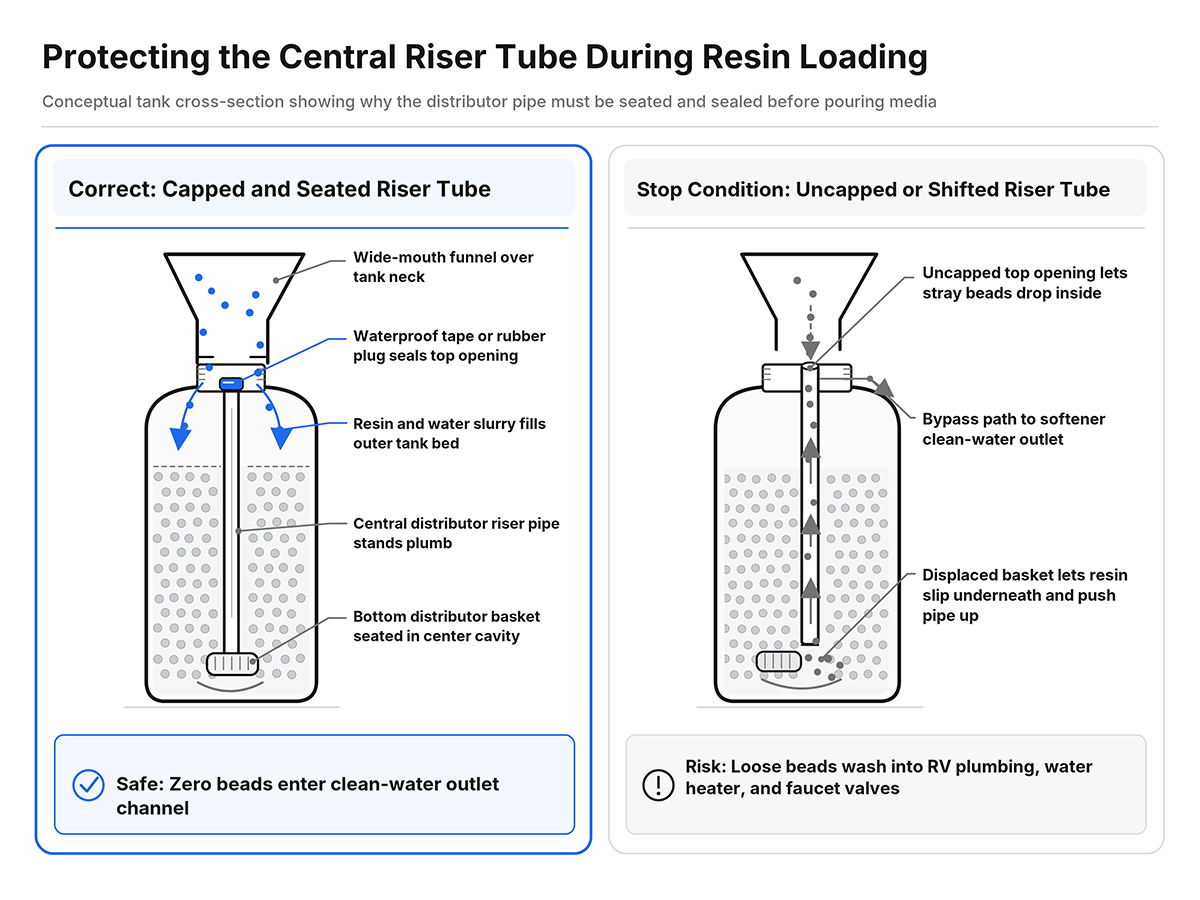
- Checkpoint: Verify there are no gaps in the tape and that the tape will not peel off when wet.
Step 6: Funnel in the New Resin Using a Water Slurry
Place your wide-mouth funnel into the tank neck over the capped riser pipe. Pour the measured replacement cation resin into the funnel in stages, pouring small amounts of clean water into the funnel periodically as you go.
- Why This Matters: Dry resin beads build up static electricity and bridge across narrow tank necks. Adding water creates a smooth slurry that carries the beads cleanly down around the distributor pipe without clumping or spilling.
- Stop Condition: Watch the top of the riser pipe while pouring. If the pipe rises out of its bottom pocket because resin slipped underneath the basket, stop pouring, wash the resin back out into a clean container, re-seat the pipe, and reload.
Step 7: Clean the Threads, Lubricate the O-Ring, and Reseal the Head
Once all resin is loaded, carefully peel the protective tape or plug off the top of the riser tube so no beads sitting on the tape fall into the pipe. Use clean water and a soft brush to wash every stray resin bead out of the tank’s female threads and sealing rim. Apply a light coat of 100% food-grade silicone grease to the head O-ring, align the top manifold head over the riser tube, and thread the head on hand-tight.
- Checkpoint: Confirm the threads are completely free of gritty resin beads before tightening. Even a few trapped beads on the sealing surface can cut the O-ring, cause cross-threading, or create a persistent pressure leak.
Step 8: Run the Initial Freshwater Rinse Away from the RV
Connect your freshwater supply hose from the faucet to the softener Inlet port. Leave the softener Outlet port disconnected from your RV (or attach a short scrap hose directed into a bucket or approved drainage area). Turn on the water supply and flush the tank until the discharge water runs crystal clear.
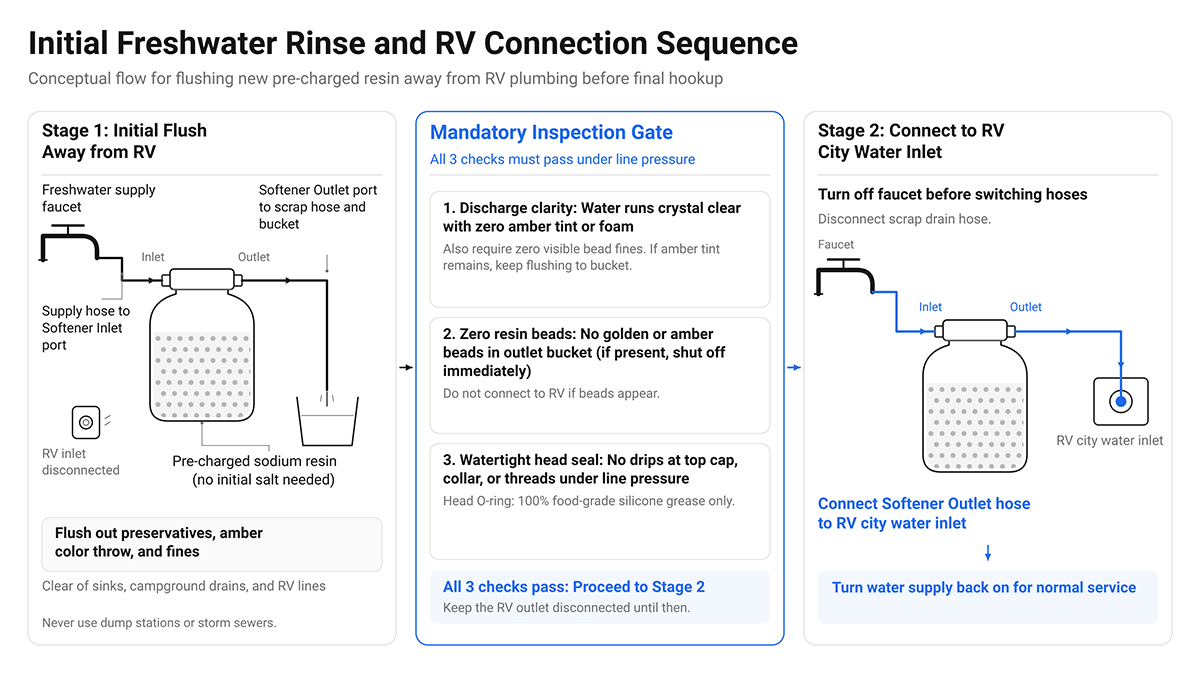
- Why This Matters: Fresh cation resin is pre-charged with sodium ions at the factory, so you do not need to add salt or run a brine regeneration cycle before first use. However, new resin contains food-grade manufacturing preservatives, color throw (an amber or yellowish tint), and microscopic bead fragments (fines) that must be flushed out before potable water enters your RV plumbing.
Post-Replacement Checklist and Troubleshooting
Before connecting your outlet hose to the RV city water inlet, verify every item in the table below:
| Inspection Point | What to Verify | Cause & Fix if It Fails |
|---|---|---|
| Outlet discharge clarity | Water exits crystal clear with zero amber tint, foam, or visible bead fines. | Cause: Incomplete initial flush. Fix: Keep flushing to a bucket away from the RV until all color throw disappears. |
| Zero beads in discharge water | No round golden or amber resin beads appear in the outlet bucket. | Cause: Uncapped riser tube during pouring or unseated bottom distributor basket. Fix: Shut off water immediately; do not connect to RV. Empty tank, inspect distributor basket for cracks, re-seat, cap tube, and reload. |
| Watertight head seal | No drips or weeping around the top cap, main head collar, or hose threads under line pressure. | Cause: Stray beads trapped in threads, dry/pinched O-ring, or cross-threaded head. Fix: Depressurize tank, unscrew head, brush threads clean, inspect O-ring, reapply food-grade silicone grease, and re-thread evenly by hand. |
Once the discharge water runs completely clear and all connections hold pressure without leaking, turn off the faucet, connect the softener outlet hose to your RV city water inlet, and turn the water supply back on (follow our guide on initial hose hookup and first-flush sequence for final line sanitation and pressure testing).
Frequently Asked Questions
Does new RV water softener resin need salt regeneration before its first use?
No. Replacement water softener cation resin is shipped from the factory fully pre-charged in the sodium form. You only need to run an initial freshwater rinse to flush out manufacturing preservatives and microscopic resin fines before connecting the unit to your RV.
Why must I tape the central riser pipe before pouring new resin?
The central distributor tube connects directly to the softener’s outlet port. If resin beads fall into the open top of that pipe while you are filling the tank, water pressure will push those loose beads straight into your RV plumbing lines, where they can clog faucet aerators, showerheads, toilet valves, and appliances.
Can I push the riser tube down if it floats up while loading resin?
No. Once resin beads settle around and underneath the bottom distributor basket, friction locks the bed in place. Forcing the pipe downward can crack the plastic distributor basket or damage the pipe. You must flush the resin back out into a clean bucket, seat the riser tube firmly in the bottom center cavity, and pour the media again.
Can I use Vaseline or petroleum jelly on the tank head O-ring?
No. Petroleum-based lubricants cause synthetic rubber and EPDM O-rings to swell, soften, and break down, leading to leaks. Always use 100% food-grade silicone grease.
How do I dispose of old, exhausted water softener resin?
Spent cation-exchange resin from residential and RV water softeners is non-hazardous solid waste. Drain the excess water, seal the beads in heavy-duty trash bags, and place them in regular household trash according to local disposal rules. Never dump resin down sinks, campground sewer hookups, or storm drains.