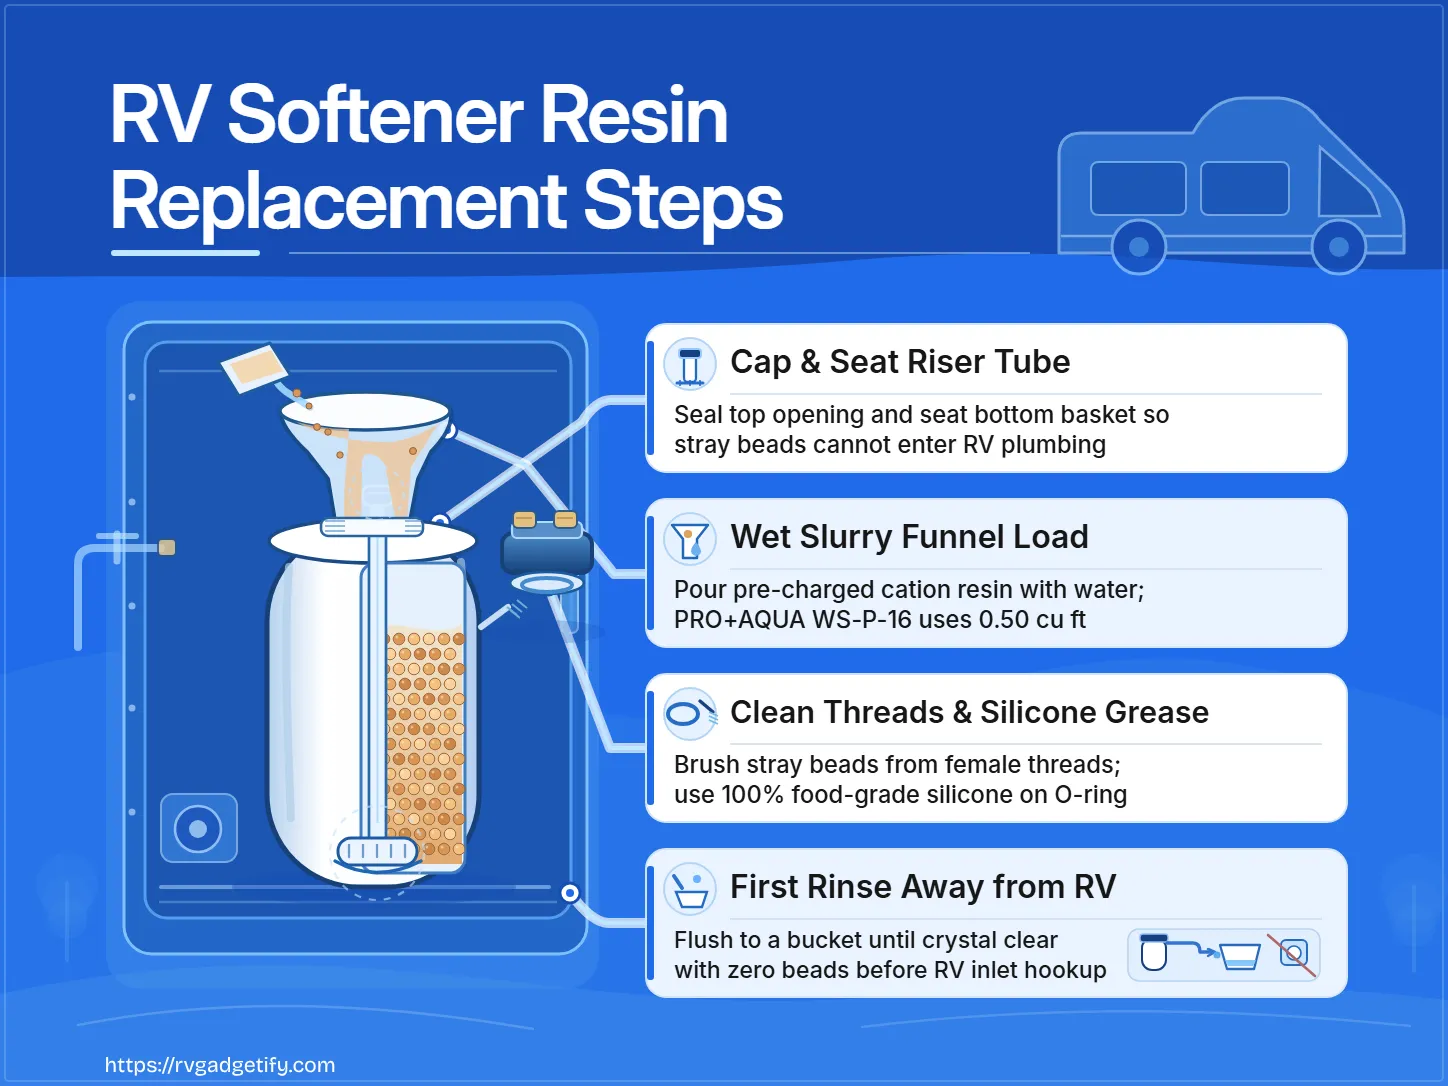
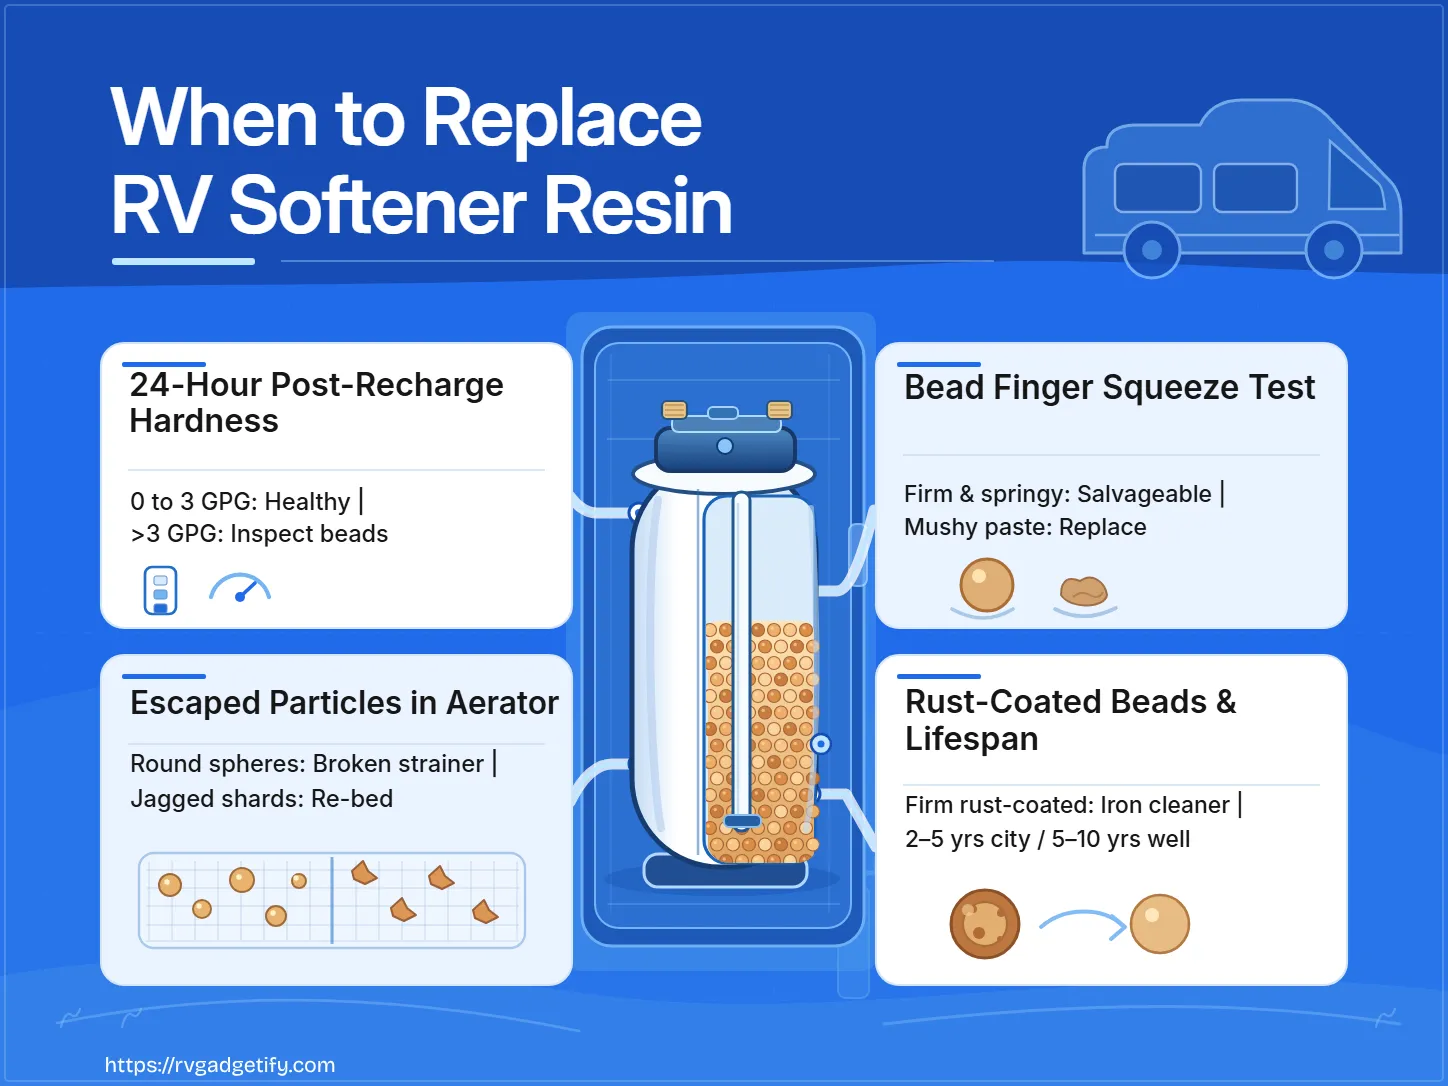

RV water softener resin needs replacement when output water remains hard shortly after a verified salt regeneration and a physical squeeze test confirms soft, mushy beads, or when shattered resin fragments escape into downstream fixtures. Because a single symptom does not prove media failure, run the ordered checks below before buying chemical cleaners or dumping the tank.
Cation exchange resin degrades over time from free chlorine exposure, hydraulic stress, mineral fouling, and normal mechanical wear. Testing output hardness, comparing flow on bypass, inspecting aerator debris, and squeezing a bead sample separates treatable iron fouling from irreversible polymer breakdown. When testing confirms failed media inside an intact, serviceable tank, re-bedding with high-capacity cation replacement resin restores softening capacity.
Key Takeaways
- Bypass immediately if beads escape: Shut off water and bypass the softener right away if yellow or amber beads appear in faucet aerators or showerheads to protect the RV water heater and toilet valves.
- Verify regeneration before condemning media: Test output hardness within 24 hours of a properly timed salt regeneration (on low gallon usage) to separate exhausted resin from an incomplete salt rinse.
- Run the finger squeeze test: Press a few beads between your thumb and forefinger to distinguish firm, salvageable resin from mushy, chlorine-oxidized media that must be replaced.
- Clean firm iron-fouled beads, replace soft ones: Use a dedicated resin iron cleaner only when rust-coated beads remain structurally firm; no chemical wash can rebuild broken polymer crosslinks.
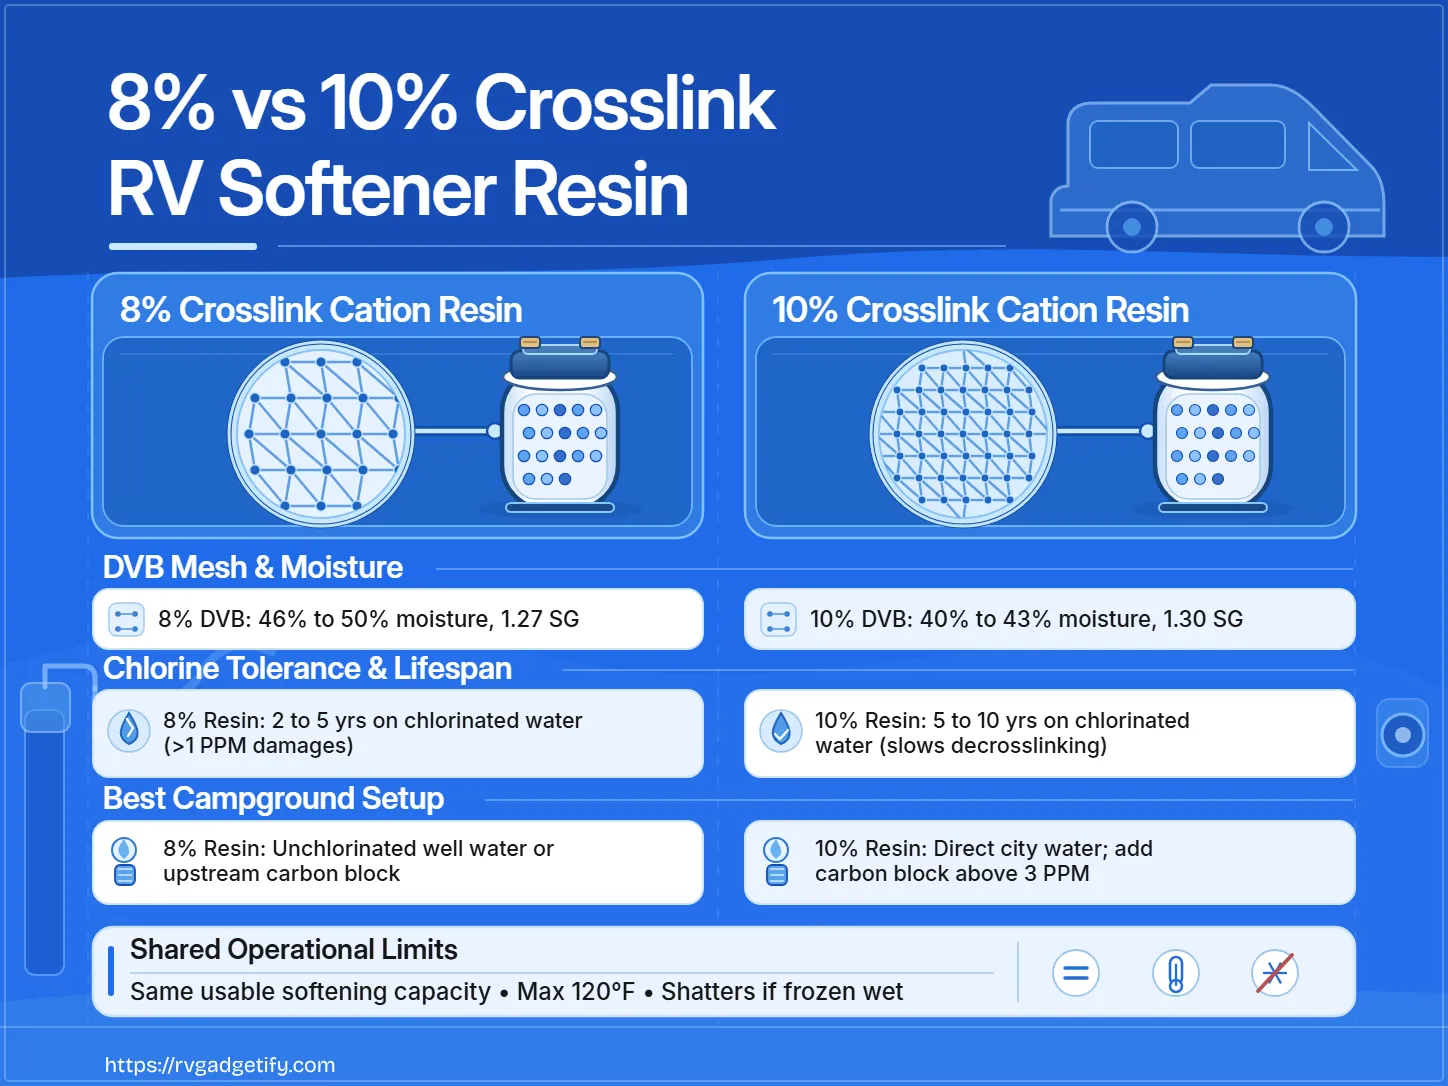
- Use calendar age as context, not proof: Standard cation resin typically lasts 2 to 5 years on chlorinated city water and 5 to 10 years on unchlorinated well water or behind a carbon pre-filter.
When Should You Stop and Isolate the Softener Immediately?
Stop diagnostic testing and isolate the softener immediately if resin beads appear in your RV plumbing, if sampled beads crush into paste, if the tank leaks, or if your only complaint is water odor. These conditions require immediate bypass, media replacement, or qualified service rather than regeneration or chemical flushing.
- Resin beads or fragments in fixtures: Shut off the water supply and switch the softener to bypass as soon as yellow or amber particles show up in faucet aerators or showerheads. Leaving the tank pressurized can flush thousands of beads into the RV water heater tank and toilet fill valves, requiring extensive plumbing disassembly.
- Beads that mash into jelly: Do not add salt or chemical cleaners if beads flatten into a soft paste during a finger squeeze test. Chlorine oxidation permanently breaks the polymer crosslinks that give beads their structure, and no regeneration cycle can reverse that damage.
- Rotten egg smell or water discoloration alone: Do not use resin cleaners to treat suspected bacterial contamination or drinking-water safety issues. Rotten egg odor typically stems from sulfate-reducing bacteria in the water source or RV water heater rather than failed softener resin, and it requires certified water testing.
- Leaking tank or uncertain chemical compatibility: Stop work and contact the softener manufacturer or a qualified RV technician if the pressure vessel shows cracks or leaks, or if you cannot confirm whether a chemical cleaner is safe for your unit’s seals and internal components.
How Do Symptoms Map to Resin Failure vs. Other Causes?
Before running physical checks, note your softener model, your primary water source (chlorinated municipal hookups vs. unchlorinated well water), and the exact symptom observed. Recording whether the unit has been exposed to campground chlorine or well-water iron narrows down whether you are dealing with surface mineral fouling, hydraulic bed compaction, or structural bead failure.
| Symptom | Possible cause | Distinguishing check | Supported action | Expected result | Stop condition |
|---|---|---|---|---|---|
| Hardness breakthrough shortly after verified salt regeneration | Loss of ion-exchange capacity from chlorine decrosslinking or severe surface fouling | Compare feedwater and output hardness within 24 hours of a verified salt recharge on low gallon usage | If output exceeds 3 GPG shortly after recharge, inspect and squeeze-test beads; replace resin if soft | Healthy regenerated resin reduces output to 0 to 3 GPG; persistent hardness after cleaning confirms expired media | Adding repeated heavy salt doses after squeeze testing confirms mushy, decrosslinked beads |
| Severe water pressure drop across the softener tank | Swollen, decrosslinked beads compressing tightly under line pressure, or surface silt matting the bed | Compare fixture flow rate with two RV faucets open while the softener is in-line versus on bypass | Briefly backwash to clear surface silt; if flow drops again immediately in service, squeeze-test beads for swelling | Flow stays normal if surface sediment was the cause; recurring restriction plus soft beads confirms bed breakdown | Running an onboard RV water pump against a severely restricted softener bed, which can overheat the pump head |
| Yellow or amber resin particles in faucet aerators or showerheads | Cracked distributor riser tube, broken bottom basket, or aged beads shattering into fine shards | Inspect trapped aerator debris to see if particles are intact round spheres or jagged fragments | Bypass softener immediately, flush cold-water RV lines, and open the head to inspect the riser pipe, basket, and resin | Intact escaped spheres point to a damaged distributor component; fine jagged shards point to shattered resin needing re-bedding | Leaving water pressure on while beads or fines are escaping into the RV water heater and valves |
| Sampled beads flatten into mushy paste under finger pressure | Advanced oxidative decrosslinking from free chlorine in municipal water supplies | Depressurize tank, remove the top cap or head, and press a pinch of beads between thumb and forefinger | Replace the resin bed completely; skip salt regeneration and chemical resin cleaners | Intact beads feel firm and springy; oxidized beads feel slippery and crush into paste | Pouring acid or iron cleaners into a tank filled with structurally mushy resin |
| Beads coated in dark brown or rust-orange film | Clear-water ferrous iron oxidizing onto bead surfaces and blocking exchange sites | Confirm well-water iron exposure and squeeze-test beads to verify they remain hard beneath the rust film | Treat the bed with a manufacturer-approved resin iron cleaner (reducing agent), then regenerate and retest hardness | Surface iron dissolves and output returns to 0 to 3 GPG without requiring a full re-bed | Applying chemical iron cleaner to beads that are soft, cracked, or mushy |
Use this table as an ordered filter: rule out regeneration mistakes and surface silt first, inspect debris geometry if particles escaped, and rely on the physical bead squeeze test before buying replacement resin or chemical cleaners.
How Long Does RV Water Softener Resin Typically Last?
Portable RV water softener resin typically lasts 2 to 5 years when connected regularly to chlorinated municipal water and 5 to 10 years on unchlorinated well water or behind a dedicated carbon pre-filter. Actual service life depends on cumulative chlorine exposure, ambient heat, and regeneration habits rather than calendar age alone.
- Chlorinated campground water accelerates breakdown: Free chlorine and chloramines in municipal water attack the divinylbenzene crosslinks that hold polystyrene resin beads rigid. Without a carbon pre-filter upstream of the softener, frequent city-water camping commonly shortens resin life to the 2 to 5 year range.
- Unchlorinated water or carbon pre-filtration extends life: When feedwater is free of oxidants, either on private well water or behind an active carbon filter, the polymer matrix avoids chlorine oxidation and commonly lasts 5 to 10 years.
- Combined operating stresses wear down beads: Inside a portable tank, resin faces repeated pressure changes, chlorine and chloramine oxidation, particulate and organic fouling, osmotic swelling and shrinking during salt regeneration, and mechanical friction between beads. Because these stresses compound over time, always test performance and bead firmness rather than replacing resin strictly by calendar age.
Which Safe Diagnostic Checks Should You Run First?
Start with low-risk external checks before opening the softener tank. Working from regeneration verification to a tactile bead check prevents unnecessary teardown when the real problem is an incomplete salt cycle.
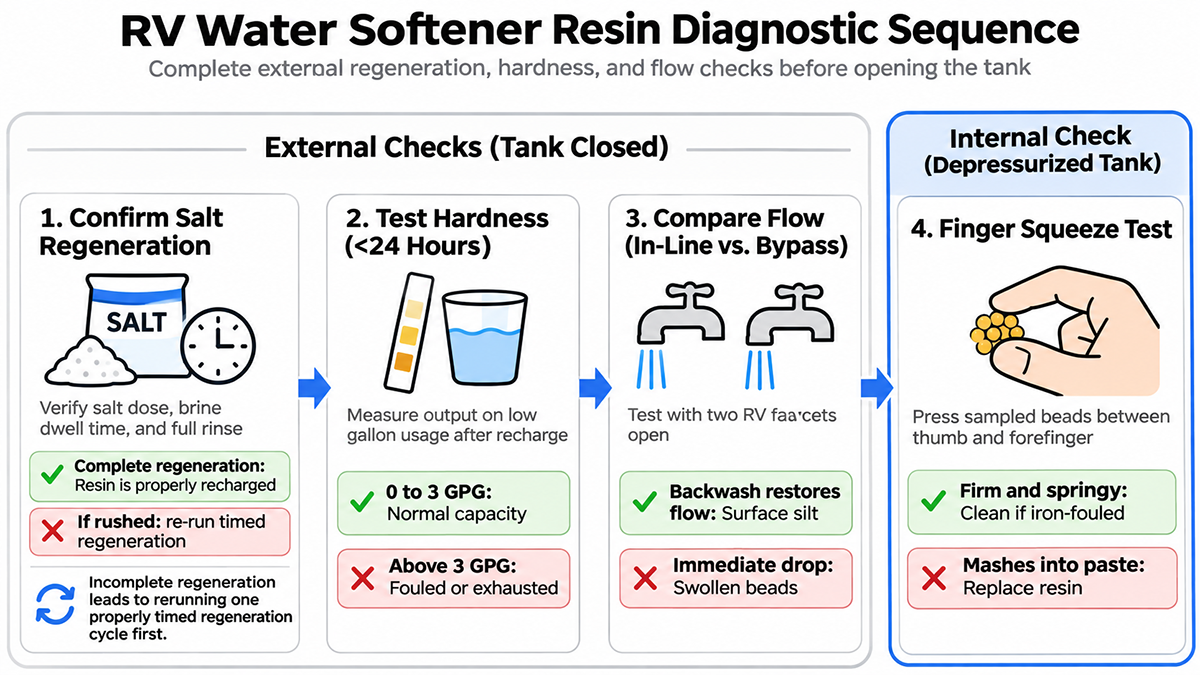
1. Confirm a Complete Salt Regeneration
Verify that the most recent regeneration used the correct salt quantity and allowed full brine dwell time and rinsing as specified in your softener manual. If the brine rinsed through too fast or salt failed to dissolve completely, run one properly timed regeneration cycle before blaming the resin bed.
2. Test Output Hardness Within 24 Hours of Recharge
Measure both incoming feedwater hardness and softened output water within 24 hours of a verified regeneration, while total gallon usage is still low. Softened output should drop to 0 to 3 GPG; readings above 3 GPG shortly after recharge indicate that the resin bed can no longer hold calcium and magnesium ions, either from surface fouling or structural exhaustion.
3. Compare Flow Rate In-Line Versus on Bypass
Open two RV fixtures and compare water flow with the softener connected in-line against flow with the unit bypassed. A steep pressure drop across the softener tank points to either surface sediment matting the top of the bed or swollen, decrosslinked beads compressing under water pressure. If a brief backwash clears the restriction and flow remains steady, sediment was the culprit; if pressure drops again immediately, inspect the beads.
4. Depressurize and Squeeze-Test a Bead Sample
Shut off the water supply, open a faucet to relieve pressure, remove the softener head or fill cap, and pull a small pinch of resin from the top of the bed. Press a few beads firmly between your thumb and forefinger:
- Healthy beads feel firm, smooth, and resilient, resisting finger pressure without flattening.
- Chlorine-damaged beads feel soft or spongy and mash easily into a jelly-like paste.
What Do Escaped Resin Beads in Aerators Mean?
Resin particles trapped in faucet aerators or showerheads mean media is leaving the tank and entering your RV plumbing, which requires immediate isolation followed by debris inspection. The shape and size of the trapped particles help distinguish a broken internal strainer from shattered resin media.
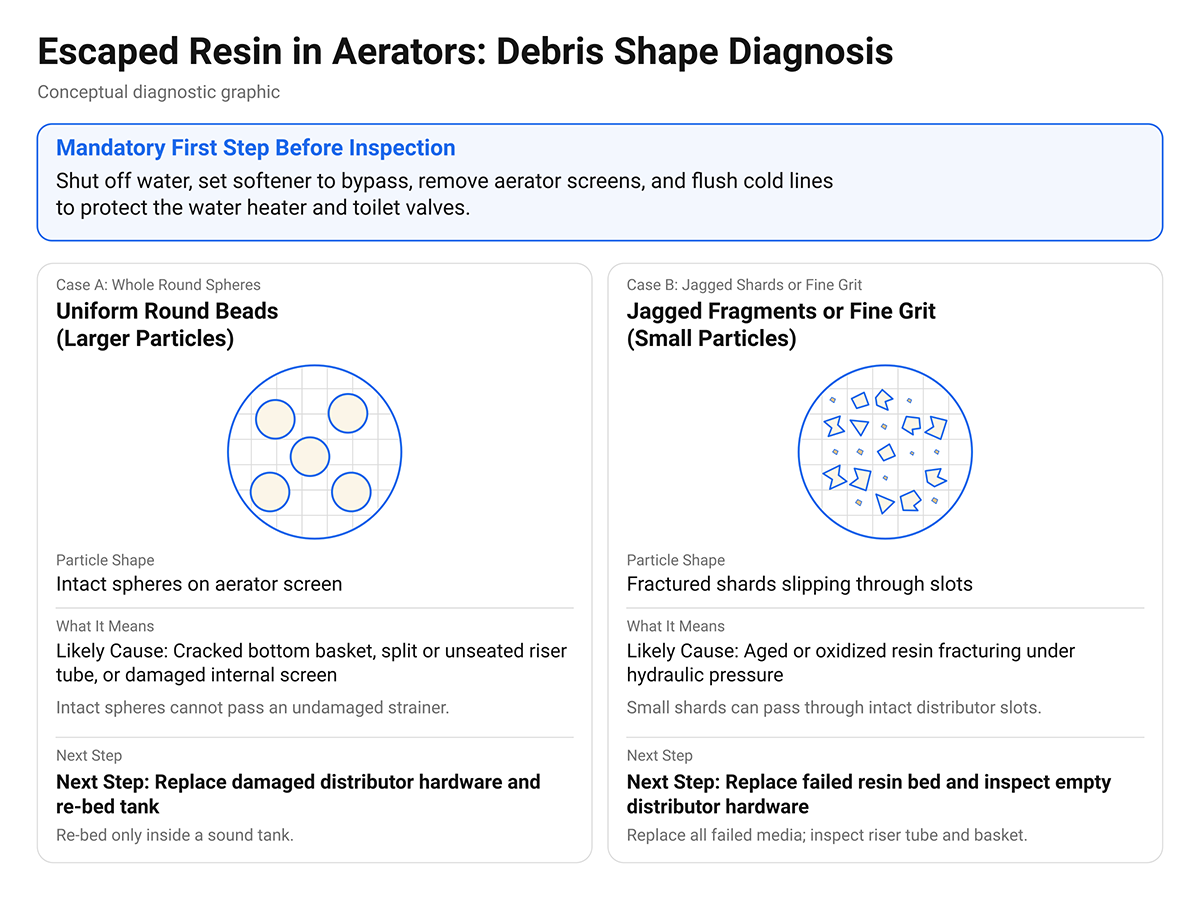
- Bypass and flush cold lines first: Turn off the water supply, place the softener on bypass, remove aerator screens, and flush cold-water lines so trapped beads do not migrate into the water heater or toilet valves.
- Check whether particles are whole spheres or fine shards:
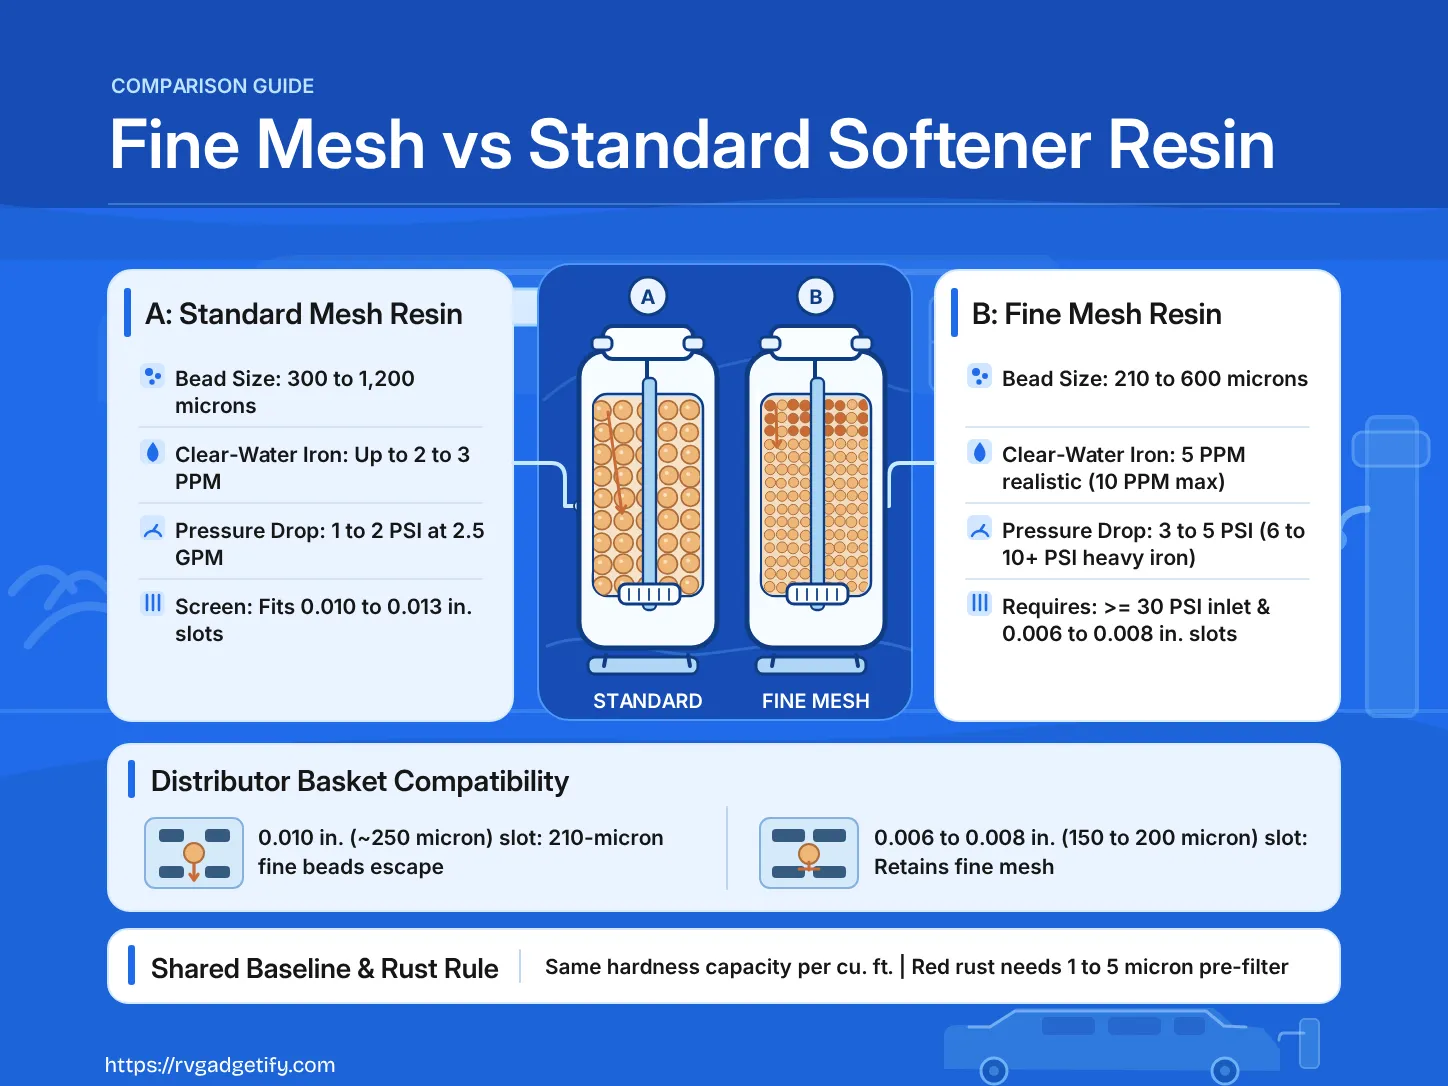
- Uniform round beads (larger particles): Intact resin spheres should not pass through an undamaged strainer. Whole beads in aerators point to a cracked bottom distributor basket, a split or unseated central riser tube, or damaged internal screens.
- Jagged fragments or fine amber grit (small particles): Aged or oxidized resin beads can fracture under hydraulic pressure into fine shards small enough to slip through intact distributor slots. Fine debris indicates that the resin media itself has broken down and needs replacement, though you should still inspect the riser tube and basket while the tank is empty.
Can Iron-Fouled Resin Be Cleaned Instead of Replaced?
Iron-fouled resin can be restored with a chemical cleaner only when the beads remain structurally firm beneath the mineral coating. Because surface iron blocks ion-exchange sites without severing polymer crosslinks, the finger squeeze test determines whether cleaning is worth attempting.
- Confirm bead firmness before buying cleaner: Extract a sample of the rust-colored or dark brown beads and squeeze them between your fingers. If the beads are firm, proceed with cleaning; if they crush into paste, skip chemical treatment and replace the resin.
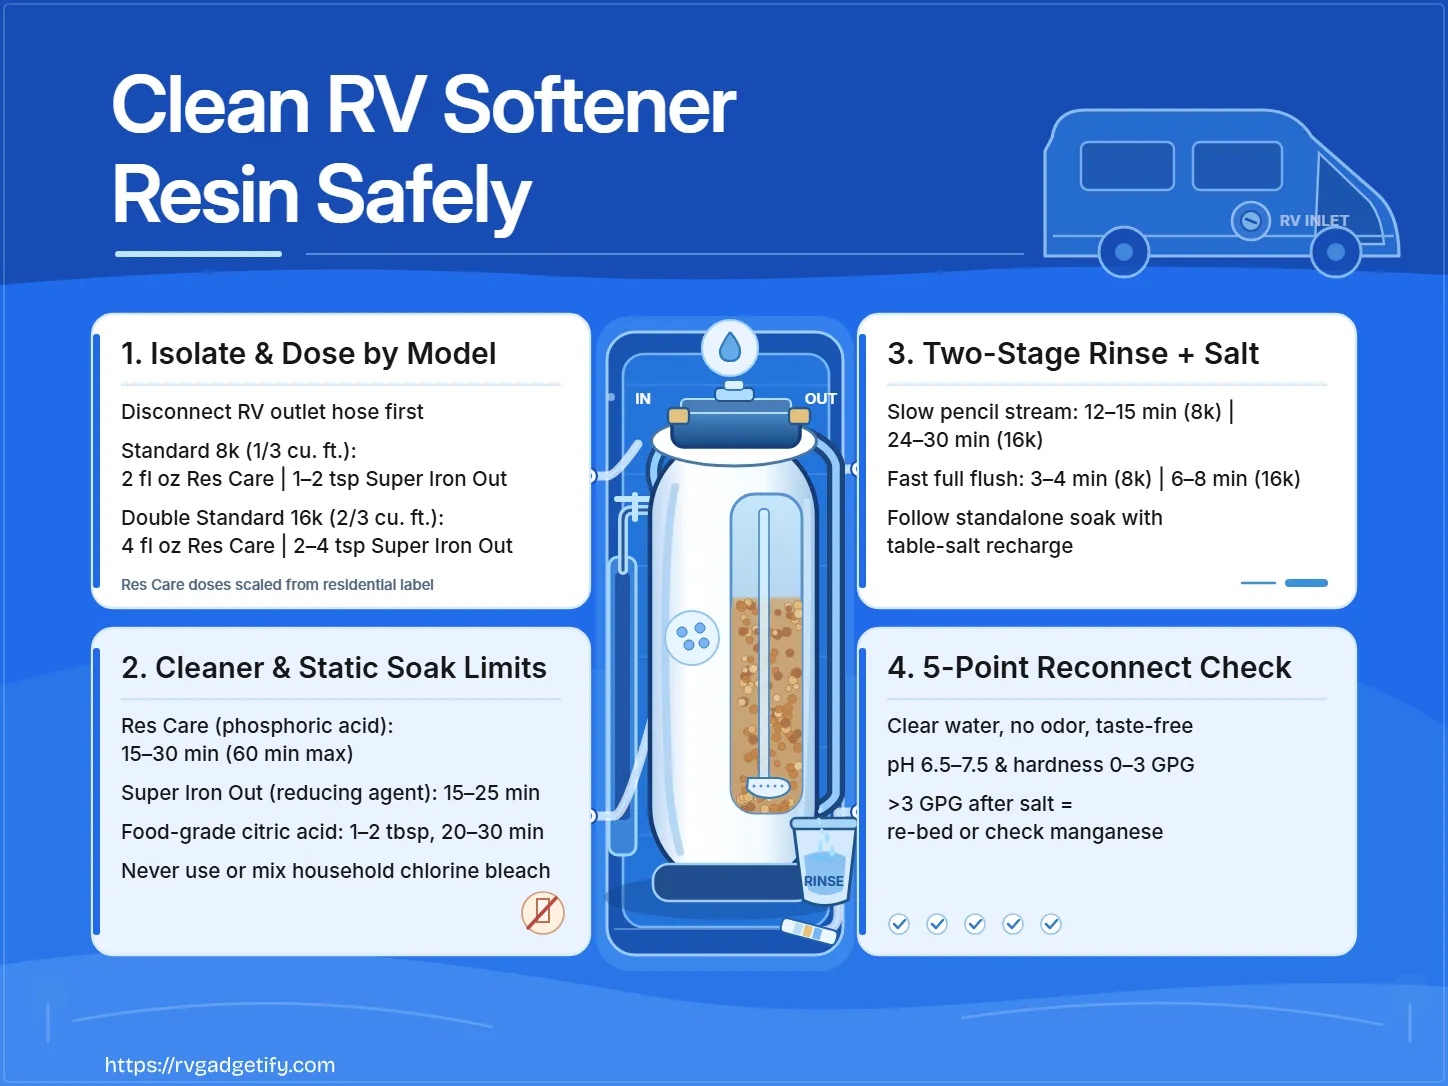
- Apply a dedicated resin iron cleaner: Use a specialized water softener iron cleaner (reducing agent) according to the product and softener manufacturer instructions to dissolve oxidized iron from the bead surfaces, then complete a full salt regeneration and rinse.
- Verify recovery with a before-and-after hardness test: Test output water hardness before treatment and again within 24 hours after the post-cleaner regeneration. A drop back to 0 to 3 GPG confirms that iron fouling was the problem and the bed is restored; persistent hardness above 3 GPG means the media has lost capacity and needs replacement.
When Should You Replace the Resin vs. Call for Service?
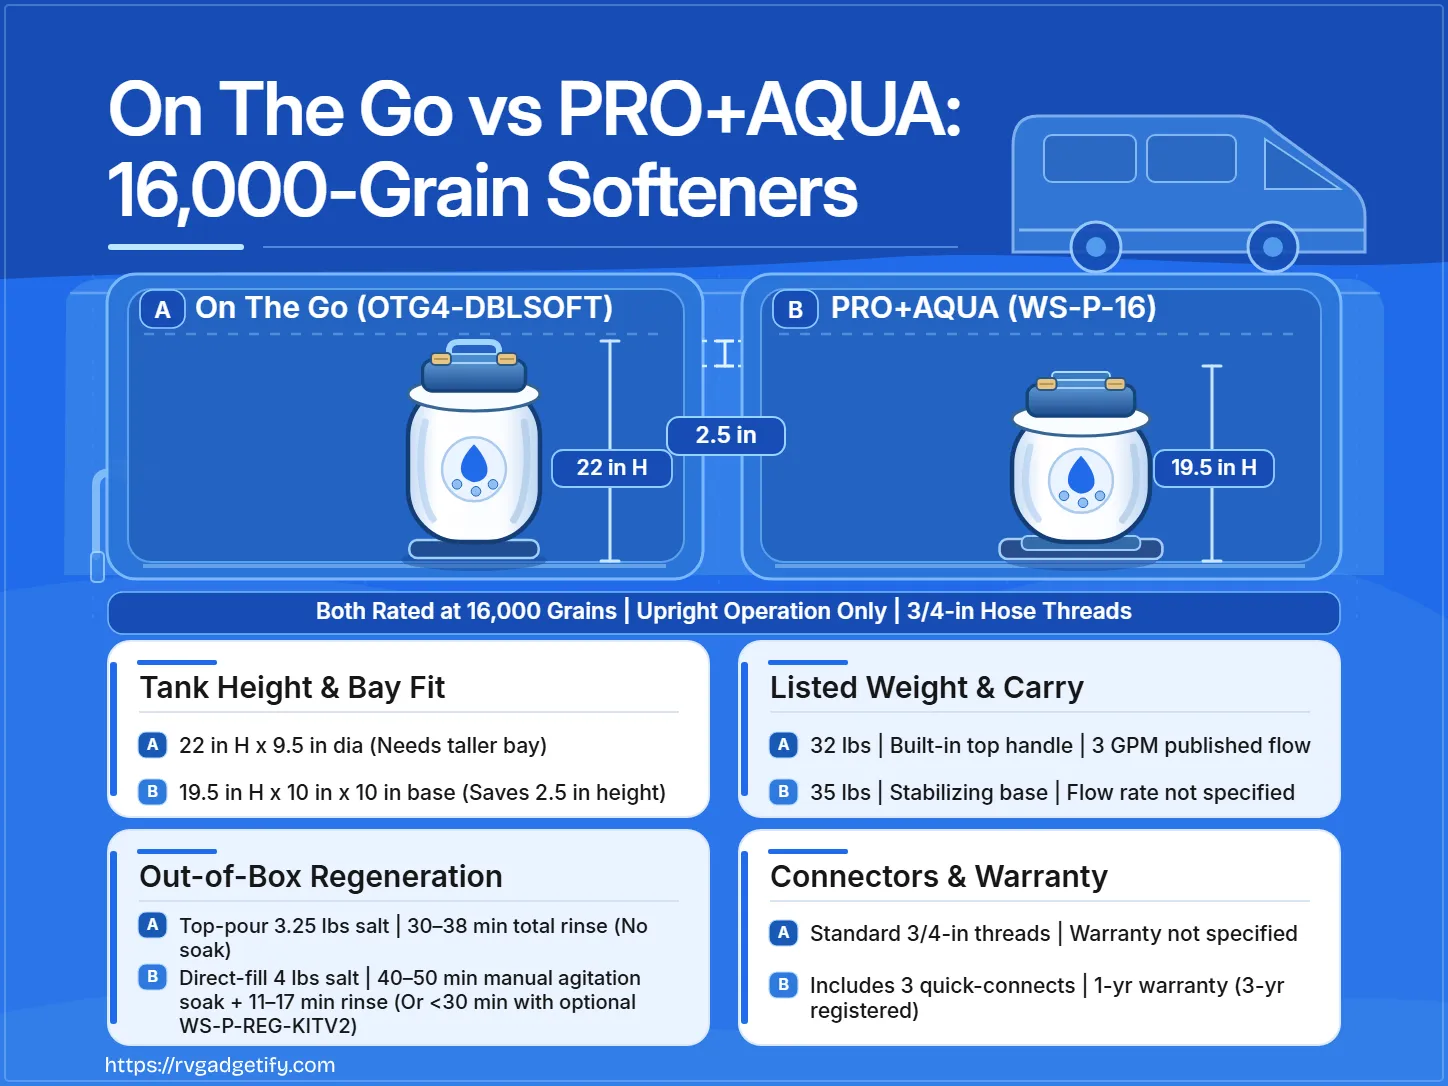
Base your final repair decision on the physical state of the beads, the condition of the internal distributor hardware, and whether the tank itself is serviceable (if physical tank damage accompanies media failure, evaluate replacement portable RV water softener models).
RVGadgetify / Water System Diagnostics
RV Water Softener Resin Diagnostic & Action Decision Tool
Diagnose hard water after salt recharge, pressure loss, iron-coated beads, and resin escaping into RV fixtures. Critical tank, water-quality, and media failures take priority over regeneration or cleaning.
Before diagnosing: If a tank is cracked or leaking, chemical compatibility is uncertain, or resin particles are reaching fixtures, follow the immediate stop path. Do not run an onboard pump against a severely restricted resin bed.
Ordered Action Steps
Verification Endpoint
Diagnostic Interpretation
Stop Conditions & Service Boundaries
Verify Diagnostic Logic (Built-in Self-Tests)
Run representative safety, regeneration, flow, hardness, and replacement checks. Your live inputs and results remain unchanged.
- Re-bed the tank with new resin when your softener has a removable head or fill port, the tank shell and distributor assembly are intact, and testing shows either mushy beads or persistent hardness breakthrough (>3 GPG) after iron cleaning and verified regeneration.
- Replace the distributor assembly and re-bed when whole resin beads escaped into fixtures and inspection reveals a cracked riser pipe or broken bottom basket inside an otherwise sound tank.
- Stop and contact the manufacturer or a technician if the pressure vessel is cracked or leaking, if you suspect unsafe drinking water, or if chemical compatibility with your unit’s internal seals is unclear.
Conclusion: Take This Next Step
If you have spotted amber beads in a faucet aerator, bypass the softener immediately and check whether the debris consists of whole spheres or shattered fines. Otherwise, verify a complete salt regeneration, test output hardness, and run the finger squeeze test on a small sample of beads to decide between an iron-cleaner flush and a full resin replacement.
Frequently Asked Questions
Is household chlorine bleach safe for cleaning softener resin?
No. Household chlorine bleach is a strong oxidizer that breaks down the divinylbenzene crosslinks in cation resin beads, causing them to swell, turn mushy, and permanently lose softening capacity. Never pour bleach into a resin bed to clean fouled media.
Why does water test hard right after salt regeneration?
When a properly timed salt regeneration fails to bring output water down to 0 to 3 GPG even on low gallon usage, the resin bed has lost its active exchange capacity. Either severe iron fouling is blocking the bead surfaces or chlorine oxidation has destroyed the polymer structure so the bed can no longer hold calcium and magnesium ions.
Does low water pressure prove the resin has gone bad?
Not by itself. While swollen, decrosslinked resin beads can pack tightly under line pressure and choke water flow, surface silt or sediment trapped at the top of the tank can cause a similar restriction. Compare flow on bypass, backwash the unit if supported, and squeeze-test a bead sample to confirm whether the media has softened.