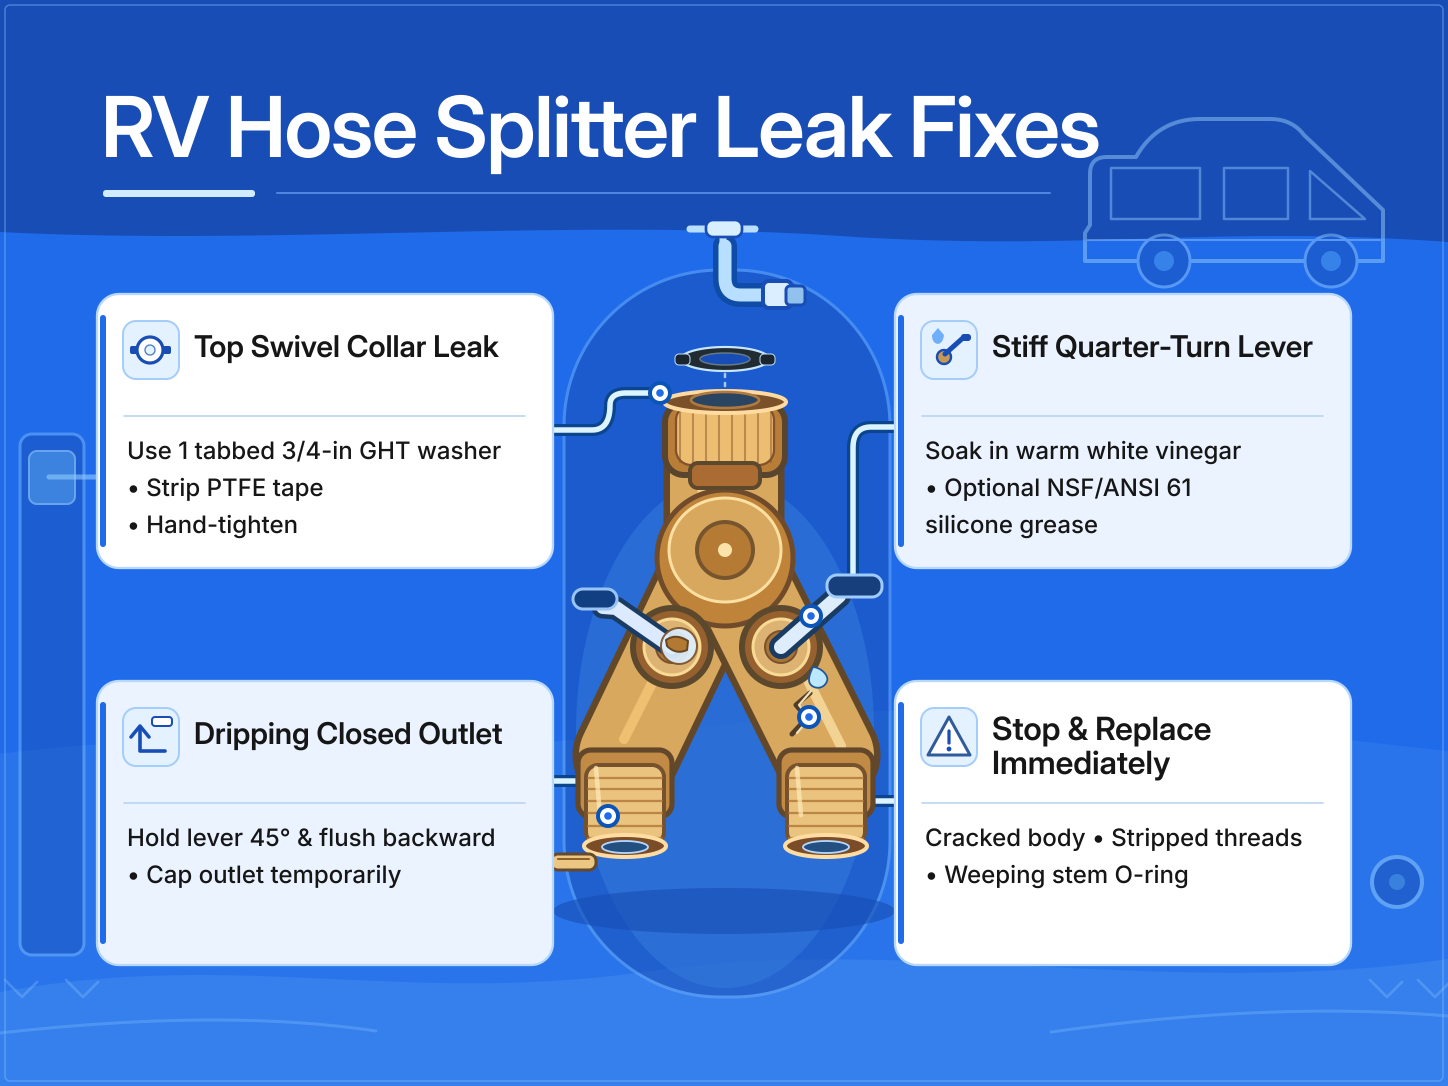

Most RV hose splitter leaks start at the top female swivel collar, where a missing, flattened, hardened, or grit-fouled rubber washer prevents a watertight seal against the campground spigot. Wrapping PTFE (Teflon) thread tape onto straight garden-hose threads is another frequent trigger, because bunched tape can stop the collar from threading far enough to compress the washer.
The right fix depends on where water escapes or how the valve behaves. Seepage at the top collar calls for a washer swap and thread cleanup, a stiff quarter-turn lever points to hard-water mineral scale, a dripping closed outlet points to trapped sediment or a worn internal seat, and a cracked housing or stripped thread requires immediate replacement.
Key Takeaways
- Stop and replace the splitter if the brass, zinc, or plastic body is cracked, the threads are stripped, the female swivel collar wobbles, or a seized lever will not move after descaling.
- Fix collar leaks with a fresh 3/4-inch GHT washer, not by cranking the coupling tighter with pliers.
- Remove PTFE tape from straight garden-hose threads (GHT) so the female collar can pull the flat rubber washer squarely against the spigot face.
- Soak a scale-stiffened metal splitter in warm white vinegar rather than forcing a stuck quarter-turn handle with a wrench.
- Use only potable-water-safe materials on your fresh water hookup; never spray petroleum-based penetrating oils such as WD-40 into an RV drinking-water fitting.
Symptom Triage: Locate the Leak and Match the Fix
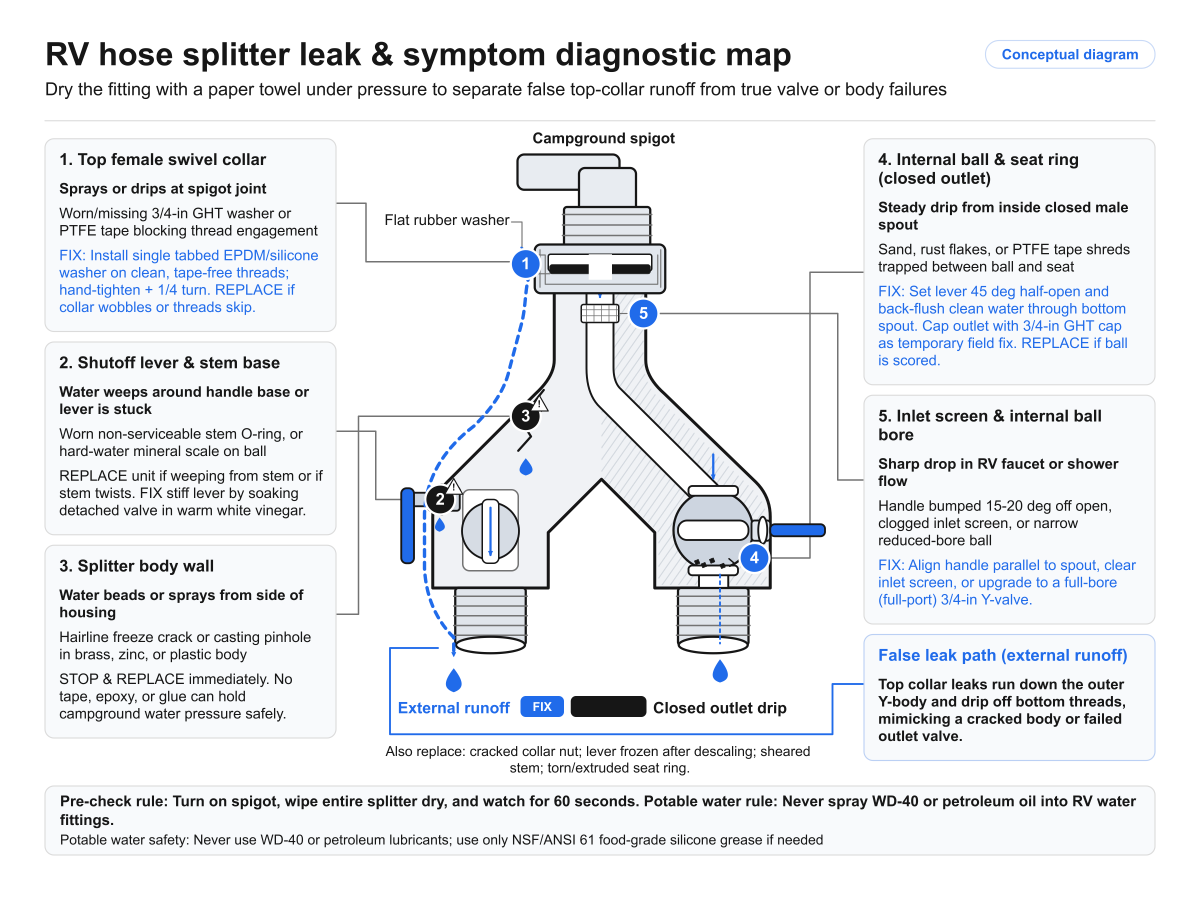
Before unscrewing the splitter, turn on the campground spigot, dry the outside of the fitting with a paper towel, and watch where water first appears. Water spraying from the top swivel collar often runs down the outside of the Y-body and drips off the bottom threads, making a simple washer leak look like a cracked housing or a failed outlet valve.
| Symptom | Plausible Cause | First Safe Check | Recommended Action | Stop and Replace Condition |
|---|---|---|---|---|
| Water sprays or drips around the top female swivel collar | Missing, flattened, hardened, or split rubber washer; PTFE tape blocking thread engagement; nicked spigot rim | Shut off water, remove the splitter, and inspect the washer and male spigot threads | Remove any PTFE tape from straight hose threads, install a tabbed EPDM or silicone hose washer, and hand-tighten | Threads are stripped, the collar wobbles excessively, or the collar nut is cracked |
| Quarter-turn shutoff lever is stiff or stuck | Hard-water calcium or magnesium scale buildup around the internal ball and stem | Test whether the lever moves smoothly by hand with water pressure relieved | Soak the detached splitter in warm white vinegar to dissolve mineral scale, then rinse thoroughly with clean water | Lever remains frozen after descaling, or the stem twists without turning the internal ball |
| Closed outlet continues to drip while the other side is pressurized | Sand, rust flakes, or shredded PTFE tape trapped between the internal ball and its seat | Confirm the drip comes from inside the closed male spout rather than running down from the top collar | Disconnect the splitter, hold the valve half-open, and flush clean water backward through the outlet while cycling the lever | Outlet continues to drip under pressure after flushing, indicating a scored ball or degraded internal seat |
| Water weeps around the base of the shutoff lever | Worn or dry internal stem O-ring or packing seal | Dry the area behind the handle and open the spigot to see if water wells up around the stem | Replace the splitter (most consumer Y-valves have non-serviceable pressed stems) | Persistent weeping from the valve stem under normal water pressure |
| RV faucet or shower flow drops noticeably after installing the splitter | Partially closed splitter lever, clogged inlet screen, or narrow reduced-bore internal ball passage | Confirm the lever is fully parallel with the outlet and check flow with the splitter bypassed | Clear any inlet screen debris, or upgrade to a full-bore (full-port) 3/4-inch Y-valve if the splitter body is the bottleneck | Internal ball fails to open fully when the handle turns |
| Water beads or sprays through the side of the splitter body | Hairline freeze crack or casting pinhole | Dry the body and inspect the housing seams under pressure | Shut off the spigot and replace the splitter | Any crack, split, or pinhole in a brass, zinc, or plastic housing |
When to Stop and Replace the Splitter Immediately
Not every leaking splitter can or should be repaired. Stop troubleshooting and replace the unit whenever you find structural or mechanical damage:
- Cracked brass, zinc, or plastic housing: Water trapped inside a splitter during an overnight freeze expands and can split plastic housings or open hairline cracks in metal castings. No tape, epoxy, or glue will safely hold campground water pressure on a cracked valve body.
- Stripped threads or a wobbling swivel collar: Heavy hoses, inline water filters, and brass pressure regulators hanging directly off a splitter without strain relief can deform threads or pull the top swivel collar out of round. Once threads skip or the collar rocks under pressure, a new washer will not hold.
- Sheared or bent valve stem: Forcing a seized quarter-turn handle with pliers or channel locks can snap the narrow valve stem or strip the handle spline, leaving the internal ball permanently stuck open or closed.
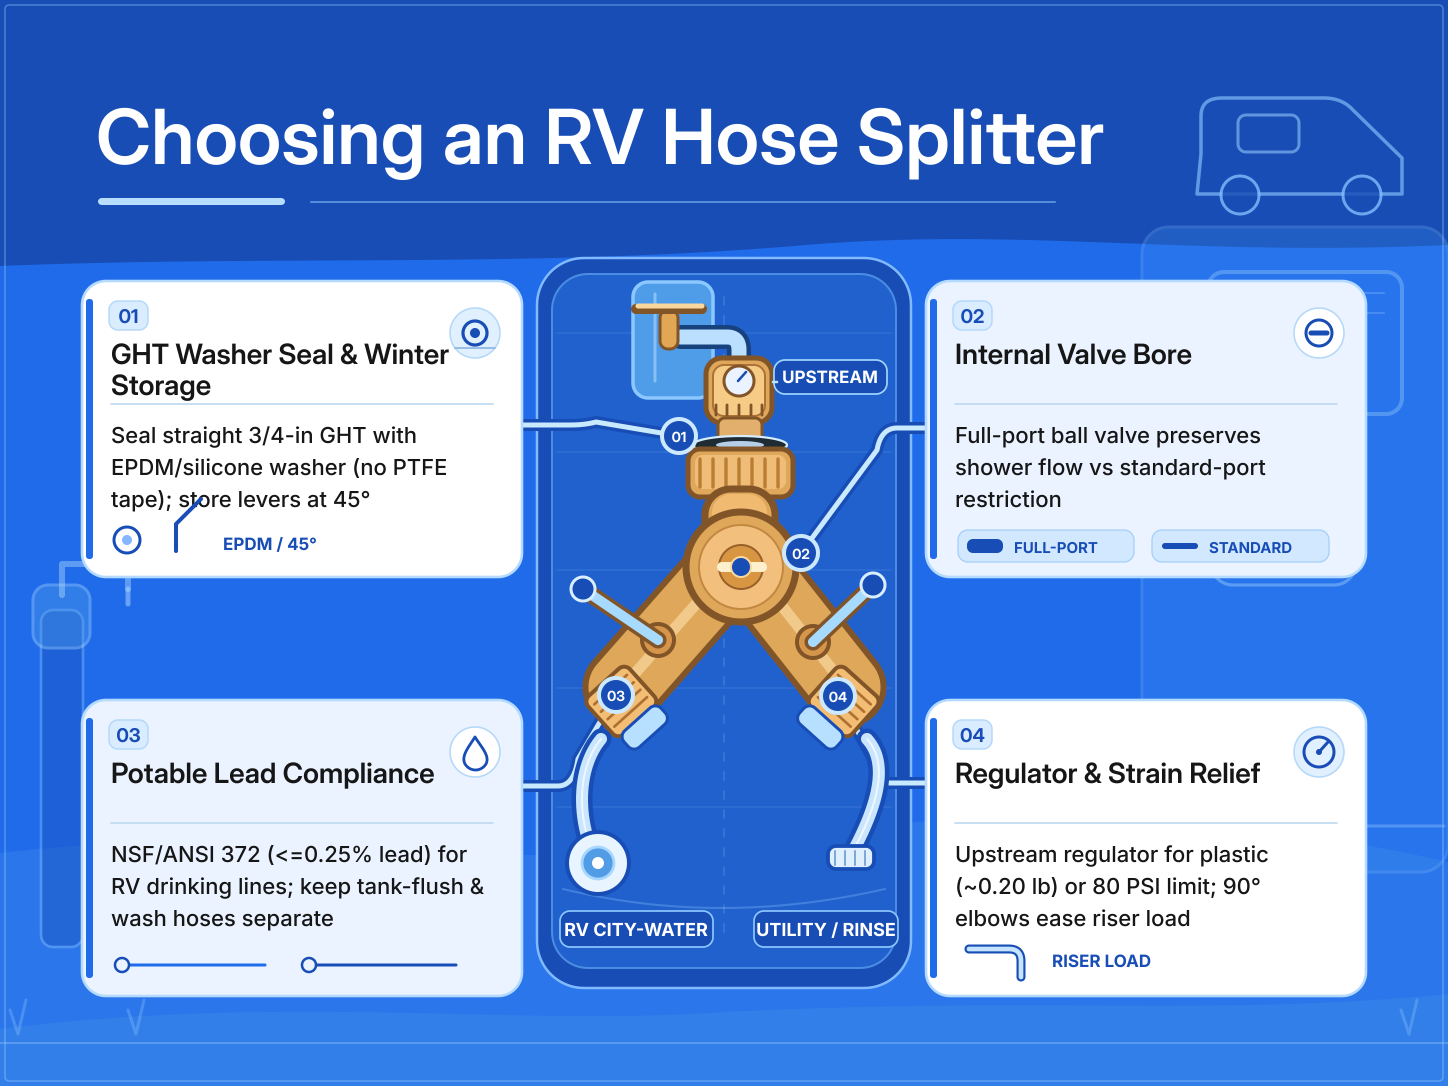
- Potable-water contamination or corrosion: If an older splitter has heavy internal corrosion, flaking plating, or has been sprayed with petroleum-based lubricants, retire it from your fresh water line. When buying a replacement for an RV drinking-water hookup, select a fitting rated for potable water (such as lead-free brass compliant with NSF/ANSI 61 or NSF/ANSI 372, or a potable-rated polymer unit).
Fix 1: Stop a Leaking Female Swivel Collar
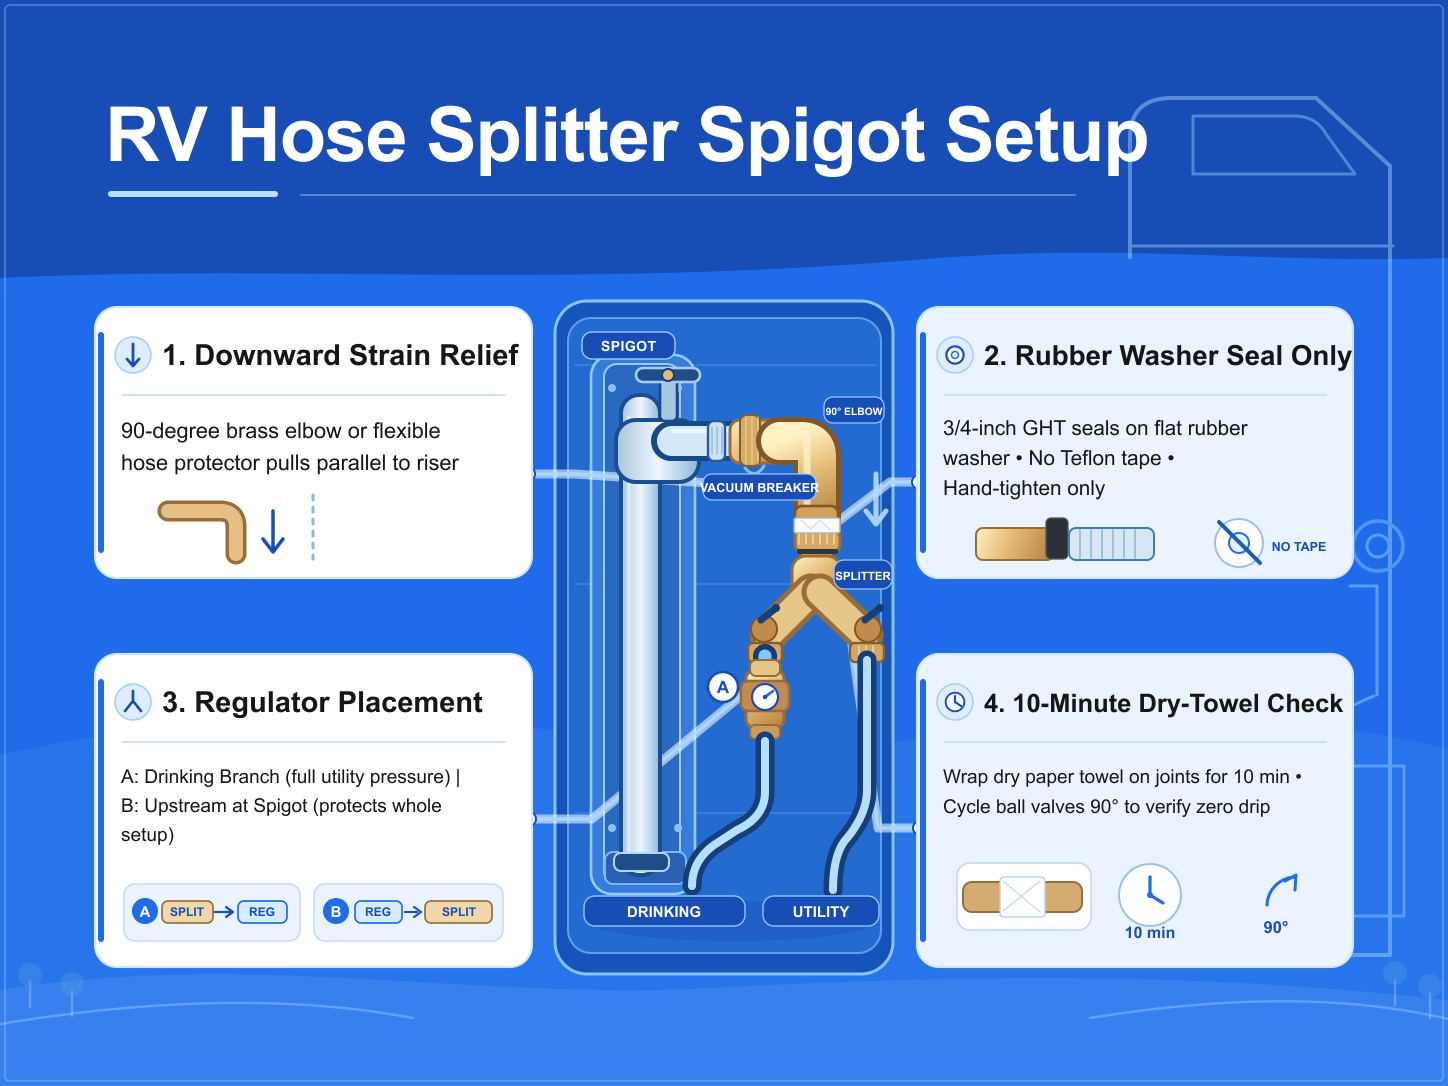
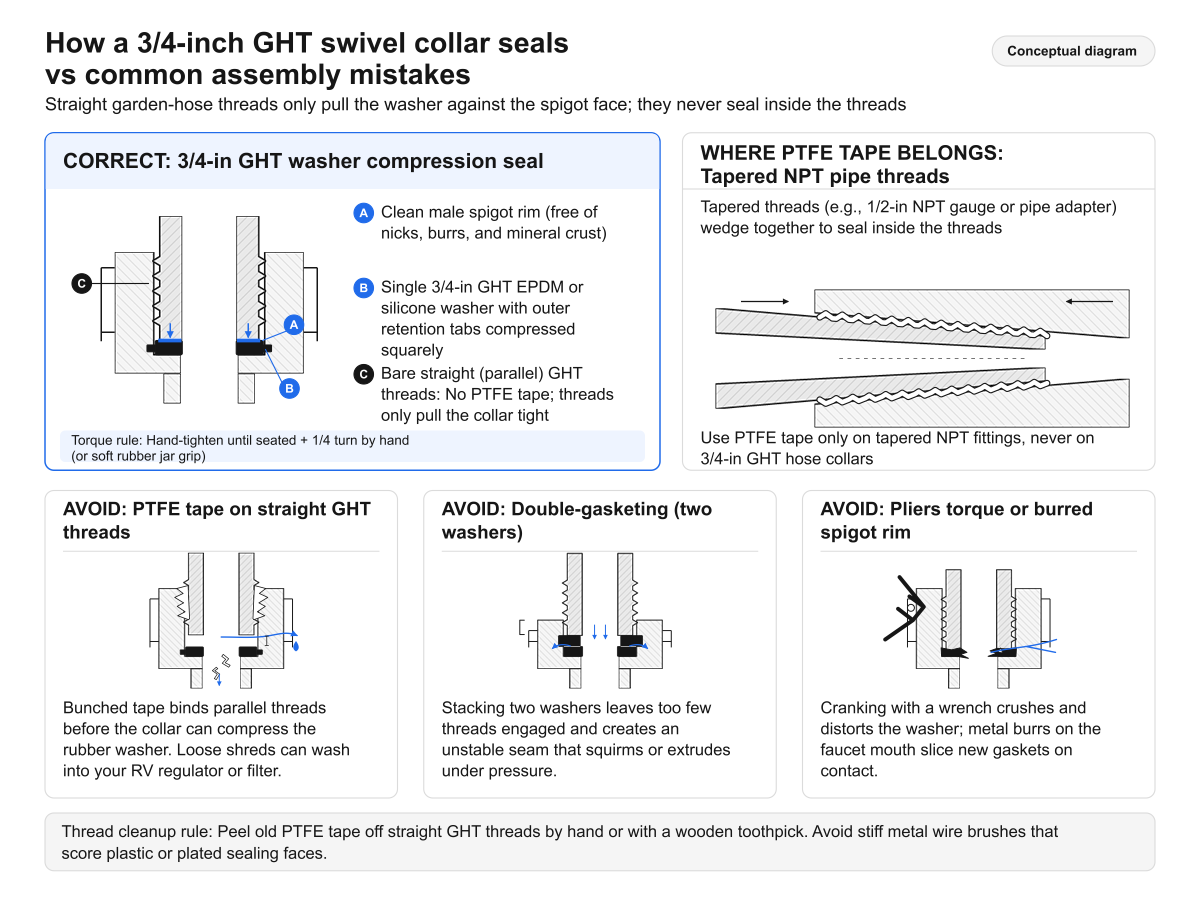
A leak at the top swivel collar is almost always a gasket-seating problem rather than a thread-sealing problem. Standard North American garden-hose fittings use 3/4-inch Garden Hose Thread (GHT), which is a straight (parallel) thread. Unlike tapered plumbing pipe threads, straight GHT threads do not seal against each other; their only job is to pull the flat rubber washer inside the female collar tightly against the flat rim of the male spigot spout.
- Shut off the spigot and relieve pressure: Turn the campground faucet clockwise until it stops, then open one of the splitter’s shutoff levers to bleed trapped water pressure before unscrewing the top collar.
- Remove the old washer and inspect the seat: Pry out the rubber washer inside the female swivel collar. Replace the washer if it is flattened, hard, brittle, split, or coated in sand. A 3/4-inch GHT EPDM rubber washer (or a soft silicone hose washer) with small outer retention tabs is easiest to use because the tabs hold the gasket flat against the collar floor and keep it from falling out in your tool bag. Do not stack two washers in one collar; double-gasketing leaves too few threads engaged and allows the washers to squirm out of place under pressure.
- Strip all PTFE (Teflon) tape off straight hose threads: If someone previously wrapped white PTFE tape around the campground spigot or the splitter’s male GHT outlets, peel it off completely by hand or with a wooden toothpick. On straight GHT connections, bunched PTFE tape can bind the collar before the rubber washer compresses, and loose tape shreds can wash downstream into your RV pressure regulator or water filter. Avoid scraping plastic or plated threads with a stiff metal wire brush, which can score the sealing face. (Note: Use PTFE tape only if your setup includes a separate tapered pipe adapter, such as a 1/2-inch NPT fitting, where the threads themselves form the seal.)
- Check the campground spigot face: Run a finger carefully around the mouth of the campground faucet. Nicks, metal burrs, or crusty mineral deposits on the spigot rim can slice a brand-new washer the moment you tighten the collar. Wipe away loose grit, and if the spigot sits too close to a post or utility wall for the splitter collar to thread on straight, attach a short flexible hose saver or a 45-degree brass elbow first.
- Hand-tighten only: Thread the female swivel collar onto the spigot by hand until the washer contacts the spout face, then turn the collar roughly an extra quarter turn by hand (or with a soft rubber jar grip). Do not crank the collar with pliers or a pipe wrench; excess torque crushes and distorts the rubber washer, turning a minor drip into a sideways spray.
Fix 2: Free a Stiff or Stuck Quarter-Turn Lever
Quarter-turn ball valves rely on a drilled sphere rotating smoothly inside the splitter body. When hard campground water evaporates inside the valve between trips, calcium and magnesium carbonate scale crusts onto the ball and stem, making the lever stiff or difficult to turn.
- Never force a stuck lever with pliers: Applying wrench leverage to a small quarter-turn handle can shear the brass stem right below the handle screw. If the lever will not turn with firm thumb pressure, remove the splitter from the spigot.
- Soak the detached splitter in warm white vinegar: Place the disconnected splitter in a bowl or cup of warm household white vinegar so the liquid enters both the top inlet and bottom outlets. Let the mild acetic acid soften the white mineral crust around the ball and stem, then gently work the lever back and forth by hand until full 90-degree movement returns.
- Rinse thoroughly with clean water: Flush the splitter under a faucet to wash out dissolved scale and vinegar residue. Remember that a vinegar soak is a mineral-descaling step, not a drinking-water sanitization treatment.
- Lubricate only if needed with food-grade silicone grease: If the valve action still feels dry after descaling, apply a tiny dab of NSF/ANSI 61 certified (food-grade) plumbers’ silicone grease to the accessible ball surface through the open port and cycle the handle. Never use WD-40, motor oil, or standard lithium grease on a fitting connected to your RV fresh water system.
Fix 3: Clear a Dripping Closed Outlet
When one branch of the splitter is connected to your RV water hose and the second branch is shut off, water dripping steadily out of the closed male spout means water is bypassing the internal ball seal.
- Flush out trapped grit: Sand, rust scale from old campground pipes, or fragments of old PTFE tape frequently lodge between the rotating ball and its internal PTFE or rubber seat ring, keeping the ball from sealing completely. Disconnect the splitter, set the leaking lever halfway open (at roughly a 45-degree angle so water can wash across the seat face), and run a strong stream of clean water backward through the bottom male outlet and out the top collar while opening and closing the lever several times.
- Inspect the internal ball and seat: Shine a flashlight into the bottom outlet with the valve closed and then open. If you see deep scratches on the ball or a torn, pinched, or extruded white seat ring inside the port, flushing will not restore a pressure-tight seal.
- Use a hose cap as a temporary campsite workaround: If an internal seat still weeps slightly during a trip and you do not have a spare splitter on hand, thread a 3/4-inch GHT brass or plastic end cap (with a rubber hose washer inside) onto the unused male outlet. The cap’s washer will seal the spout externally until you can replace the splitter.
Fix 4: Troubleshoot a Drop in RV Water Flow
If your RV shower or sink pressure drops sharply right after adding a hose splitter at the spigot, do not assume the splitter is defective until you isolate the cause:
- Check handle alignment and inlet screens first: A quarter-turn lever bumped even 15 to 20 degrees off its full-open position partially blocks the internal ball passage. Also check whether the splitter’s top washer is a screened sediment washer that has trapped sand or rust flakes from the campground hydrant.
- Bypass the splitter to confirm the bottleneck: Connect your RV drinking-water hose and pressure regulator directly to the campground spigot without the splitter. If interior faucet flow stays weak, check your inline water pressure regulator, kinked supply hose, or clogged RV water filter cartridge rather than blaming the Y-valve.
- Switch from a reduced-bore splitter to a full-bore Y-valve: If bypassing the splitter immediately restores normal flow inside the RV, examine the size of the hole through the splitter’s internal ball. Many inexpensive garden-hose splitters use a narrow, reduced-bore ball opening that necks down well below the 3/4-inch hose diameter, restricting volume even when only one outlet is open. Replacing a standard reduced-bore splitter with a full-bore (full-port) 3/4-inch brass ball-valve splitter keeps the internal water path wide open. Keep in mind that running both outlets at the same time (for example, rinsing gear outside while someone showers inside) will always split the available spigot flow between the two branches.
Verify the Repair and Prevent Repeat Leaks at the Spigot
After swapping a washer, cleaning threads, or descaling a valve, run a two-stage check before walking away from the hookup:
- Closed-valve pressure test: Thread the splitter onto the spigot by hand, close both quarter-turn levers, and turn the campground spigot fully on. Wipe the entire fitting dry and watch the top swivel collar, both valve stems, and both closed outlets for 60 seconds under static pressure.
- Flowing-water hookup test: Connect your RV water hose, pressure regulator, and filter, open the branch lever feeding the RV, and run an interior faucet for a minute. Re-check the top swivel collar to confirm the downward weight of the water-filled hose does not pull the collar sideways and start a slow drip.
To keep the repaired splitter from leaking on future trips, support heavy inline accessories (such as brass regulators or exterior water filters) with a 45-degree or 90-degree brass hose elbow or a short flexible leader hose so they do not pry downward on the splitter threads. Before overnight temperatures drop near freezing, disconnect the splitter from the hydrant and leave both levers halfway open so trapped water can drain from the ball cavity.
Frequently Asked Questions
Why does my hose splitter leak only when the water is first turned on, then stop?
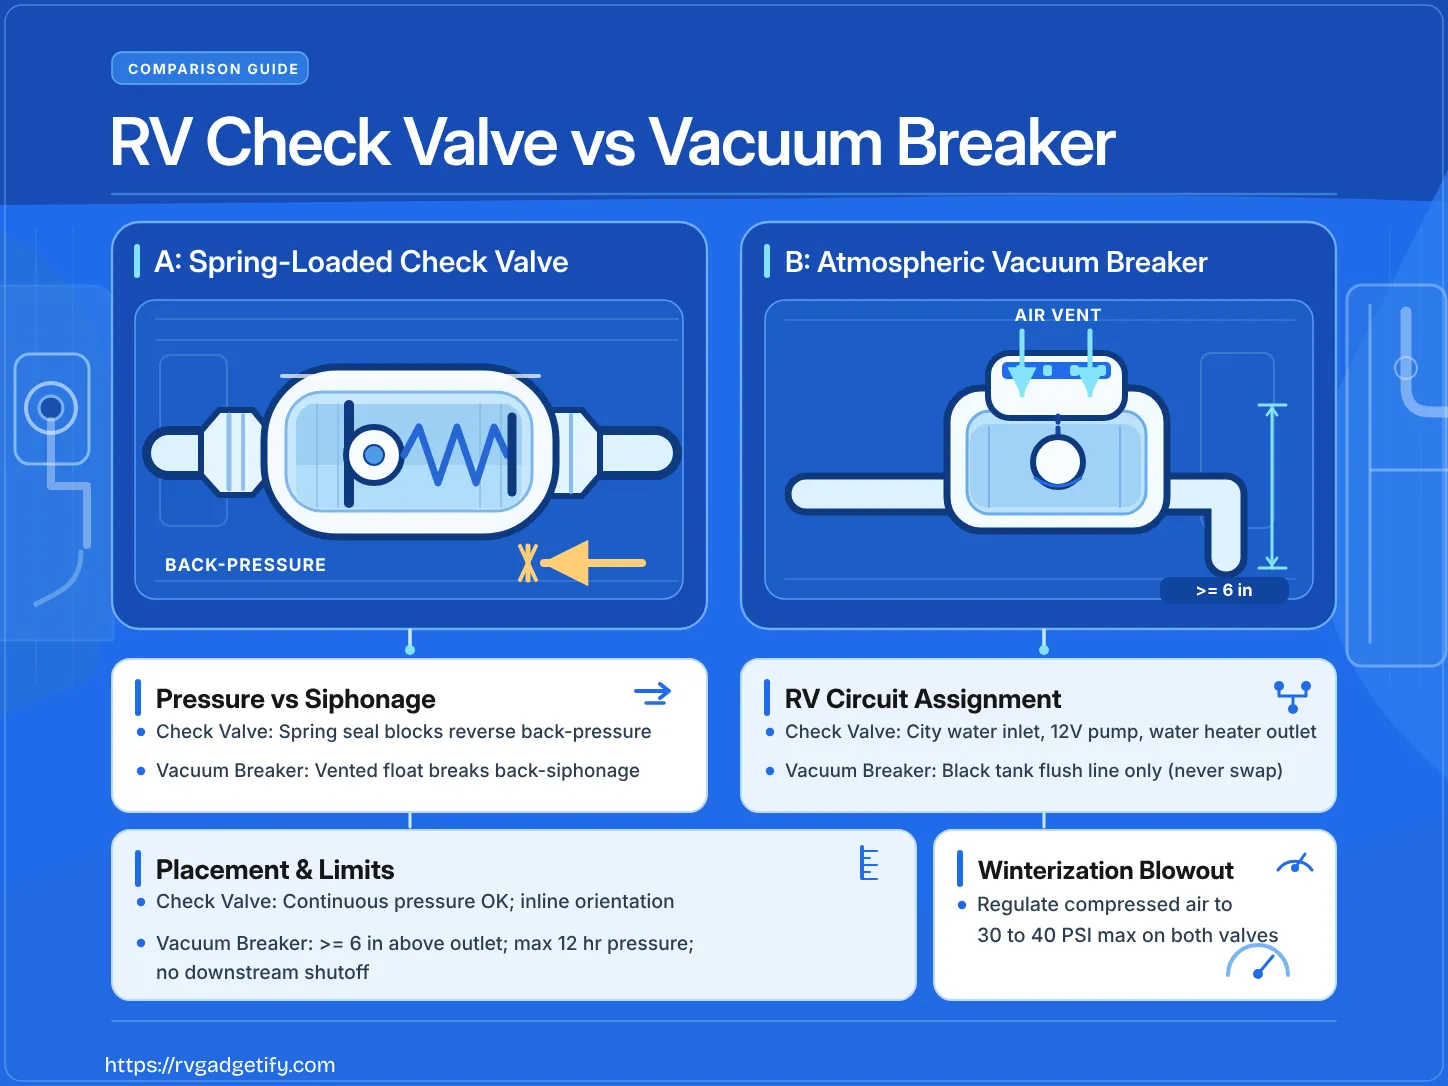
Brief spitting when you first open the spigot usually happens for one of two reasons: either the rubber washer inside a slightly loose swivel collar shifts until water pressure pushes it flat against the seat, or the campground spigot’s built-in atmospheric vacuum breaker (backflow preventer) is venting air as the line pressurizes. Snug the splitter collar a quarter turn by hand; if the water is coming from vent slots on the campground faucet above your splitter, the issue is the campground hydrant’s backflow valve, not your splitter.
Can I stack two rubber washers inside the swivel collar to stop a stubborn leak?
No. Stacking two washers reduces the number of threads holding the collar onto the spigot and creates an unstable seam between the two rubber rings. Under campground water pressure, stacked washers frequently shift sideways or extrude into the water path. Instead, use a single thick 3/4-inch GHT EPDM or silicone hose washer on clean, tape-free threads.
When should I use PTFE thread tape on an RV water setup?
Use PTFE (Teflon) thread seal tape only on tapered pipe threads, such as National Pipe Thread (NPT) connections found on screwed-in pressure gauges, residential plumbing adapters, or certain PEX-to-pipe fittings. Never wrap PTFE tape onto straight 3/4-inch Garden Hose Thread (GHT) connections on spigots, hose splitters, or RV water hoses, which rely on a flat rubber washer to seal.
Can I cap one side of a hose splitter if the internal valve still drips?
Yes, as a temporary field fix. As long as the splitter body is not cracked and the valve stem is not leaking, threading a 3/4-inch GHT end cap containing a good rubber washer onto the dripping male outlet will seal the port externally until you can replace the worn splitter.
Sources:
- Use of Lead Free Pipes, Fittings, Fixtures, Solder, and Flux for Drinking Water – U.S. Environmental Protection Agency, Safe Drinking Water Act Lead-Free Rule and 0.25% weighted average lead statutory requirement.
- How to Identify Lead Free Certified Drinking Water Products – U.S. Environmental Protection Agency Office of Ground Water and Drinking Water, PDF guidance on third-party certification marks, NSF/ANSI 372 testing, and plumbing product labeling.
- ASSE International Plumbing Product Standards – ASSE International, performance requirements and test methods for ASSE 1011 hose connection vacuum breakers and backflow protection.
- Home Water Systems: Backflow Prevention Devices – Colorado State University Extension, technical guidance on cross-connection control, hose-end vacuum breakers, and plumbing backflow protection.