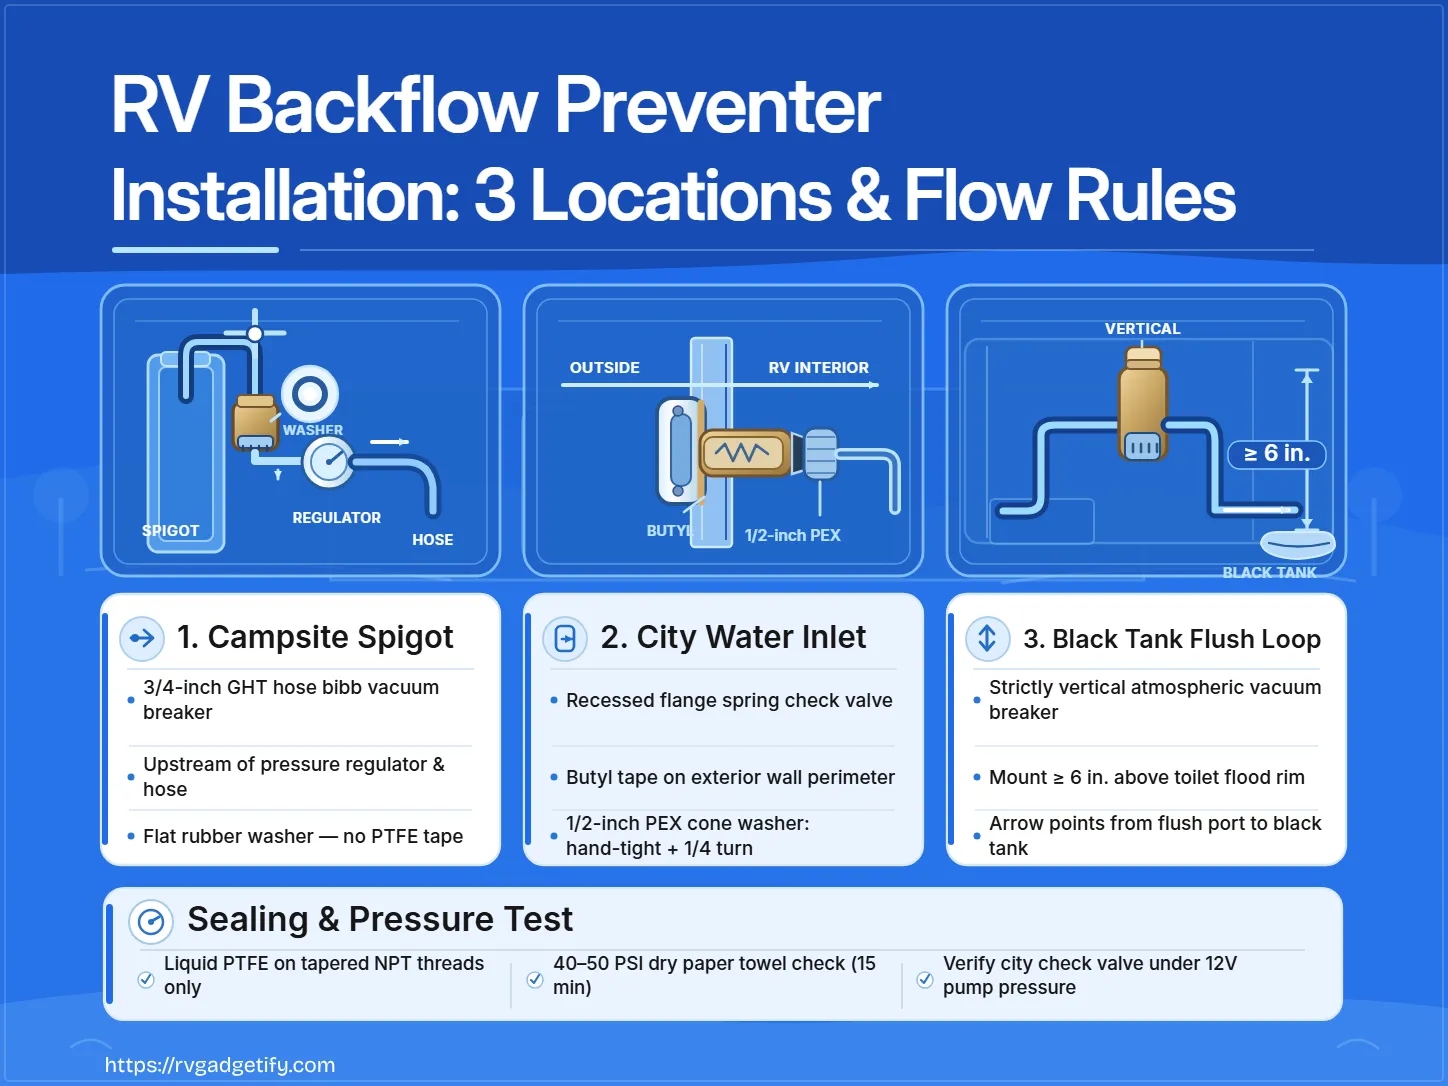
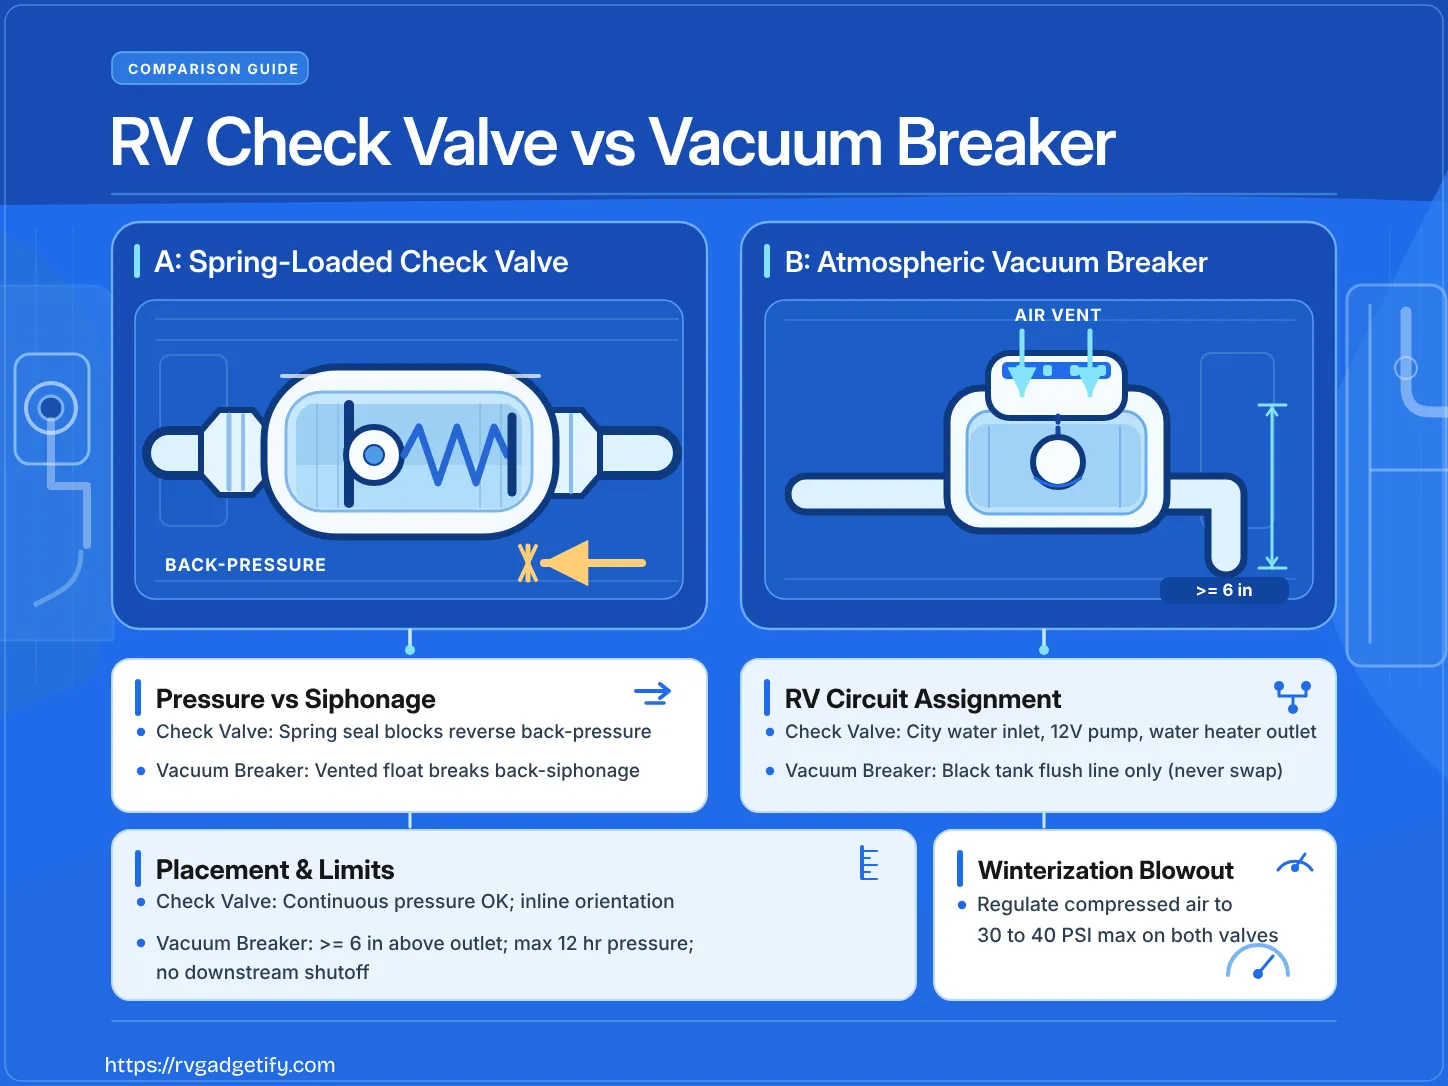

RV backflow preventers install in three distinct plumbing locations: a hose bibb vacuum breaker threads directly onto the campground water spigot, a spring-loaded check valve sits inside the recessed exterior city water inlet flange (or inline on the interior 1/2-inch PEX supply), and an atmospheric vacuum breaker mounts in an elevated vertical loop on the black tank flush line. Because each device protects against a different backflow hazard, these three components are not interchangeable.
A leak-free installation requires matching each valve to its correct orientation and sealing method. Inline check valves and black tank vacuum breakers must align with the stamped flow arrow on the valve body, and a black tank flush vacuum breaker must sit vertically at least 6 inches above the toilet flood rim. Garden hose connections and cone-washer PEX swivel nuts seal through rubber gasket compression rather than thread tape, whereas tapered NPT pipe threads require a potable-water-safe thread sealant. Every completed installation should pass a pressurized 15-minute dry paper towel leak check at 40 to 50 PSI before you close access panels.
Where Do the Three RV Backflow Preventers Belong?
An RV uses three separate backflow prevention devices across its exterior hookup, freshwater inlet, and waste tank flushing circuit. Each location requires a specific valve mechanism, mounting position, and thread connection.
| Installation Location | Backflow Device | Placement and Orientation Rule |
|---|---|---|
| Campsite pedestal spigot | Hose bibb atmospheric vacuum breaker | Thread directly onto the 3/4-inch male Garden Hose Thread (GHT) spigot upstream of the pressure regulator and drinking water hose. |
| RV exterior sidewall | City water inlet spring check valve (or interior inline check valve) | Mount the recessed check-valve flange flat in the exterior sidewall opening; if using a separate inline check valve on the 1/2-inch PEX line, point the stamped arrow downstream into the RV. |
| Black tank flush loop | Atmospheric vacuum breaker check valve | Mount strictly upright in the interior PEX loop at least 6 inches above the highest flood rim of the toilet bowl, with the flow arrow pointing from the exterior flush port toward the black tank. |
Each device matches the pressure conditions at its location:
- Campsite spigot: A hose bibb atmospheric vacuum breaker protects the campground water supply at the source before water enters your pressure regulator and drinking water hose.
- City water inlet: A spring-loaded check valve built into the recessed exterior fill flange lets pressurized city water flow into the RV while keeping onboard 12V water pump pressure from spraying back out the exterior inlet when you camp off-grid.
- Black tank flush line: An elevated atmospheric vacuum breaker opens an air vent whenever water flow stops, preventing gravity backsiphonage of black tank waste if the tank backs up while a flush hose is attached.
What Tools, Materials, and Sealants Do You Need?
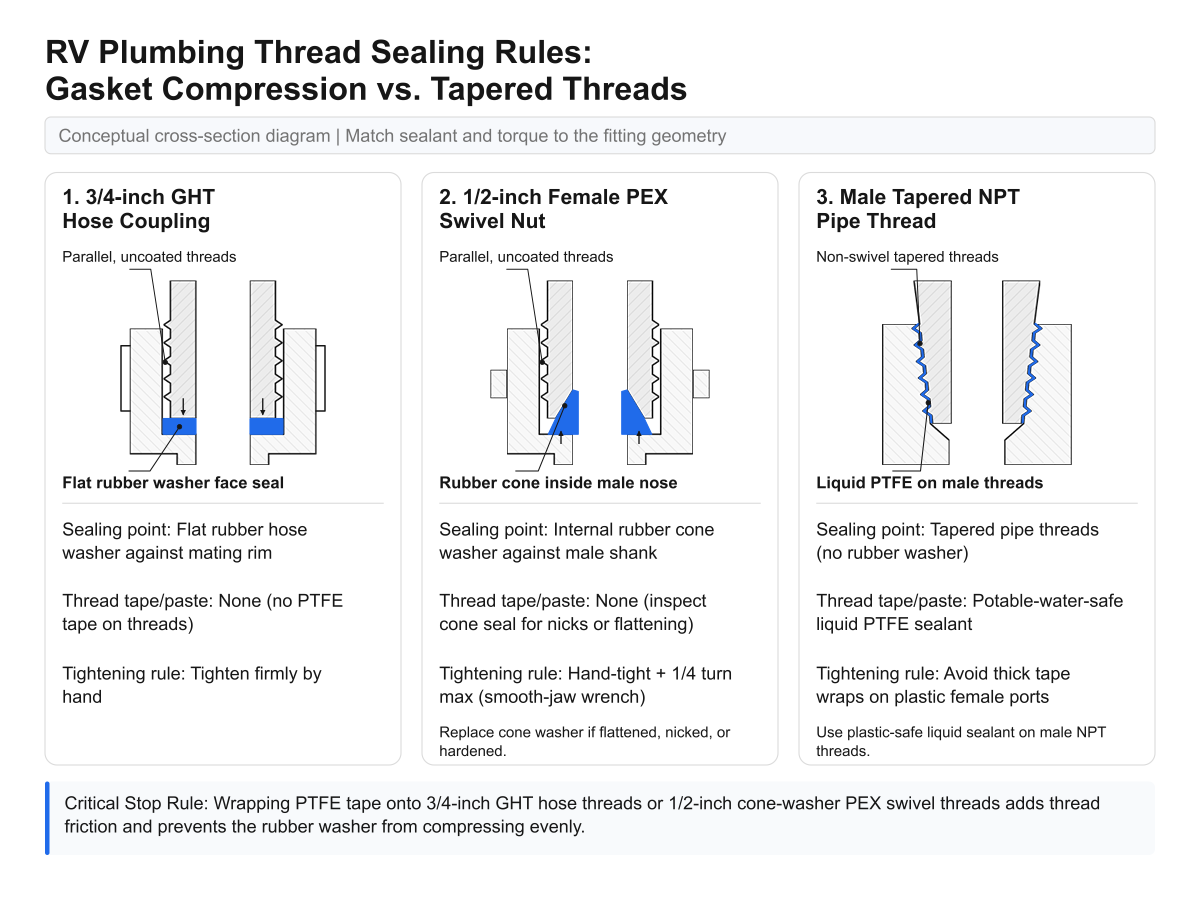
Gather butyl tape, a smooth-jaw wrench, replacement rubber washers, and potable-water-safe liquid PTFE pipe thread sealant based on the specific fitting type you are servicing. Garden hose couplings, PEX swivel nuts, and tapered NPT threads seal through different mechanical principles, so applying the wrong sealant causes leaks or cracked fittings.
| Connection or Task | Required Material or Tool | Sealing Method and Tightening Rule |
|---|---|---|
| 3/4-inch GHT spigot or hose coupling | Flat rubber hose washer | Seals by compressing the flat rubber gasket against the mating rim; tighten firmly by hand and do not apply PTFE (Teflon) tape to the threads. |
| Exterior city water inlet flange to RV sidewall | Pliable butyl tape and stainless steel screws | Press a continuous ring of butyl tape around the back perimeter of the flange to block rainwater and washdown spray from entering the wall substrate. |
| 1/2-inch plastic female PEX swivel nut | Internal rubber cone washer and smooth-jaw wrench | Seals via the internal rubber cone washer against the end of the male shank; tighten hand-tight plus one-quarter turn maximum without thread tape or paste. |
| Male tapered NPT pipe threads (non-swivel) | Liquid PTFE pipe thread sealant (potable-water and plastic-safe) | Seals on the tapered pipe threads themselves; apply liquid PTFE sealant to the male NPT threads rather than thick PTFE tape wraps that can split plastic female ports. |
Before starting work, inspect the internal rubber cone washer inside any 1/2-inch female PEX swivel nut you disconnect. If the cone seal is flattened, nicked, or hardened, replace the cone washer before reassembling the joint rather than tightening the plastic nut past its quarter-turn limit.
What Pre-Installation Checks and Stop Conditions Apply?
Shut off all water sources, relieve line pressure, and confirm proper valve orientation and clearance before loosening or installing any RV plumbing fitting. Opening a pressurized line sprays water into wall cavities, while installing a backflow preventer in the wrong orientation can block water flow or defeat anti-siphon protection.
Complete these pre-installation checks before assembly:
- Depressurize the plumbing system: Turn off the onboard 12V water pump, close the campground spigot, disconnect the exterior water hose, and open a low interior faucet to bleed trapped pressure.
- Confirm thread and adapter compatibility: Check whether your replacement city water inlet or check valve uses 1/2-inch male pipe threads (MPT) that mate directly with a 1/2-inch female PEX swivel nut, or 1/2-inch female pipe threads (FPT) that require a 1/2-inch male adapter nipple.
- Check the stamped flow arrow: On any inline check valve or black tank flush vacuum breaker, verify that the arrow stamped on the valve body points downstream in the intended direction of water flow.
Stop the installation immediately if any of the following conditions exist:
- Insufficient black tank vacuum breaker elevation: Do not install a black tank flush atmospheric vacuum breaker if the cabinet or wall cavity does not allow upright mounting at least 6 inches above the top flood rim of the toilet bowl.
- Tilted or horizontal vacuum breaker mounting: Do not mount an atmospheric vacuum breaker horizontally or at an angle. The internal float poppet relies on gravity to drop open when flow stops, and a tilted body can stick open (flooding the cabinet during flushing) or fail to vent a vacuum.
- PTFE tape on gasketed threads: Do not wrap PTFE tape onto 3/4-inch GHT hose threads or 1/2-inch cone-washer PEX swivel threads, where tape interferes with full thread engagement and keeps the rubber washer from compressing evenly.
How Do You Install a Hose Bibb Vacuum Breaker at the Campsite Spigot?
Thread the hose bibb vacuum breaker directly onto the 3/4-inch male GHT campground faucet before attaching your water pressure regulator or drinking water hose. Placing the vacuum breaker first protects the pedestal spigot at the exact point of connection.
- Inspect the 3/4-inch male GHT threads on the campsite spigot for debris or damaged threads, and flush the spigot briefly to clear stagnant water or grit.
- Confirm that a flat rubber hose washer is seated flat inside the female inlet of the hose bibb vacuum breaker.
- Thread the hose bibb vacuum breaker onto the campsite spigot and tighten it by hand until the rubber gasket compresses snugly against the spigot rim. Do not wrap PTFE tape on the spigot threads.
- Thread your RV water pressure regulator onto the outlet of the vacuum breaker, checking that its rubber hose gasket is in place.
- Connect your potable drinking water hose to the outlet of the pressure regulator and route it to the RV city water inlet.
The completed exterior hookup sequence from the pedestal is: campsite spigot, hose bibb vacuum breaker, water pressure regulator, drinking water hose, and RV city water inlet.
How Do You Install or Replace an RV City Water Inlet Check Valve?
Replace a faulty city water inlet check valve by disconnecting the interior 1/2-inch PEX connection, sealing the new recessed inlet flange against the exterior sidewall with butyl tape, and reconnecting the interior PEX swivel fitting. On standard RV city water inlets, the spring check valve is integrated into the recessed exterior flange housing.
- Shut off the 12V water pump and external water supply, open a faucet to depressurize the lines, and disconnect the exterior drinking water hose.
- Open the interior access panel or cabinet behind the utility bay to reach the back of the city water inlet.
- Unscrew the 1/2-inch plastic female PEX swivel wing-nut from the threaded shank on the back of the existing inlet flange, and place a towel underneath to catch residual water in the line.
- Remove the exterior mounting screws from the recessed city water fill flange, pull the old flange from the sidewall cutout, and scrape old caulk or butyl residue off the exterior siding.
- Press a continuous ring of pliable butyl tape around the back perimeter of the replacement city water inlet flange.
- Insert the new flange shank through the sidewall opening, align the screw holes, and tighten the stainless steel exterior screws evenly until the butyl tape compresses around the rim.
- If you are also installing a separate inline check valve on the interior 1/2-inch line, apply potable-water-safe liquid PTFE sealant to the male tapered NPT pipe threads and point the stamped arrow downstream toward the RV plumbing.
- Inspect the rubber cone washer inside the 1/2-inch female PEX swivel nut, thread the nut onto the 1/2-inch male shank at the back of the inlet flange hand-tight, and turn it an additional one-quarter turn maximum with a smooth-jaw wrench.
How Do You Install the Black Tank Flush Vacuum Breaker?
Mount the black tank flush vacuum breaker vertically at the top of the interior flush loop at least 6 inches above the highest flood rim of the toilet bowl. You will usually find this valve inside the bathroom vanity cabinet, behind a removable panel under the bathroom sink, or behind a shower access panel.
- Locate the elevated black tank flush loop inside the bathroom cabinet or wall cavity, and place a towel below the valve before disconnecting the fittings.
- Trace the two 1/2-inch PEX lines connected to the valve: the supply line runs upward from the exterior black tank flush port, and the discharge line runs downward to the spray nozzle inside the black waste tank.
- Position the replacement atmospheric vacuum breaker in a strictly vertical orientation with its air vent cap at the top.
- Check the stamped flow arrow on the vacuum breaker body and orient the ports so water from the exterior black tank flush inlet enters the upstream (inlet) port and exits through the downstream (outlet) port toward the black tank.
- Verify that the valve sits at least 6 inches above the top rim of the toilet bowl and that the internal float poppet moves freely under gravity.
- Connect the 1/2-inch PEX lines to the inlet and outlet ports: if using female PEX swivel nuts with internal rubber cone seals, tighten hand-tight plus one-quarter turn; if using non-swivel female tapered NPT adapters, seal the male tapered NPT threads with potable-water-safe liquid PTFE pipe thread sealant.
- Secure the PEX loop to the interior cabinet wall or framing so water pressure cannot push the vacuum breaker out of its vertical alignment during tank flushing.
How Do You Pressure-Test and Verify the Completed Installation?
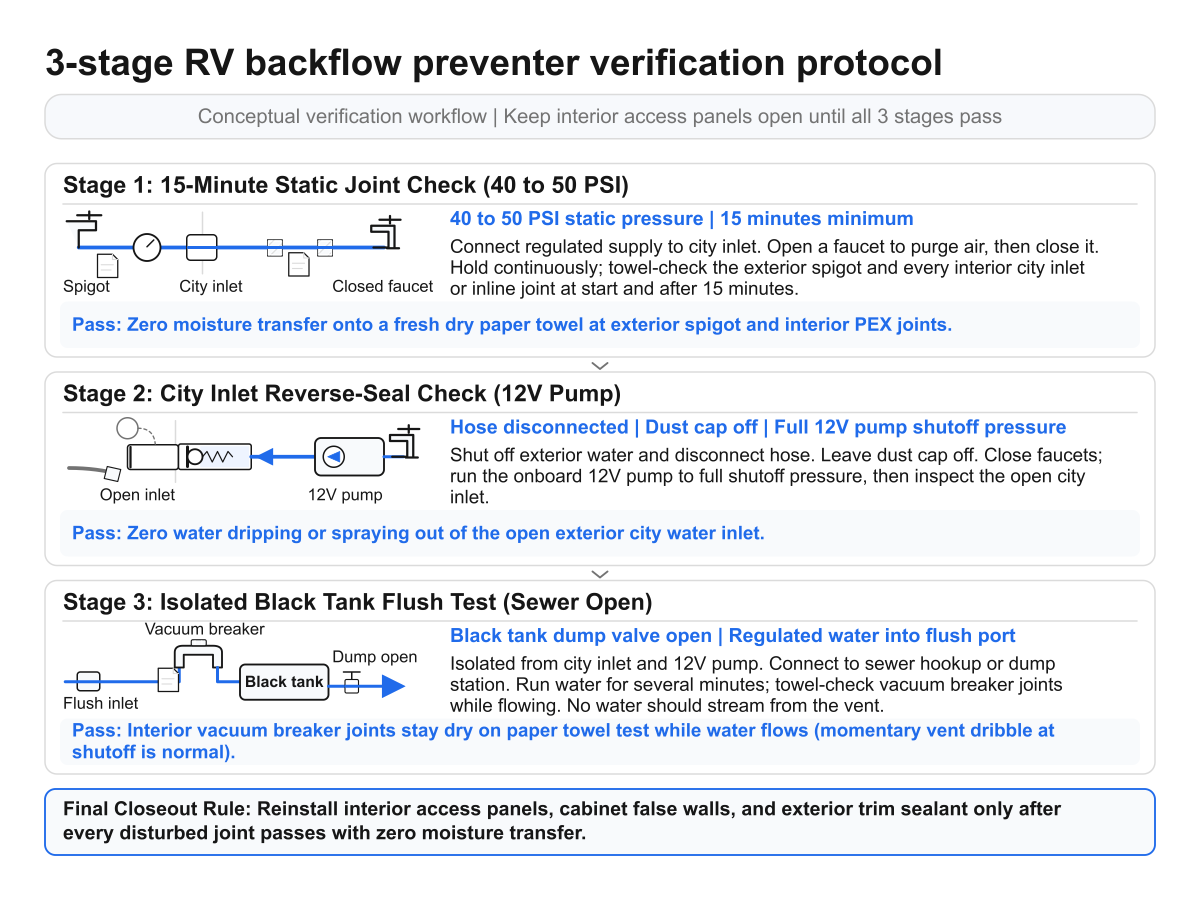
Test the potable freshwater connections at 40 to 50 PSI for at least 15 minutes with a dry paper towel, verify city inlet backflow sealing with the 12V water pump, and test the separate black tank flush loop before closing any interior access panels. A dry paper towel reveals slow weeping around threads long before a visible puddle forms.
- Connect a regulated water supply set to 40 to 50 PSI to the city water inlet, open an interior faucet to purge air from the lines, and close the faucet to hold static pressure.
- Wipe a dry paper towel around the exterior spigot connections and every interior city water inlet or inline check valve joint.
- Re-inspect every joint with a fresh dry paper towel after 15 minutes of continuous pressure to confirm zero moisture transfer.
- Shut off and disconnect the exterior city water hose, leave the city water inlet dust cap off, and turn on the onboard 12V water pump until it builds full shutoff pressure.
- Inspect the open exterior city water inlet and confirm that no water drips or sprays past the internal spring check valve poppet.
- If you replaced the black tank flush vacuum breaker, note that neither the city water inlet nor the 12V water pump pressurizes the black tank flush circuit. While connected to a sewer hookup or dump station with the black tank dump valve open, run regulated water into the exterior black tank flush inlet for several minutes and wipe the interior vacuum breaker joints with a dry paper towel to confirm they stay dry.
Only reinstall interior access panels, cabinet false walls, and exterior trim sealant after all disturbed joints remain completely dry under pressure.
How Do You Prevent Freeze Damage and Fix Common Installation Mistakes?
Clear trapped water from both the city water inlet check valve and the elevated black tank flush loop before freezing temperatures arrive, and correct any weeping joints or reversed valves immediately. Even a small pocket of water trapped behind a check valve poppet or inside a plastic vacuum breaker body can freeze and split the housing.
During winterization, protect all three backflow prevention points:
- Campsite spigot vacuum breaker: Unthread the hose bibb vacuum breaker from the spigot, let it drain completely, and store it dry with your water pressure regulator and hoses.
- City water inlet check valve: When blowing out lines with compressed air or pumping RV antifreeze, briefly depress the small center pin on the city water inlet check valve (after relieving line pressure and shielding your eyes) so trapped water drains out of the valve chamber, or use a blowout plug through the inlet.
- Black tank flush vacuum breaker loop: Because the black tank flush line is completely separate from the potable water lines, blow compressed air or pump RV antifreeze directly into the exterior black tank flush port to clear water out of the elevated interior vacuum breaker loop and down into the black tank.
If you encounter a leak, blocked water flow, or backflow during testing, match the symptom to the corrective action below:
| Installation Mistake | Symptom | Corrective Action |
|---|---|---|
| Inline check valve or black tank vacuum breaker arrow points backward | Water will not flow into the RV or through the black tank flush line | Depressurize the line and reinstall the valve with the stamped flow arrow pointing downstream toward the fixture or tank. |
| PTFE tape wrapped on 3/4-inch GHT or cone-washer PEX swivel threads | Joint weeps around the coupling nut despite tightening | Unthread the fitting, peel off all PTFE tape, confirm the flat rubber hose washer or internal PEX cone seal is intact, and retighten. |
| Plastic female PEX swivel nut overtightened | Continuous drip at the swivel collar or stripped plastic threads | Replace the deformed internal rubber cone washer (or the cracked swivel nut) and tighten hand-tight plus one-quarter turn maximum. |
| Black tank vacuum breaker mounted tilted or horizontally | Water spills out of the vacuum breaker vent inside the cabinet while flushing | Remount and secure the atmospheric vacuum breaker in a strictly upright vertical position so the internal float seats under water pressure. |
| Black tank vacuum breaker mounted below the toilet flood rim | Fails anti-siphon elevation protection if the black tank backs up | Reroute the interior PEX loop higher in the vanity cabinet or wall cavity so the vacuum breaker sits at least 6 inches above the toilet bowl rim. |
Frequently Asked Questions
Why should you avoid using PTFE thread tape on garden hose threads and PEX swivel nuts?
Both 3/4-inch garden hose couplings and 1/2-inch female PEX swivel adapters are parallel-style connector nuts that seal by compressing an internal rubber washer (a flat hose washer for GHT, or a tapered rubber cone washer for PEX swivels) against the face of the male fitting. Wrapping PTFE tape on these threads adds friction that can prevent the nut from pulling the rubber seal tight against the mating surface. Reserve liquid PTFE thread sealant for tapered NPT pipe threads that do not use an internal rubber gasket or cone washer.
Does pressurizing the RV city water inlet or 12V water pump test the black tank flush vacuum breaker?
No. The black tank flush system is an isolated plumbing line that runs only from the dedicated exterior black tank flush inlet up to the interior vacuum breaker and down to the black tank sprayer. To check a newly installed black tank flush vacuum breaker for leaks, you must connect a water hose directly to the exterior black tank flush inlet while the black tank dump valve is open at a sewer connection.
Why does water briefly dribble from a hose bibb or black tank atmospheric vacuum breaker when you shut off the water?
A small momentary discharge of water when supply pressure drops is normal operation for an atmospheric vacuum breaker. When water flow stops, the internal float poppet drops by gravity to open the air vent and break any vacuum in the line, which can release a few drops of residual water from the vent ports. However, if water streams continuously out of a black tank vacuum breaker while water is actively flowing, the valve is either mounted off-vertical, fouled with debris, or running at insufficient flow pressure to lift the internal float against its top seal.
Can you replace a leaking black tank flush atmospheric vacuum breaker with a standard inline check valve?
No. An inline spring check valve and an atmospheric vacuum breaker are not interchangeable on a black tank flush line. Because the flush line terminates inside a waste holding tank containing sewage, plumbing safety standards require an elevated atmospheric vacuum breaker (or combo vacuum breaker check valve) mounted at least 6 inches above the toilet flood rim so air physically enters the line if a siphon develops.
How can you tell whether your city water inlet check valve has failed?
Disconnect your exterior drinking water hose, remove the rubber dust plug from the city water inlet, and turn on your 12V onboard water pump with all interior faucets closed. If water drips or sprays out of the exterior city water inlet while the pump pressurizes the system, debris is holding the internal spring poppet open or the check valve seal is worn out and needs replacement.
Sources:
- Use of Lead Free Pipes, Fittings, Fixtures, Solder, and Flux for Drinking Water – U.S. Environmental Protection Agency, Safe Drinking Water Act Lead-Free Rule and 0.25% weighted average lead statutory requirement.
- How to Identify Lead Free Certified Drinking Water Products – U.S. Environmental Protection Agency Office of Ground Water and Drinking Water, PDF guidance on third-party certification marks, NSF/ANSI 372 testing, and plumbing product labeling.
- ASSE International Plumbing Product Standards – ASSE International, performance requirements and test methods for ASSE 1011 hose connection vacuum breakers and backflow protection.
- Home Water Systems: Backflow Prevention Devices – Colorado State University Extension, technical guidance on cross-connection control, hose-end vacuum breakers, and plumbing backflow protection.