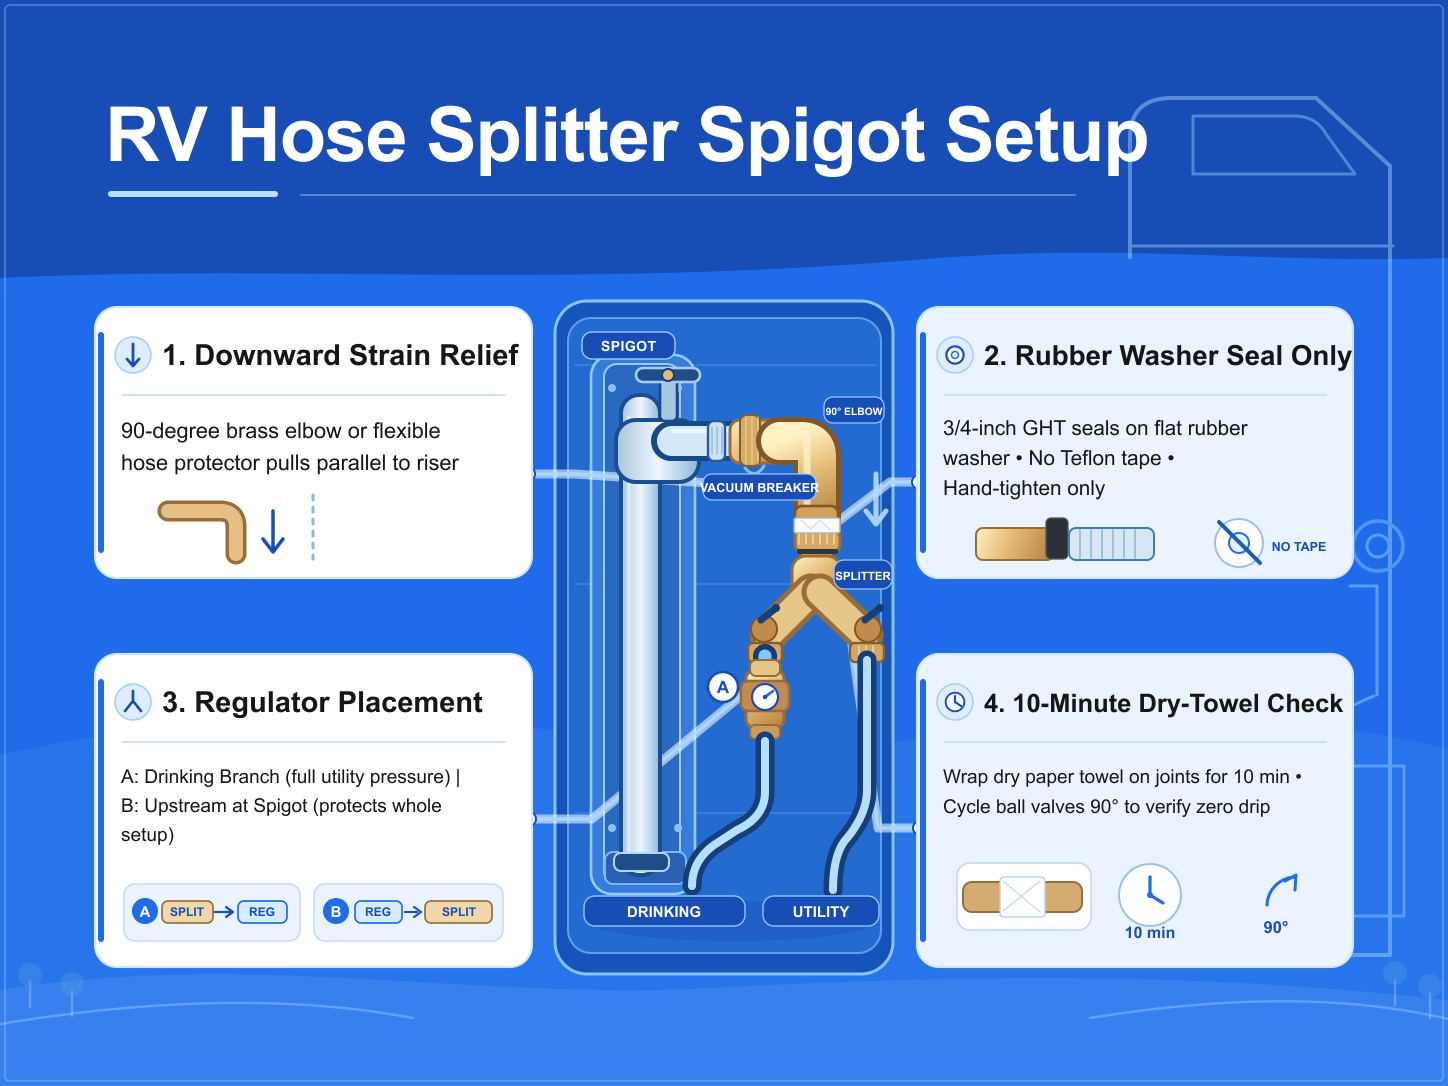

Installing an RV hose splitter at a campground spigot lets you run a potable drinking-water hose and a separate utility hose from a single water outlet. A reliable setup requires a 90-degree brass elbow or flexible hose protector for strain relief, flat rubber washers seated cleanly inside each female coupling, and firm hand tightening without wrenches. After pressurizing the hookup, wrap a dry paper towel around every joint for 10 minutes and cycle each shutoff valve to confirm a drip-free seal before leaving the pedestal.
Key Takeaways
- Redirect hose weight at the spigot: Install a 90-degree brass elbow or flexible hose protector upstream of the splitter so heavy water-filled hoses pull downward parallel to the riser instead of prying against the spigot.
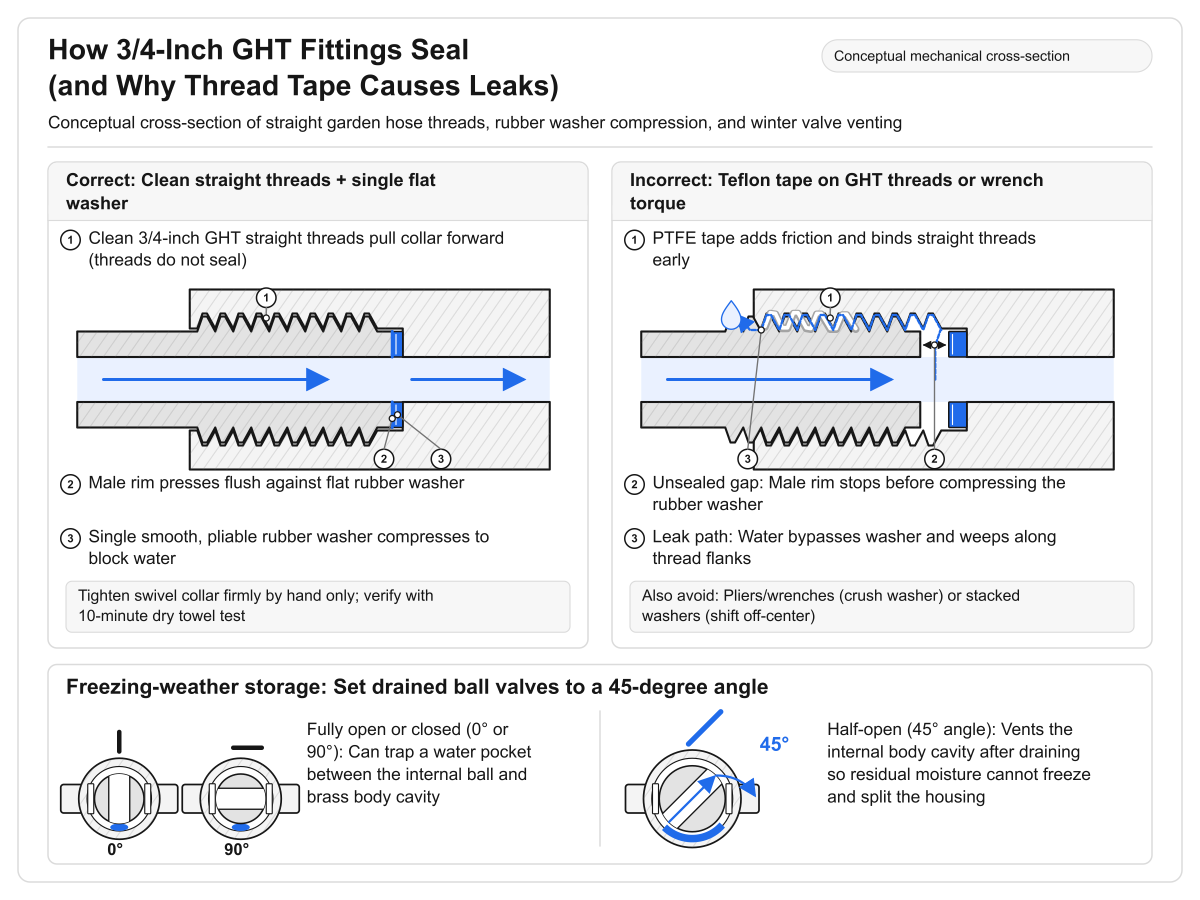
- Seal with the rubber washer, not thread tape: Standard 3/4-inch garden hose threads (GHT) seal by compressing a flat rubber washer against the male rim; Teflon tape interferes with full thread engagement and prevents the washer from seating.
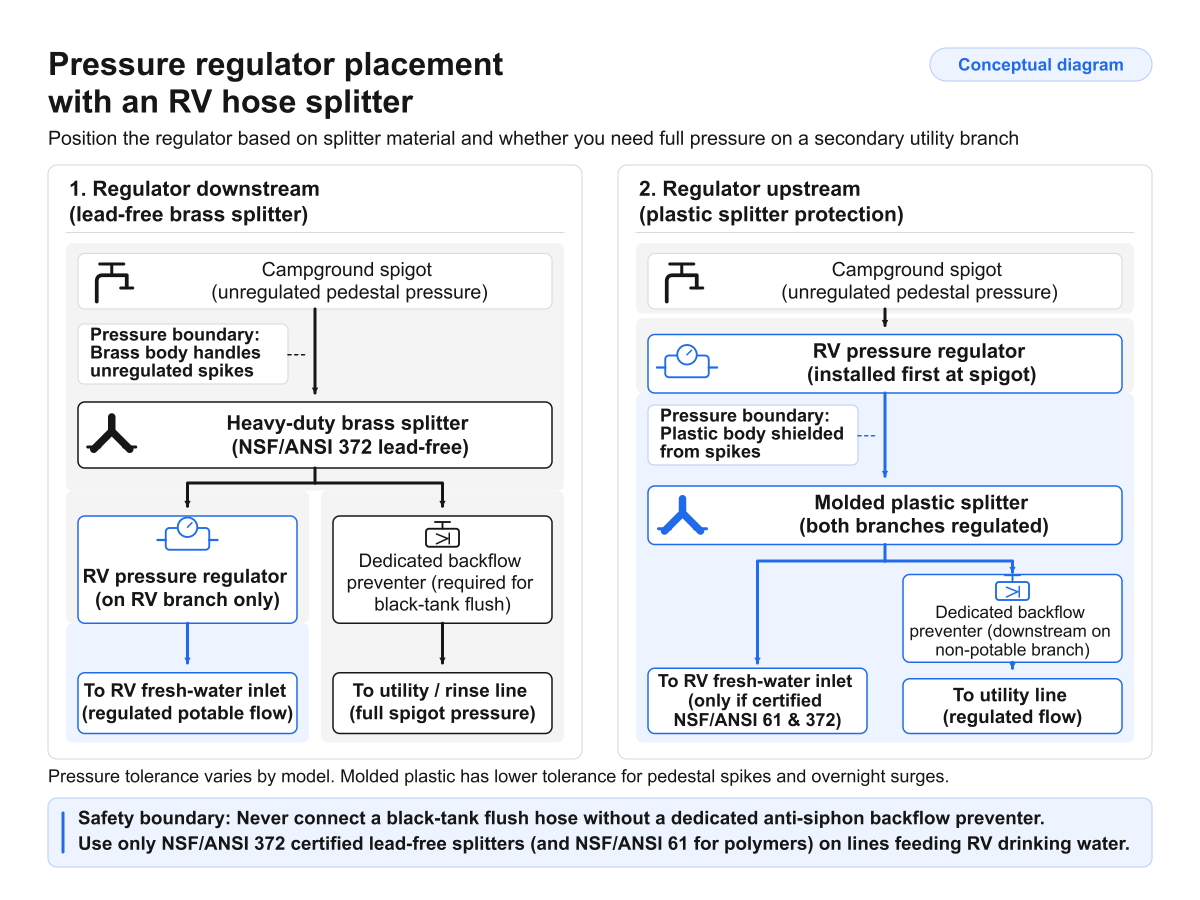
- Choose regulator placement before assembly: Mount the pressure regulator on the splitter’s drinking-water branch to keep full pressure on the utility port, or install it upstream of the splitter to protect the splitter body and both hoses from high pressure surges.
- Tighten swivel collars by hand only: Pipe wrenches and slip-joint pliers can crush rubber washers and deform brass swivel collars.
- Verify with a 10-minute dry-towel check: Wrap a dry paper towel around every pressurized joint for 10 minutes to catch slow weeping that visual checks miss.
What Does This Spigot Installation Cover?
This setup tutorial covers temporary campsite water hookups using standard 3/4-inch garden hose thread (GHT) fittings to split one campground spigot into two branches: a regulated potable drinking-water line for the RV interior and a secondary utility line for exterior rinsing or tank flushing. It applies to above-ground campground pedestals and yard hydrants, not permanent residential plumbing or underground irrigation lines.
What Components Do You Need Before Starting?
Stage your fittings by function before opening or threading onto the spigot. Keeping potable drinking-water components separate from utility-branch fittings prevents cross-contamination during setup.
| Component | Role in the Hookup | Requirement Scope |
|---|---|---|
| Hose-bibb vacuum breaker | Helps prevent back-siphonage into the campground water supply | Required at the spigot if the campground hydrant does not already have one installed; use a separate backflow preventer on the black-tank flush line |
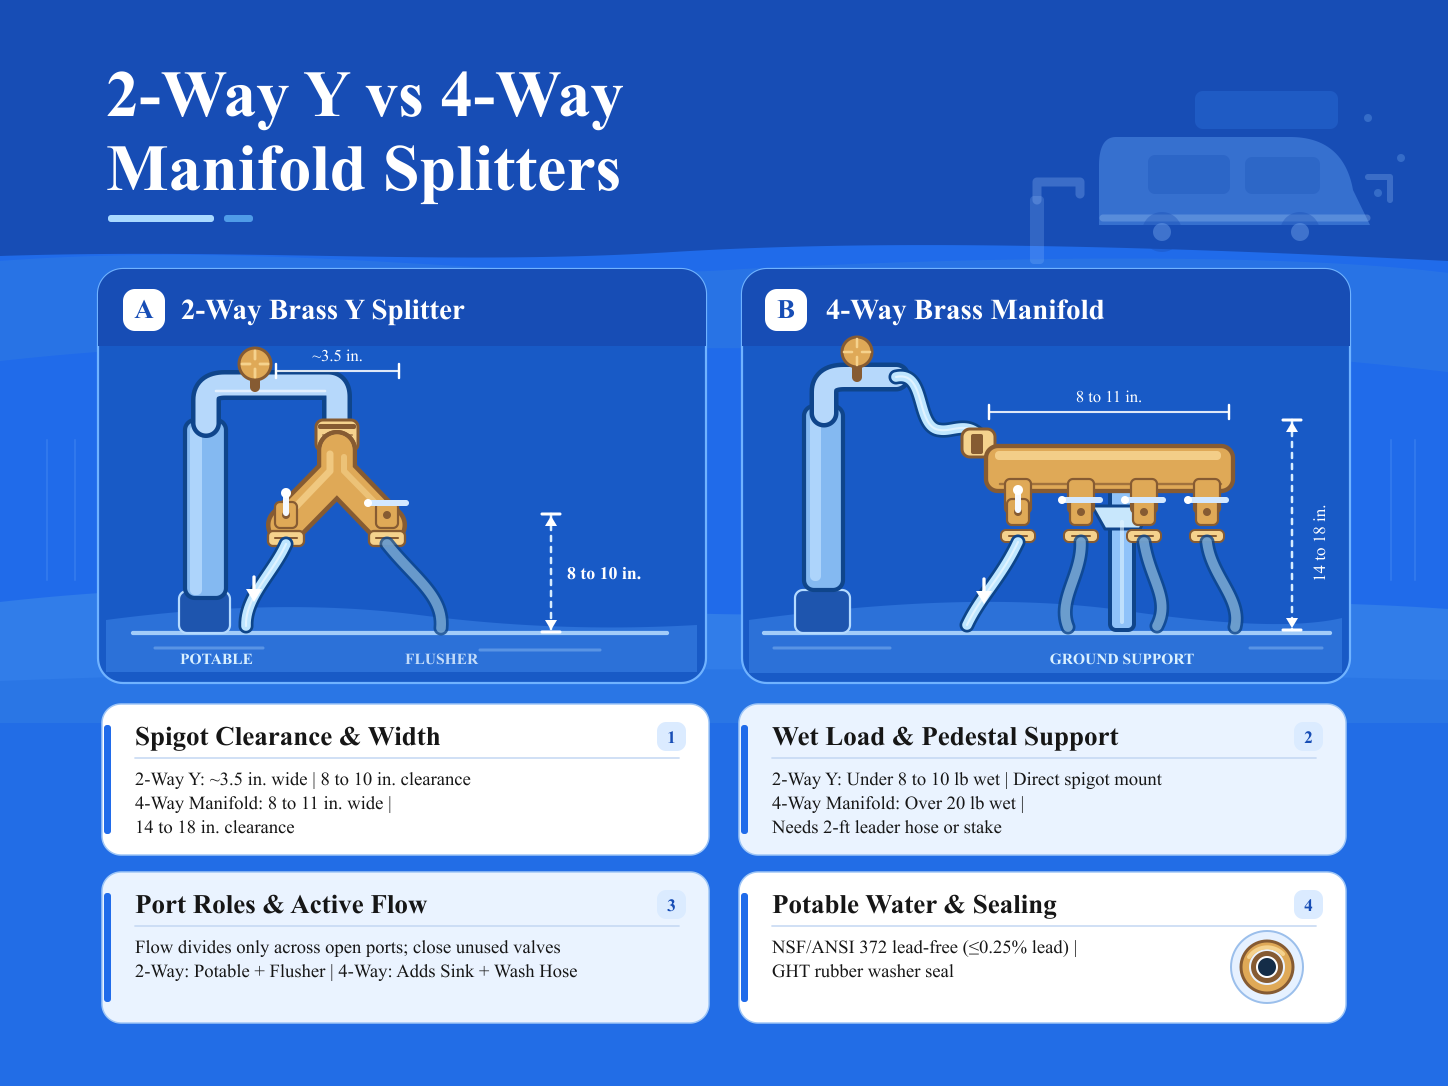
| 90-degree brass elbow or flexible hose protector | Redirects hose weight downward to relieve bending load on the spigot and riser | Required on unbraced or cramped pedestals |
| RV hose splitter (3/4-inch GHT) | Splits one water source into two independently controlled outlet branches | Core fitting |
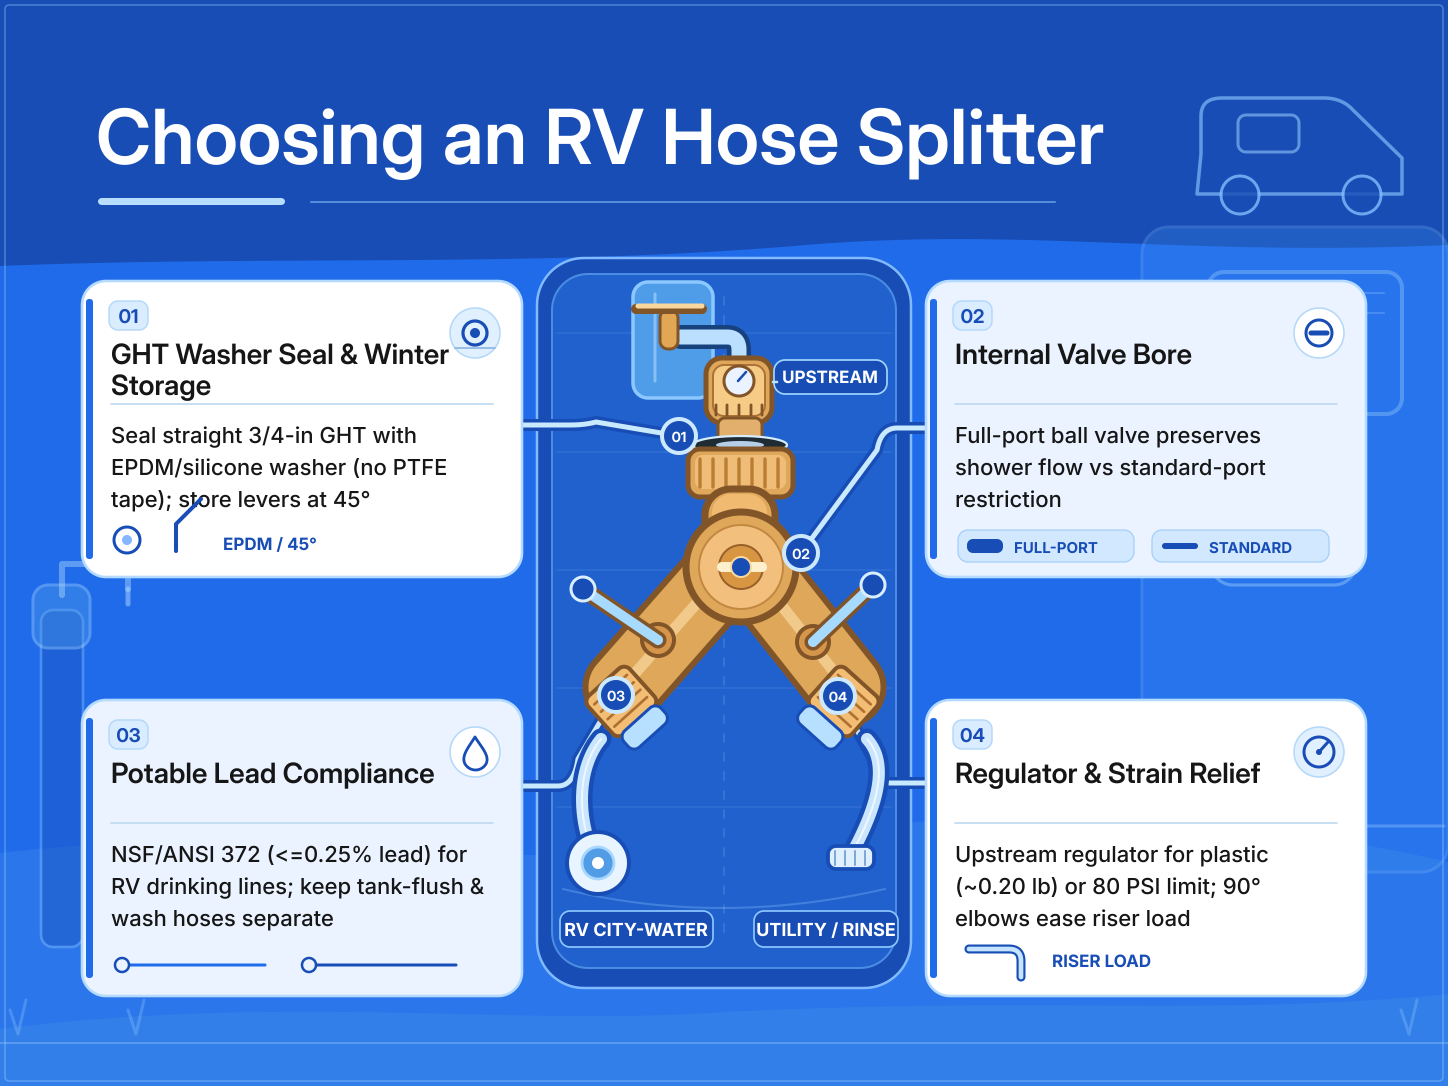
| Flat rubber hose washers | Create the compression seal inside every female 3/4-inch GHT swivel collar | Required inside every female coupling |
| Lead-free RV water pressure regulator | Limits downstream water pressure to protect RV plumbing (or the entire splitter assembly) | Required for the RV drinking-water supply |
| Potable-rated drinking-water hose | Carries fresh water from the regulated drinking branch to the RV city-water inlet | Required for the drinking-water branch |
| Lead-free brass quick-disconnect fittings | Allow push-to-connect hose attachment without twisting hoses | Optional; drinking-branch fittings must be certified lead-free for potable water |
| Food-grade silicone plumber’s grease | Keeps quick-disconnect male O-rings pliable for smooth collar movement | Optional seasonal maintenance item |
| Dry paper towels | Detect slow seepage around pressurized joints during the 10-minute leak check | Required for completion verification |
What Conditions Should Stop the Installation?
Check the pedestal and your fittings before threading hardware onto the water supply. Stop and correct the setup if any of these conditions apply:
- Unbraced riser with no strain relief available: Do not hang a heavy brass splitter, regulator, and water-filled hoses straight off an unsupported vertical pipe. Without a 90-degree elbow or flexible hose protector to direct weight downward, cantilever force can crack the campground riser or strip spigot threads.
- Missing, crushed, or doubled rubber washers: Do not assemble a joint if the female coupling lacks a smooth, pliable rubber washer or has two washers stacked together. Replace deformed washers before threading.
- Non-potable fittings on the drinking-water branch: Do not install standard leaded brass quick-disconnects, non-potable splitters, or utility garden hoses on the branch feeding the RV fresh-water inlet. Every component in the drinking-water path must be rated for potable water.
- Sub-freezing temperatures without freeze protection: Standard above-ground brass splitters, regulators, and hoses trap standing water that freezes and cracks housings. Disconnect and drain the assembly when temperatures drop below freezing.
Where Should You Place the Pressure Regulator?
Decide where to place your water pressure regulator before threading the splitter onto the spigot so you do not have to disassemble the hookup mid-installation. The right position depends on whether you prioritize full utility-port pressure or whole-assembly surge protection.
| Placement Option | Connection Order | Best When | Trade-Off |
|---|---|---|---|
| Downstream on the drinking-water branch | Spigot -> Vacuum breaker -> Strain relief -> Splitter -> Regulator on drinking port | You need full campground water pressure on the secondary port for a black-tank flush nozzle or high-pressure wash hose | The splitter body and utility hose remain exposed to unregulated campground line pressure |
| Upstream at the spigot (before the splitter) | Spigot -> Vacuum breaker -> Strain relief -> Regulator -> Splitter | Campground pressure is unusually high, or you use a lightweight plastic splitter or thin utility hose | Both branches receive regulated (reduced) water pressure and flow |
How Do You Install the Splitter Step by Step?
Step 1. Inspect the rubber washers and clean the threads
Look inside every female swivel collar on your strain-relief fitting, splitter, pressure regulator, and hoses. Confirm that each coupling holds a single smooth, pliable rubber washer seated flat against the base of the collar.
Remove any leftover Teflon (PTFE) tape from male 3/4-inch garden hose threads before assembly. Unlike tapered pipe threads (NPT), straight garden hose threads do not seal at the thread flanks; their only job is to pull the male rim tightly against the flat rubber washer. Wrapping tape on GHT threads adds friction that stops the collar before the rim compresses the washer, creating a leak path along the threads.
Step 2. Confirm or attach backflow protection at the spigot
Inspect the campground water spigot first. Many campground hydrants already have a permanent hose-connection vacuum breaker threaded onto the outlet. If the spigot is bare, thread your vacuum breaker onto the spigot by hand.
Sanitation note: A spigot-mounted vacuum breaker helps protect the campground supply from back-siphonage, but it does not prevent cross-flow between the two outlet branches of a splitter. When connecting a secondary hose to an RV black-tank flush inlet, verify that a functioning backflow preventer or check valve is installed on the black-tank flush line, and check whether your spigot vacuum breaker is rated for continuous static pressure if both splitter valves will remain closed with the spigot open.
Step 3. Attach the strain-relief fitting
Thread a 90-degree brass elbow or a flexible hose protector onto the spigot (or vacuum breaker outlet). Orient the elbow so its outlet points straight down parallel to the utility riser, removing sideways pull on the plumbing.
If a cramped electrical pedestal enclosure or a low-mounted spigot blocks a rigid 90-degree elbow from turning or clearing the ground, thread on a flexible coil-spring hose protector instead. The flexible sleeve absorbs bending stress and prevents the hose from kinking directly below the fitting.
Step 4. Hand-tighten the splitter and pressure regulator in your chosen order
Assemble the splitter and pressure regulator according to the placement you selected:
- For downstream (drinking-branch) regulation: Thread the RV hose splitter onto the strain-relief fitting, then thread the lead-free pressure regulator onto the splitter outlet designated for your drinking-water hose.
- For upstream (whole-setup) regulation: Thread the pressure regulator directly onto the strain-relief fitting, then thread the RV hose splitter onto the outlet of the pressure regulator.
Tighten each female swivel collar firmly by hand until the rubber washer compresses snugly against the male rim. Do not use a pipe wrench or slip-joint pliers. Excessive wrench torque crushes the rubber washer out of shape and can ovalize or crack brass swivel nuts.
Step 5. Thread on quick-disconnect fittings (if used)
If your setup uses quick-disconnect fittings, thread a potable-rated, lead-free brass female/male quick-disconnect set onto the drinking-branch outlet (on the downstream side of the pressure regulator if the regulator is mounted on the drinking branch) and a second fitting onto the utility-branch outlet. Quick-disconnects let you snap hoses on and off without twisting pressurized lines.
Once per camping season, apply a thin film of food-grade silicone plumber’s grease to the male quick-disconnect O-rings. Light lubrication keeps the O-rings supple and prevents the spring-loaded ball-detent collar from sticking.
Step 6. Connect the potable drinking-water hose and utility hose
Attach your potable drinking-water hose to the regulated drinking-water branch and route it to the RV city-water inlet. Connect your utility or rinse hose to the secondary splitter port. Before turning on the water, close the utility-branch ball valve on the splitter if no nozzle is attached to the utility hose.
How Do You Verify the Connections Are Leak-Free?
Do not open the RV interior plumbing supply or walk away from the pedestal until you verify that both the thread seals and the splitter valves hold pressure cleanly:
- Pressurize the assembly: Open the campground spigot slowly to bring the splitter, regulator, and attached hoses up to full operating pressure while purging trapped air.
- Run the 10-minute dry-towel test: Wipe away any assembly splash, then wrap a dry paper towel around each threaded joint and quick-disconnect collar. Leave the towels in place for 10 minutes. Even a tiny pinhole weep wicks visibly into dry paper towel fibers long before a drip hits the ground.
- Check valve shutoff: Close the utility-port ball valve by turning its lever 90 degrees to the off position, disconnect or open the downstream utility nozzle to release trapped line water, and verify that zero water drips past the closed ball valve.
If every paper towel remains bone-dry after 10 minutes and the closed valve holds with zero downstream drip, the installation is complete.
What Setup Mistakes Cause Spigot-Side Leaks?
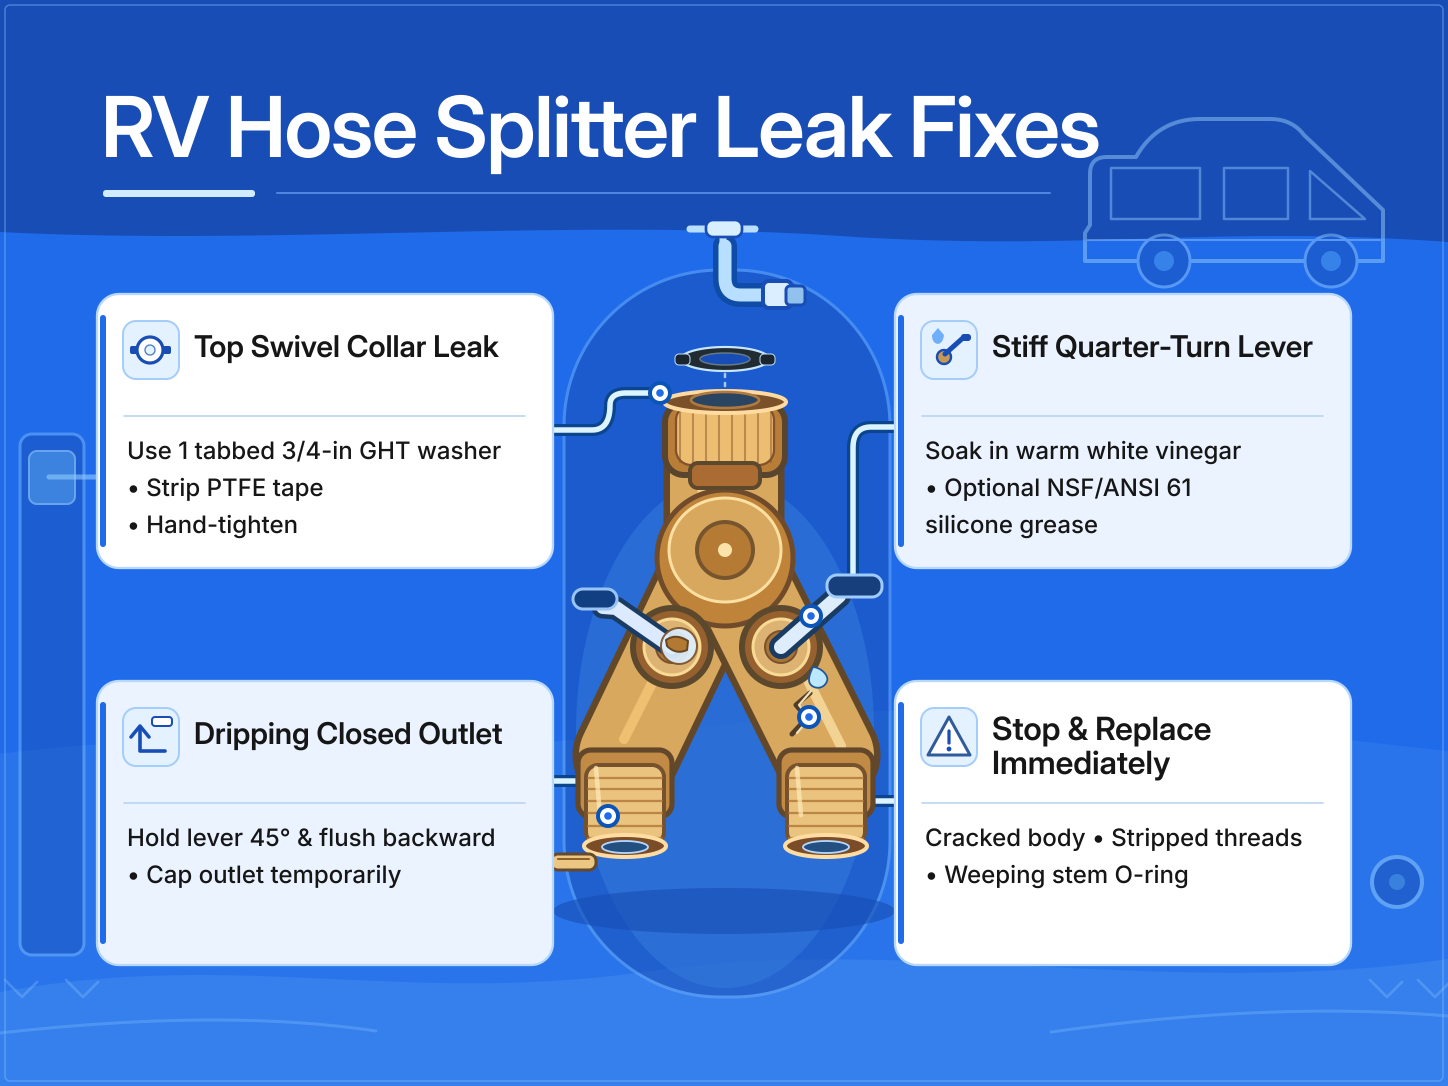
Most leaks at a campground hose splitter stem from washer compression problems rather than defective brass castings. Use the diagnostic table below to correct a damp joint without over-tightening.
| Setup Mistake | Why It Causes Leaks or Damage | Direct Fix |
|---|---|---|
| Wrapping Teflon tape on 3/4-inch GHT threads | Tape binds the straight threads before the male rim can compress the flat rubber washer | Unscrew the joint, peel off all tape, and let the clean rubber washer form the seal |
| Tightening swivel collars with a wrench or pliers | Excess torque extrudes, cuts, or crushes the flat washer and distorts the brass collar | Replace the crushed washer and tighten the swivel collar firmly by hand only |
| Missing, hardened, or doubled-up rubber washers | A missing or brittle washer leaves a gap; stacked washers shift off-center under pressure | Seat a single smooth, pliable rubber washer flat inside each female coupling |
| Hanging a heavy splitter directly off a horizontal spigot | Hose weight pulls the coupling at an angle, unseating one side of the washer and straining the pipe | Add a 90-degree brass elbow or flexible hose protector upstream of the splitter |
If a quick-disconnect joint leaks rather than a threaded swivel collar, inspect the internal O-ring on the male plug for nicks or flattening and replace the O-ring before applying a light smear of food-grade silicone grease.
How Do You Disconnect and Store the Splitter?
Always relieve trapped water pressure before uncoupling quick-disconnects or unscrewing the splitter from the pedestal:
- Turn the campground spigot fully off.
- Open the utility hose nozzle or an RV faucet to bleed residual line pressure so hoses do not whip and quick-disconnect O-rings do not blow out of their grooves during release.
- Uncouple the hoses, unscrew the splitter assembly by hand, and shake out standing water.
When storing a brass splitter in freezing weather, turn each quarter-turn ball valve lever to a 45-degree half-open angle after draining. Leaving a ball valve fully open or fully closed can trap a pocket of water between the internal ball and the brass body cavity; the 45-degree position vents that cavity so residual moisture cannot freeze and split the housing.
What Is the Next Step at Your Campsite?
Complete the 10-minute dry-towel test across every joint and cycle both quarter-turn ball valves 90 degrees before leaving the utility pedestal unattended. Once every towel comes back dry and the closed utility port shows zero drip, open the drinking-water branch valve to supply your RV.
Frequently Asked Questions
What should I do if a hand-tightened splitter joint still weeps after the 10-minute towel test?
Shut off the spigot, relieve line pressure, and unscrew the damp collar to inspect the washer and male rim. A joint that still weeps after firm hand tightening usually has a nicked or hardened rubber washer, sand trapped on the sealing rim, or a rough casting burr on the campground spigot face. Swapping in a thicker, softer silicone or EPDM hose washer helps seal minor imperfections on worn campground spigots without resorting to pliers.
Can I leave both splitter valves closed while the campground spigot stays open?
Only if every upstream component, including the hose-bibb vacuum breaker, is rated for continuous static water pressure. Many standard atmospheric hose-bibb vacuum breakers (ASSE 1011 type) are not designed to stay under continuous dead-head pressure with downstream shutoff valves closed for more than 12 hours and may weep from their vent ports or stick. When shutting off all water for an extended period, close the campground spigot itself rather than relying solely on the splitter levers.
Why do my quick-disconnect collars become hard to pull back mid-season?
Mineral scale from hard campground water and dry rubber O-rings increase friction inside the sliding sleeve. Rinse grit out of the ball-detent ring with fresh water and apply a light coat of food-grade silicone plumber’s grease to the male O-ring so the collar slides smoothly.
Sources:
- Use of Lead Free Pipes, Fittings, Fixtures, Solder, and Flux for Drinking Water – U.S. Environmental Protection Agency, Safe Drinking Water Act Lead-Free Rule and 0.25% weighted average lead statutory requirement.
- How to Identify Lead Free Certified Drinking Water Products – U.S. Environmental Protection Agency Office of Ground Water and Drinking Water, PDF guidance on third-party certification marks, NSF/ANSI 372 testing, and plumbing product labeling.
- ASSE International Plumbing Product Standards – ASSE International, performance requirements and test methods for ASSE 1011 hose connection vacuum breakers and backflow protection.
- Home Water Systems: Backflow Prevention Devices – Colorado State University Extension, technical guidance on cross-connection control, hose-end vacuum breakers, and plumbing backflow protection.